• Steel Soldiers now has a few new forums, read more about it at: New Munitions Forums!

  • Microsoft MSN, Live, Hotmail, Outlook email users may not be receiving emails. We are working to resolve this issue. Please add support@steelsoldiers.com to your trusted contacts.


1984 m1009 CUCV rebuild

forest522

Member
308
4
18
Location
Bernalillo, New Mexico
Right at one year ago, I jumped in on a project vehicle and thought I'd share how things have been going.

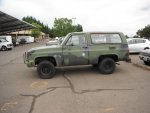
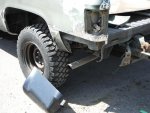
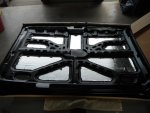
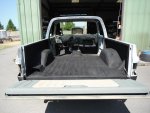
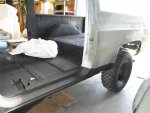
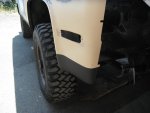
The '09, a CL find, was pretty rough and smoked most of the 300 miles from pickup to new home.

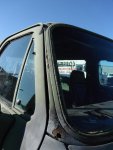
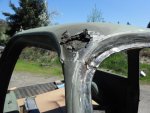
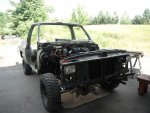
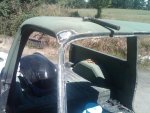
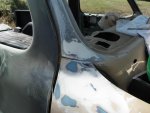
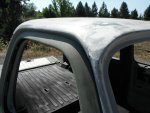
New batteries, new Injection Pump and some wiring work and it was driveable. The body was rough with hefty dents to right front fender, tailgate, bend brush guard, the hood was separated from the framework, the right front A pillar was rusted through in two spots and the removable top bolts into the cab were very rusted - a bad omen.

My computer is a bit old so bear with me while I upload picture a couple at a time.

The go chronologically...
 

Attachments

forest522

Member
308
4
18
Location
Bernalillo, New Mexico
more...

Roof repaired...new metal welded in

A great tip from this site, the roof repair sound deadening trick! Hood was lined, then the stock matting put in place (next set of pics)

The roof repair stuff was great! Lined each door, backside of interior door panels, entire fire wall and tailgate interior.
 

Attachments

forest522

Member
308
4
18
Location
Bernalillo, New Mexico
and more...

I sprayed the entire interior with Dupli Color's paintable undercoating/bedliner. Great stuff. Also used as a 6 to 8 inch rock chip layer along bottom edge of body all around. More pics on that later.

Wheels and other removable metal trim was powder coated Oil Rubbed Bronze. I was just going to do black but the shop offered up this option that matches one of the three colors in the desert camo pattern. So what the heck!...
 

Attachments

forest522

Member
308
4
18
Location
Bernalillo, New Mexico
It has been awhile since I started this thread. Lots has been added, just took me a long time to do it!
I'l try to stay in chronological order, but it's all starting to melt together...

Proof that everything works - family trip to retrieve a Christmas tree - Mission accomplished!
DSCN3969.jpg

Stage one of completed interior...
DSCF1985.jpg

Recently, I have been working on several small projects that I will organize and describe later. One in particular was the addition of a 12 volt accessory fuse panel in the interior. I used a plan from a FJ forum that a friend recommended. The plan allows for 2 40 amp circuit to be switched on by the ignition thus preventing battery drain. I know have 12 available fused power slots inside for whatever I want.

Under the seat...DSCF2326.jpg

Into the console, and then some switches I picked up from a site called Over the River and Through the Woods (OTRATTW), they carry a wide variety of 12 accessories and switches.

DSCF2327.jpgDSCF2328.jpg
 

forest522

Member
308
4
18
Location
Bernalillo, New Mexico
The wiring from inside the engine compartment. Everything is set up near the batteries for easy access to the positive buss bar and batteries. Again, this set up is from an FJ forum...

http://www.fjcruiserforums.com/foru...-switched-fuse-block-installation-w-pics.html

Great write up, with clear instructions.

So, I cut a piece of metal, made a panel on the inside right fender and set up relays and circuit breakers...the ignition "on" swithched wire comes from the CUCV fuse panel inside upper left, a single post.

DSCF2329.jpgDSCF2333.jpgDSCF2332.jpg

The last pic shows the HD wiring harness that keeps the new headlights going. They are nice too. The towels are the negative cables wrapped up. Keeps the sparking to a minimum while I'm messing around in there!
 

forest522

Member
308
4
18
Location
Bernalillo, New Mexico
The console is a Troy Products model, not sure which but I can find out from my receipts later. I scooped up out of the dumptster where i work. It had a rough life in several law enorcement or fire vehicles. I had it powdercoated and then i bought the faceplates, cupnolder and lockbox. A friend gave me the armrest.

These consoles are mounted to a long plate that bolts into the seat posts. Very solid. There were no seat post mounts made for this application so i found some old ones from a Ford Expedition and drilled new holes to make a pretty good fit.

http://www.troyproducts.com/main.htm
 

Crash_AF

Active member
1,530
7
38
Location
Colorado Springs, CO
Thanks for the info.

Can we get more pics? Pics of the mounts too? Looks like it fits REALLY well.
Oh, and measurements.

Thanks,
Joe
 
Last edited:

forest522

Member
308
4
18
Location
Bernalillo, New Mexico
Natemccabe - yes in the picture it does look as if it would be awkward. It really isn't though. From the drivers side, it is easy to get to and the knob on the top of the shifter is several inches from the console once in 4wheel drive.

This consoles rests on a heavy steel plate that is mounted to independant 'feet' that slide under each seat mount. No extra holes that way. The console can then be mounted in 1 to 2 inch increments forward or rearward, whatever your preference or based upon the overall length of the console. The company makes several lengths, widths and styles that mount to the steel floor plate.

Floorplate as it was being installed with seat mounts:
DSCF1792.jpg
Console mounted to floorplate, drivers seat not completely installed yet at that point
DSCF1795.jpg
 

forest522

Member
308
4
18
Location
Bernalillo, New Mexico
Crash - The console itself is 9 inches wide, about 28 inches in overall length, and just about a foot tall (at the very front). The floorplate sits about an two and a half inches above the transmission hump.
 

bikeman

Well-known member
Steel Soldiers Supporter
2,894
501
113
Location
Ft. Bragg, NC
how'd the matting work out with sound deadening? I'm thinking if I ever get my hands on one of these projects that I will have to do that.
 

forest522

Member
308
4
18
Location
Bernalillo, New Mexico
Thanks all!

Bikeman - the entire floor was sprayed with undercoating

IMG00222-20120705-1546.jpgDSCF1415.jpgDSCF1462.jpg

then the doors, tailgate and firewall lined with peel and stick roof repair stuff from Home Depot. LMC underlayment and polyvinyl floor was next. Took a lot of the road noise out, tires are still loud but you can have a reasonable conversation inside now!

Thundercracker - those are the original seats. I had them recovered by a local guy who did a great job. He had materials on hand, from a previous job and the tan center was also something he had on hand. Originally it was going to be all the nut brown sort of color, but we thought the tan would be cool and he didn't charge extra for it. Soo....they are much better than before, but the frames are still a little wobbly or loose. Need to figure out how to tighten the rest of the seat up a bit.

James Kelly - the console was a worn our unit and discarded from years of wear in either an LE or Fire rig. I had it powder coated the same as the bumper and grill guard - "oil rubbed bronze." Again, another good local deal, had several parts to powder coat and the local shop was reasonable. It is a Troy Products "modcon" console, with mis-matched floor mounts and plate. Did some extra cutting and drilling to get it to fit.

Again, Thanks all!
 
Top
AdBlock Detected

We get it, advertisements are annoying!

Sure, ad-blocking software does a great job at blocking ads, but it also blocks useful features of our website like our supporting vendors. Their ads help keep Steel Soldiers going. Please consider disabling your ad blockers for the site. Thanks!

I've Disabled AdBlock
No Thanks