• Steel Soldiers now has a few new forums, read more about it at: New Munitions Forums!

  • Microsoft MSN, Live, Hotmail, Outlook email users may not be receiving emails. We are working to resolve this issue. Please add support@steelsoldiers.com to your trusted contacts.


BELT TENSION GAUGE NO. 371

Inspector 1

Active member
105
72
28
Location
Spring Texas
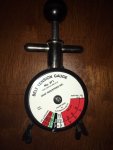
Can anyone give me advice on the use of this gauge? I have 3 belts coming off of my generator and 1 on the power steering pump. I can get the gauge on one generator belt towards the block of the motor. I cannot get gauge on center belt or belt towards the fan. I will try to install gauge from underneath motor for power steering belt. Any suggestions would be greatly appreciated.
 

Attachments

Milcommoguy

Well-known member
Supporting Vendor
1,652
2,095
113
Location
Rosamond, CA
IMO,

Might be more trouble that is is worth. When I see the gauges from the HumV tool kits they all look new ?? Huh

Three belts are going to be stinker to dial in if not a matched set. Go with tight and no slipping, slapping and squeaking but not so tight to overload the spinning parts / bearings / bushings, belts etc.

I know what it's for and the science behind it, just never bothered / lazy to mess with it , cuz just as you get it set, you're back at it a month later.

Set and forget the arm strong method, CAMO

Did someone say serpentine belt?
 

TOBASH

Father, Surgeon, Cantankerous Grouch
Steel Soldiers Supporter
3,251
2,981
113
Location
Brooklyn, NY
Warm the engine, stop engine and remove key, loosen pulley bolts, use a Big F'n Lever, and pull hard while an assistant tightens.

If your rig squeals after that, your belts are mismatched.

In the word's of High Sierra..."Gauges, we don't need no stinkin' gauges".
 

Inspector 1

Active member
105
72
28
Location
Spring Texas
Warm the engine, stop engine and remove key, loosen pulley bolts, use a Big F'n Lever, and pull hard while an assistant tightens.

If your rig squeals after that, your belts are mismatched.

In the word's of High Sierra..."Gauges, we don't need no stinkin' gauges".
I could not agree more. The belts are actually fine. I've never used a gauge to adjust belts in the past. I'm not sure why I felt the need to adjust belts with a gauge now. Oh well. I will chalk it up to wasting $50 on live and learn. Thanks for the input. Be safe and be Blessed.
 

Inspector 1

Active member
105
72
28
Location
Spring Texas
IMO,

Might be more trouble that is is worth. When I see the gauges from the HumV tool kits they all look new ?? Huh

Three belts are going to be stinker to dial in if not a matched set. Go with tight and no slipping, slapping and squeaking but not so tight to overload the spinning parts / bearings / bushings, belts etc.

I know what it's for and the science behind it, just never bothered / lazy to mess with it , cuz just as you get it set, you're back at it a month later.

Set and forget the arm strong method, CAMO

Did someone say serpentine belt?
I'll second that!! Thanks for the input.
 

DREDnot

Well-known member
717
430
63
Location
Phoenix, AZ
I got that same gauge in a set of HMMWV tools.

I've used them in the past to good effect, but its nearly impossible to get a good reading on the HMMWV as close as the belts are to each other and other clearance related issues.

I had a bad belt flopping problem that didn't go away with a new set of genuine GI matched belts. The only way to fix it was to tighten them way beyond what you think would be too tight. You almost cant do it alone as it takes two hands on the prybar to get enough tension. And, even atomic tight, there is still some belt flop but its not enough to concern me so far.
 

pig9r

New member
28
9
3
Location
KCMO
I got that same gauge in a set of HMMWV tools.

I've used them in the past to good effect, but its nearly impossible to get a good reading on the HMMWV as close as the belts are to each other and other clearance related issues.

I had a bad belt flopping problem that didn't go away with a new set of genuine GI matched belts. The only way to fix it was to tighten them way beyond what you think would be too tight. You almost cant do it alone as it takes two hands on the prybar to get enough tension. And, even atomic tight, there is still some belt flop but its not enough to concern me so far.
I believe I read in one of the TMs that belt flop is normal at idle.
 

Milcommoguy

Well-known member
Supporting Vendor
1,652
2,095
113
Location
Rosamond, CA
Pretty much normal.

It is normal to see the belts driving the alternator (top side) to be flopping / whipping what looks to be slack. No worries. At idle diesel engine banging away is not a smooth continuous power and belts start a harmarmic dance between engine firing and the three phase pulsing of the alternator fields during charging. Run RPM's up to 1200 RPM's and all will smooth out.

I know this sound like a bunch of "Whooie" but I left out the plasma field interrupter part to keep it simple, CAMO
 

DREDnot

Well-known member
717
430
63
Location
Phoenix, AZ
Yeah, They smoothed out with a few rpms but they were whipping and snapping into each other at idle which wasn't very confidence inspiring in the middle of nowhere where my property is. I wish I had the serpentine system for sure.

DSCN9545.JPG
 

Milcommoguy

Well-known member
Supporting Vendor
1,652
2,095
113
Location
Rosamond, CA
On this same note of belts and alternator... Something to check on any 60 AMP rig. Make sure that the front and rear mounting ears (lower ones that it hinges on) have the thick spacer (item #21) and that bracing straps are in the right places.

When tightening the long thru bolt. If you detect pulling up any gap as in the two ears coming together (preloading), there's a good chance of the missing spacer at the rear ear. Real good chance of a breaking an ear. Maybe not now, but soon with the wacky - snappy belts working at it,

They fall out, hit the ground, never to be found or seen when removing (wrestling) with the alternator.

Five cent part holding the five hundred dollar alternator, CAMO


There's a couple of different versions for mounting. Pay attention to item 21 and its location between ear and saddle mount #18.


IMG_8311.jpg
 
Top
AdBlock Detected

We get it, advertisements are annoying!

Sure, ad-blocking software does a great job at blocking ads, but it also blocks useful features of our website like our supporting vendors. Their ads help keep Steel Soldiers going. Please consider disabling your ad blockers for the site. Thanks!

I've Disabled AdBlock
No Thanks