• Steel Soldiers now has a few new forums, read more about it at: New Munitions Forums!

  • Microsoft MSN, Live, Hotmail, Outlook email users may not be receiving emails. We are working to resolve this issue. Please add support@steelsoldiers.com to your trusted contacts.


Bought an MEP-805B, started messing with it

MrShawn305

Active member
168
97
28
Location
El Paso, TX
So I bought an MEP-805B on a M200A1 trailer from another member on here and got to messing with it. The seller went through the known issues with me so I had a little bit of an idea of what I was getting myself into. I did notice that there weren't many threads on here about the 805B so I thought I would document my work in case it helps someone in the future. I haven't read a whole lot into the TM, I have to put hands on the machine to learn it and refer to the TM's as I go. So here's what I got so far:

Unit hard to start, has to be manually primed before starting and then the unit will hunt for a while before smoothing out.

Checked cooling system, coolant low not visible in fill neck, petcock inoperable

What I found:

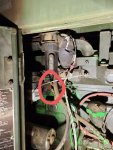
Unit was acting like it had air in the system as it was hard to start and would hunt after starting, eventually smoothing out at idle. Not sure how it acts under a full load, I am still in the process of procuring a load bank. When the seller was showing me to prime the system, I noticed the fuel fitting on the fuel pump was moving as he pumped it. Photo included, with the fitting circled in red. I took that apart and got everything cleaned up with brake cleaner and tightened it all up. Primed it as best I could and fire it up. Unit ran rough as it worked the air through the system. I cracked the injector lines while it was running to help purge the air and that seemed to help. A minute or two later and the unit smoothed out and has now been easy to start and runs beautifully. I will attach a link to a video of the unit running below.

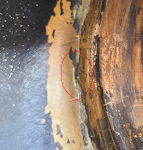
As for the cooling system, I started looking closer into it and found a couple of things. The petcock opens but does not drain at all. The radiator cap looks like it's about time to replace it. So I searched quite a bit and found a post on here where someone had matched up the cap to a Stant 10293. My first call rep was not able to get me the stant, but was able to get the Motorad HD cross. I pulled the upper and lower radiator hoses and a ton of filthy coolant ran out. I pulled the petcock and found why it didn't flow. It was full of grit and sediment. I cleaned it up and have been working to flush the cooling system for the past few days off and on. I'm still getting some grit out but for the most part it's now clean. But I did notice that the upper radiator inlet is deformed and a little bent. As a result, I can't get the hose to seal on it and it leaks. I am going to try a new hose but I don't think that will solve the issue 100%. Does anyone know how to straighten out a brass radiator inlet without pulling the rad?

Here is the video of how the unit ran, in case it helps someone. Note: It's dark, but was not late at night. And it was a Friday anyway.


Attachments

MrShawn305

Active member
168
97
28
Location
El Paso, TX
My first call guy matched up the hoses for me as well. Looks like the upper is a 21216 and then you cut the excess off one end. The lower was "matched" up but is too big I.D. so I will have to sent it back.
 

Guyfang

Moderator
Staff member
Moderator
15,855
22,039
113
Location
Burgkunstadt, Germany
I think the expanding tool should work. Just be easy with it. I have had to do this with several different gen sets over the years, and never split an inlet. Loosened one, yeah. And indeed, we just soldered it back up. The hand pump "problem" is a very frequent thing. When ever this puppy runs rough, and is hard to start, its time to look at the fuel fittings. Also, the hand pump itself is a known problem area. I heard back in 2010 that the Army was going to start using a different hand pump. But doubt that happened.
 

MrShawn305

Active member
168
97
28
Location
El Paso, TX
I think the expanding tool should work. Just be easy with it. I have had to do this with several different gen sets over the years, and never split an inlet. Loosened one, yeah. And indeed, we just soldered it back up. The hand pump "problem" is a very frequent thing. When ever this puppy runs rough, and is hard to start, its time to look at the fuel fittings. Also, the hand pump itself is a known problem area. I heard back in 2010 that the Army was going to start using a different hand pump. But doubt that happened.
Good to know. I'll see about getting an expander and see if I can make it happen that way. I've been messing with it all day and can't get it to seal up to save my life. If that doesn't work, I might just have someone pull the radiator and I'll take it to a shop so they can go through it anyway. Wouldn't be a bad idea
 

MrShawn305

Active member
168
97
28
Location
El Paso, TX
So I got a tailpipe expander and it seemed to do the job really well for the most part. It didn't get it perfect as far as the dents out of it and all that, but it got it back to round. No dice though, still leaks. I took the top off today in preparation to pull the radiator (really thinking about paying someone to do it) and thought "I'm going to eliminate that TEE and everything else and just run a spare hose to it and fill it with water. So I did that and of course, it still leaked. (I was hoping it would be the vertical hose that goes to the cap.) So while I was taking the hose off, in the daylight now, I noticed a tiny gap. And it's exactly where I've been seeing the water flow from! So I'm not 100% sure that this was my problem all along, or if I created this crack messing with it so much.
 

Attachments

MrShawn305

Active member
168
97
28
Location
El Paso, TX
UPDATE: I went back to my photos from the other day and blew them up on the PC (gotta love high def photos and screens), and it looks like there WAS a very small crack all along. Attached is the photo with what I suspect is the crack circled. It looks like a very small gap with green oxidation in it.
 

Attachments

Ray70

Well-known member
2,366
5,053
113
Location
West greenwich/RI
You should be able to easily solder up that crack without removing the radiator, but if you prefer to send it out, any radiator shop will solder and pressure test it pretty cheap.
 

MrShawn305

Active member
168
97
28
Location
El Paso, TX
You should be able to easily solder up that crack without removing the radiator, but if you prefer to send it out, any radiator shop will solder and pressure test it pretty cheap.
I've soldered them before and have a bunch of silvaloy on hand. So I'll do that tonight and see how it goes.
 

MrShawn305

Active member
168
97
28
Location
El Paso, TX
Well, brazing didn't work. It's been so long since I've done it, it just didn't come out good looking. It's still leaking and I'm not sure it it's my crappy brazing job or the neck. I think it's time to quit messing with it and pull that rad. I'm going to see about getting someone to do it as that's not a can of worms I want to open. I got quoted 100-120 to completely go through the rad and refurbish then pressure test it.
 

MrShawn305

Active member
168
97
28
Location
El Paso, TX
So, I just got the radiator back from the shop this afternoon. I got it installed and just buttoned it up. I'm going to wait until the morning to fill it and pressure test for leaks. My buddy pointed out that the radiator can be removed from the "driver" side of the trailer/unit. After that, any radiator shop worth their salt can go through and repair/refurbish the radiator. These are quality brass radiators. I would not replace it with a new plastic/Al unit unless I absolutely had to. The radiator shop charged me $200 to go through it, rod it out, clean and test it as well as replace the dented up inlet. Looks good as new now. How I did it:

Drain coolant and remove radiator hoses

Remove Bottom side panel (the long skinny one under the doors on the "driver side")

Remove the 4 bolts that secure the fan shroud to the radiator (NOT all of the little screws and nuts going around it)

Move the shroud up against the engine as best you can

Pull the bottom two nuts off the radiator from the battery compartment (open the door, you'll see them)

Remove the bracket from the cylinder head of the engine that supports the two upper radiator supports. There are two 18mm bolts securing this to the head, one on each side. This will give you easier access to the fasteners on top of it

Remove two of the three nuts and bolts securing the lower radiator bracket. Leave one in as a pivot point so the assembly can be dropped down a bit

Drop the radiator down carefully, supporting with blocks as needed, and remove the two bolts and spacers on top of the radiator for the upper supports.
*NOTE* My upper radiator had a bunch of washers instead of a spacer. I did not have the time to measure and source a spacer, but from looking at it, I'm guessing anywhere from a 3/4" to 1" long spacer would be about right. Perhaps someone that has the correct spacers could chime in.

With the radiator supported on both sides with blocks, you can remove the pivot bolts and remove the lower rad support through the battery compartment to give yourself more clearance to pull the radiator.

With a helper, carefully remove the radiator out the "driver side" doorway. One person on each side of the machine to guide it.

*NOTE* When reinstalling the radiator, make sure you get the upper rad supports bolted to the radiator before you install the lower. Otherwise you will have minimal clearance on top between the radiator and the plenum. I made this mistake and it cost me a bunch of extra work and time.

I believe this is everything, but if I think of anything else I'll edit the post to add the details.
 

MrShawn305

Active member
168
97
28
Location
El Paso, TX
Ok, so I still had a little bit of "rattling" from the engine every once in a while. The same as in the video in the first post. After I replaced the fuel fittings on the lift pump, it seemed to have helped alot. I replaced the fuel filter just because it was the next thing in line in my head and easier/cheaper than anything else to try. I did find the gasket on the filter had two points where it appeared "pinched". I also found that on top of the filter housing there is another screw top with an O ring. I took that apart as well and cleaned the whole assembly with brake cleaner. I cleaned the O ring in a rag and lubed it. I installed the filter with the gasket lubed and all that jazz. Fired it up and after a minute or so she ran smooth. I ran it for about 20 minutes or so and it seems to run smooth as a baby's bottom.

HOWEVER: Now that I fixed all of that, something new happened.......somewhere along the line it developed this strange noise that (from what I can tell) sounds like it's coming from the generator head end of the unit. It's kind of like a cross between a knocking and a rattling. It only does it on startup and shutdown it seems. It's loud enough that it has me concerned. I do feel like it also developed a vibration when running as well. I swear, it's like this thing just doesn't want to be put to work! Below is the video of the unit running good and also the noise it makes. You can hear it when I shut it down, as well as when I do a short dead crank on it right about 1:10. Anyone have a clue what that noise could be?


Guyfang

Moderator
Staff member
Moderator
15,855
22,039
113
Location
Burgkunstadt, Germany
Start up and shutdown sounded good to me. Take off the rear panel and look inside. Maybe something is loose. But it sounded alright to me. I do wear two hearing aids. But it sounded like about a billion other gen sets I have started and stopped. Startup and shutdown are the times where the whole thing shakes and vibrates the most.

How about pictures/film in the light? Then we can see if it shakes more then normal. Having watched/listened about 25 time, I think you do not have a problem.
 

MrShawn305

Active member
168
97
28
Location
El Paso, TX
Start up and shutdown sounded good to me. Take off the rear panel and look inside. Maybe something is loose. But it sounded alright to me. I do wear two hearing aids. But it sounded like about a billion other gen sets I have started and stopped. Startup and shutdown are the times where the whole thing shakes and vibrates the most.

How about pictures/film in the light? Then we can see if it shakes more then normal. Having watched/listened about 25 time, I think you do not have a problem.
I apologize for all of my videos being in the dark, I've been so busy lately I don't even get home before dark. But today I will have time to get some startup and shutdown videos. I could be overthinking the vibration thing, but the noise definitely wasn't there before and it has me concerned. I will see if I can get that panel off today and see if something is rattling around in there. I'm hoping that's all it is
 
Last edited:

MrShawn305

Active member
168
97
28
Location
El Paso, TX
Start up and shutdown sounded good to me. Take off the rear panel and look inside. Maybe something is loose. But it sounded alright to me. I do wear two hearing aids. But it sounded like about a billion other gen sets I have started and stopped. Startup and shutdown are the times where the whole thing shakes and vibrates the most.

How about pictures/film in the light? Then we can see if it shakes more then normal. Having watched/listened about 25 time, I think you do not have a problem.
Here is a video I took in the daylight. I definitely hope it is in fact normal. If people more experienced than me tell me it's fine, I'll run with it. By the way, the fuel filter was changed last night. I didn't run it much as it was late. So it likely still has some air in it.


Guyfang

Moderator
Staff member
Moderator
15,855
22,039
113
Location
Burgkunstadt, Germany
I still don't find it bad. But take the "belt" off the gen set. The belt is the metal band that keeps fingers, toys, tools and tree rats out of the main gen/engine bell housing. Its only 2 bolts/nuts. Pull it out of the way, and start looking with your GOOD flashlight, into the area, for loose crap or maybe a million miles of wire from a MPU that got ground down. Then, and this is to make you feel better about it, take the main NEG battery terminal off. Get an offset wrench, I think its 3/4?, (been about 15-16 years since I did this, and am too lazy to look it up, its 23:56) and loosen up the coupler bolts and re-tighten them. There is a torque value in the TM, but I just made them TIGHT!! as hel* and felt good about it. Turn the engine over with a bar and get them all. Mark them with a whit paint pen, so you can see them That way you KNOW they are tight.

Where you live in El Paso? I spent a year there in 85-86, over on the east side.
 
Top
AdBlock Detected

We get it, advertisements are annoying!

Sure, ad-blocking software does a great job at blocking ads, but it also blocks useful features of our website like our supporting vendors. Their ads help keep Steel Soldiers going. Please consider disabling your ad blockers for the site. Thanks!

I've Disabled AdBlock
No Thanks