• Steel Soldiers now has a few new forums, read more about it at: New Munitions Forums!

  • Microsoft MSN, Live, Hotmail, Outlook email users may not be receiving emails. We are working to resolve this issue. Please add support@steelsoldiers.com to your trusted contacts.


M35 Cargo bed cover mods

DutchmanZ

Active member
Steel Soldiers Supporter
91
218
33
Location
Pantego, NC
First off, I took the below pic off google images (I don't know whose truck it is nor do I have affiliation with them). Look at the hook tabs near the top of the cover (in this pic they look like gray-ish circles). See how they line up with the uprights for the bows-- now look on the 5 ton how the forward two bows have a closer spacing to one another compared to the spacing for the rest of the bows. When you compare the below image to your cover, it looks like the spacing on the tabs is the same with the front two being closer together. That is what I immediately thought of when I saw the pic of your cover.

Z
Thank you sir, You nailed that one! I even tried flipping the cover front to back and of course the bows still didn’t line up with the tabs. I searched for sizing info but didn’t find anything useful. At least now we know what it will fit. Guess I’ll head back to white owl with it.
 

Mullaney

Well-known member
Steel Soldiers Supporter
Supporting Vendor
7,347
19,034
113
Location
Charlotte NC
White Owl went through all the covers they had and did not have a 12 foot one. He did say it was no problem taking it back so if anybody needs a 3 color camo 5 ton cover they definitely have one.
.
Those folks at White Owl really are first class!

I really don't know when they started that business, but they were easy to work with and prices were reasonable too all the way back in 1983 when I have my first experience with them - wrenching on trucks for RH Bouligny.
 

DutchmanZ

Active member
Steel Soldiers Supporter
91
218
33
Location
Pantego, NC
.
Those folks at White Owl really are first class!

I really don't know when they started that business, but they were easy to work with and prices were reasonable too all the way back in 1983 when I have my first experience with them - wrenching on trucks for RH Bouligny.
George said one of the many times I have been over there they have been in the same location since 1947. They don’t sell complete vehicles like they used to but he does have a running 5 ton wrecker he wants to sell. Maybe one day if I’m lucky!
 

FloridaAKM

Well-known member
2,699
392
83
Location
Gainesville, Florida
Years ago, I needed a tan cover for my first Deuce & the only one I could find was a part of a GL lot of 4 new in crate, complete unissued in Oklahoma. I won the lot & then got skewered with the truck freight shipping charges to Florida.

The first cover went on the Deuce & was perfect for all expected needs. The second crate was swapped with a vendor for a camo cover which turned out to be for a 5 ton which was 14' instead of 12' with mismatched bows & staves & I learned not to trust some vendors. The 5 ton cover is still on the second Deuce I got from GP, but it is not correct & sags between the bows & staves with the reinforcement all in the wrong places. The contents of this truck keep the cover from filling with water & tearing down the cover.

I am glad that While Owl worked with you to straighten out your issue with the wrong cover for your truck. The vendor that I traded the covers with bragged about how much money he made on the virgin tan cover vs the one he traded to me with all the wrong parts as he didn't remember me.
 

DutchmanZ

Active member
Steel Soldiers Supporter
91
218
33
Location
Pantego, NC
.
Those folks at White Owl really are first class!

I really don't know when they started that business, but they were easy to work with and prices were reasonable too all the way back in 1983 when I have my first experience with them - wrenching on trucks for RH Bouligny.
George said one of the many times I have been over there they have been in the same location since 1947. They don’t sell complete vehicles like they used to but he does have a running 5 ton wrecker he wants to sell.
Years ago, I needed a tan cover for my first Deuce & the only one I could find was a part of a GL lot of 4 new in crate, complete unissued in Oklahoma. I won the lot & then got skewered with the truck freight shipping charges to Florida.

The first cover went on the Deuce & was perfect for all expected needs. The second crate was swapped with a vendor for a camo cover which turned out to be for a 5 ton which was 14' instead of 12' with mismatched bows & staves & I learned not to trust some vendors. The 5 ton cover is still on the second Deuce I got from GP, but it is not correct & sags between the bows & staves with the reinforcement all in the wrong places. The contents of this truck keep the cover from filling with water & tearing down the cover.

I am glad that While Owl worked with you to straighten out your issue with the wrong cover for your truck. The vendor that I traded the covers with bragged about how much money he made on the virgin tan cover vs the one he traded to me with all the wrong parts as he didn't remember me.
I’ve dealt with many suppliers in the automotive field and it’s hard to top a place like White Owl. There just aren’t many left. They have all been taken over by the corporate chains. I wish I could have seen the place back in it’s prime with a yard full of surplus. I could still walk the yard for hours now. I’d love to crawl through the boxes and bins of stuff just to see the history. Maybe one day I can take my deuce on a good road trip over there and get some cool pics of it out back.
 

ToddJK

Well-known member
1,312
4,464
113
Location
Sparta, MI
Usually those places that are family owned and ran, are few and far between. There was a place in NE, guys name that I know of was Seven. He had a bunch of parted out trucks and his prices were hard to beat. I don't even know if he's even still out there anymore, it's been a long time.
 

Nitrodiver

Member
91
97
18
Location
Baytown, Texas
I don’t want to highjack the OP thread here. But since my bed cover design was mentioned here I’ll post it here on how I made it, design and testing.

The Design:
I wanted a shade cover that was durable yet light weight and easily stored on the truck. Something that could de used as a bed cover or a side type awning (think RV retractable side type awning but without the hard tube and permanent mounting). So that meant it was going to have to be a tarp like device. Foldable, compact, look fairly stock (to the untrained eye) be OD or black, be more durable than your average poly tarp and not break the bank. Also had to be full length of the bed 12’ and be 8’ wide, with tool less installation and be done by one person. If you think about ball those parameters that’s a pretty tall order.

For a material I came up with reinforced vinyl, that checks those boxes. Problem was to buy it was going to cost several hundred dollars and I couldn’t find the right OD color. Anything green was really green and would look aftermarket on the truck. So color was a big problem. I really dint want black as we all know how hot that is. It would also have to be custom made adding more $ to the several hundred dollars to the equation.

For years I have been using old billboard vinyl signs as equipment tarps. They will last ten times longer than the blue Poly tarps. They are usually like 14’ X 40’ ish. When you can find them, and they are well under $100. I had a couple on hand that were in really good shape, not weathered or full of pin holes. So I set out to choose one and cut it up for my project. Pro tip: if you stretch out a tarp that size on your lawn. Don’t walk away and leave it until it cools off this afternoon. The heat under the tarp will kill your grass in short order.

The Cover:
With a 14’ x 40’ rectangle of dead grass in the yard. On the 14’ side I measured 8’ wide and cut it with a straight edge. Making a 8 x 14 tarp basically. Pro tip: use a 2x4 to back your cuts. I used a utility knife and a piece of 1x1x 20’ square tubing as a straight edge.

Laying it out on concrete or any hard flat surface Is much better for accurately measuring. Also use some kind of weights to keep it taught for measuring. I know you thinking the bed is only 12’ why cut it 14’. Wait for it…..

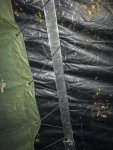
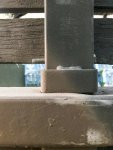
The good thing about these billboard signs is there is usually an ultrasonic welded channel all the way around the outside of the sign. Reinforcement for mounting the sign to the billboard. That channel is just right to use as an outer sleeve for the first bow (closest to the cab) to go inside of.

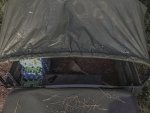
So the front is secured from the factory, so to speak. There should be a channel on both ends front and back. Your going to need a grommet kit. There’s different sizes in brass, stainless steel ect. Dealers choice on that. You can put the grommets in before or after you put it on the truck. Again dealers choice. The grommets go on the rear, tailgate end. If it’s not reinforced (double layered)fold it over itself before putting in the grommets. If the rear is double layered it would hurt to fold that over (4 layers) before putting in the grommets. This what is going to hold it on the truck and make it a cover. Not a bed flag flopping in the breeze.

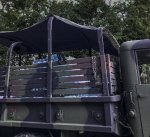
Center the cover on the front (#1) bow. Stretch it out to cover all the bows to the back of the bed. What’s left hanging over the last bow (#5) fold it under the cover. Using something like paracord. Lace the cover to the next closest bow (#4) using your newly installed grommets. And presto you have a shade cover for your bed.

Now, before say well that sounds easy and you set about getting the required materials. Understand, this is a static or VERY low speed cover. I have destroyed 5 of these covers trying to find a speed threshold that won’t destroy it. Or what it would take to secure the cover to be able to survive highway speeds. That takes a lot more work and expense that I haven’t perfected yet! As easy as it is to put up I don’t know that i will. One way to secure the cover for the highway is to roll it up. Cut a piece of 1/2” PCV 8’ long and roll up the cover on the PVC (rear to front) secure the cover and the PVC to the #1 bow with bungee cords. The PVC is flexible enough to bend to conform to the front bow. You can go down the road that way.

The PVC gives the rolling/ unrolling of the cover some structure to make it a one man job. Without that structure rolling the cover just becomes wadding it up really. Once your ready to put the cover on. Unroll it flip the end over the #5 bow and lace it up. Walla your done. Pro tip: put some screws in the PVC on each end to match your grommet spacing. Hook the screws in the grommets when you roll up the cover. It’s Much easier that way.


Colorizing your new cover:
I choose to put the black side down and the signage up on mine. So that meant I had to make all the signage go away so it looked somewhat stock. After much research and trial and error. I settled on just painting the vinyl. Easy touch up not much hassle to paint it. The best and more importantly east expensive solution I could find.

I washed and cleaned the vinyl first. Let it dry in the sun, but not on the grass ha I’m no idiot (rhetorical). The sun will dry it and also heat the vinyl to some degree. I don’t know if the heat helps the paint stick or not. It seemed a good idea in my head. And all I had to do was keep someone for steeling my lawn chair and have another frosty beverage. I used Behr premium OD in a HVLP gun to paint the top of the cover. It’s what I had on hand. I painted it in the sun and by the time I got to the bottom the top was dry to the touch. I gave it enough coats to cover the lettering (white letters on a dark blue background). Let it dry all day in the sun. Surprisingly it’s actually pretty durable. Its been on and off 5-6 times now and still in pretty good shape. Your mileage may vary.


Raising the bows to walk under:
On the troop seats, the steel uprights/pockets where the bows go. There is a steel reinforcement strap and hinge for the seat portion to hinge down near the top on the bed. I drilled 1/4” holes through the steel rectangular tubing for 1/4x20 bolts. This is what the bow legs sit on. I used a mag-drill. I used bolts because they were cheaper than lynchpin’s. Pro tip: without nuts on the bolts they will walk out of the holes, so use your nuts gentleman! If you run a 1/4 x 20 tap part way thru a Ny-Loc nut it will give just enough resistance to hold the nut and bolt together but still be a tool less install. You will have to do this by feel.

I am 6’1” and there is enough room for me to stand comfortably in the bed. I have found if I leave the #1 bow at the normal height not only does it give me easier access to bungee the rolled up cover but when the cover is on I think it looks better as well. I have gone down the road at highway speeds with just the bows (no cover) in the raised position and not had any issues of loosing any part of the bows. However, I do have the bow uprights and corner pieces bolted together. The top pieces are not bolted to the corner pieces.

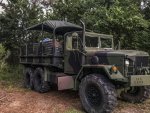
This gives you the basic theory behind my design and a few things I learned along the way. This is how I went about making the final product. Which is what you see in the pic posted previously. I have enough money in R&D with this design to buy 2 new cargo cover and a ton of hours in research. But in the end Im pretty happy with the overall end result and a lot of Deuce owners seem to really like it.


If you change something I’d be curious what and why.

I’ll have to set it up but Pics to follow.


So there you have it gents…
 

Mullaney

Well-known member
Steel Soldiers Supporter
Supporting Vendor
7,347
19,034
113
Location
Charlotte NC
I didn’t really think it was a big deal at all. I had a problem and I solved it. But lots of people have asked me about it or wanted me to make them one. It’s finding time to type it all up is the biggest problem for me.

Just make sure I get the royalties rofl
.
I definitely like the idea!! I saw it in the parade or sitting by the motel (maybe). I started ogling it when @kendelrio posted his parade pictures. Best part was the idea of attaching it to the front Bow and using a piece of PVC pipe to roll it up when you are finished.

Heck of a Plan!!
Thanks for sharing @Nitrodiver !

Pictures sure would be neat to allow us to lay eyes on the details.
 

DutchmanZ

Active member
Steel Soldiers Supporter
91
218
33
Location
Pantego, NC
So there you have it gents…
That's brilliant! Feel free to hijack, especially with pertinent info. I raised my bows 14" by simply cutting some 1x4s and dropping them into the pocket. The bows didnt seem to want to come out while driving but i also have bungee straps attached to the bed side and bow. I'll likely bolt them in place but I was looking for something temporary just to see if it worked. Now were all waiting for the pics...
 

Nitrodiver

Member
91
97
18
Location
Baytown, Texas
It was dark when I got home. Sorry for the crappy phone pics. If these suck too bad I can take some good ones this weekend.
I hate to even post these pics. But I am a man of my word. So here they are.
 

Attachments

bprzyw

Well-known member
173
414
63
Location
Moscow,Pa USA
Beautiful truck! What are the covers above the headlights? Love the “Front Towards Enemy”!!!
I’ve heard those billboard tarps are very heavy duty and last a very long time.
 
Top
AdBlock Detected

We get it, advertisements are annoying!

Sure, ad-blocking software does a great job at blocking ads, but it also blocks useful features of our website like our supporting vendors. Their ads help keep Steel Soldiers going. Please consider disabling your ad blockers for the site. Thanks!

I've Disabled AdBlock
No Thanks