• Steel Soldiers now has a few new forums, read more about it at: New Munitions Forums!

  • Microsoft MSN, Live, Hotmail, Outlook email users may not be receiving emails. We are working to resolve this issue. Please add support@steelsoldiers.com to your trusted contacts.


Mule rebuild

maccus

Super Moderator
Super Moderator
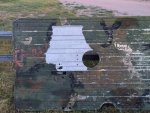
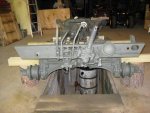
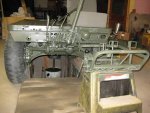
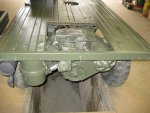
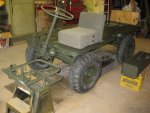
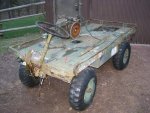
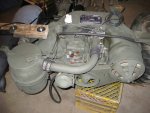
I picked up a 1968 Bayfield M274A5 with a parts engine included on the 1st of May. Did not want any more projects but the price was right so I am in the middle of another project. It is in pretty good shape as far as old mules go. Took deck off to make for easy access. Missing some expensive parts but the project is coming along. Engine did not run but after a new Carb/fuel pump and most important correct timing it runs like rabbit. Next was the overhaul of the brake system as it was frozen solid. Then on to the tranny which was also frozen solid. Then added a temporary wooden deck to do a driving check to check for leaks and correct operation. Added electric start. Found some leaks which are now repaired.

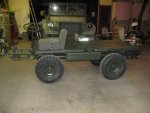
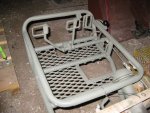
Bought a used basket and added all the items that go into it. All needed parts I am getting from John Emery. Very good guy to deal with. The last mule I did I got all my parts from Bill Watson and he was another very good person. At this time I still need a rear cage, engine deck cover, new rails, passenger foot basket, and 106 deck hole cover, And Seats... 2 each as this unit will be a two seater the same as the last one I restored. Wish I would have kept some of the parts of the 6 mules I sold to a guy in ND a few years ago.

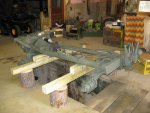
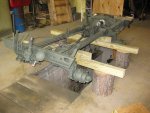
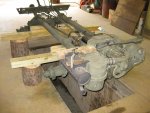
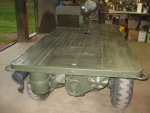
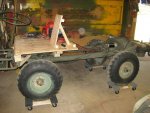
hndrsonj picked up the deck today and the 4 wheels/rims and is taking them to Cheyenne for blasting. By next weekend I should have the frame etc. cleaned/stripped/ painted and will go to Cheyenne and pick up the deck and wheels. Paint them and start installing deck/frame etc. This will be a motor pool resto.

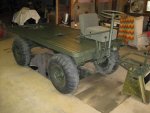
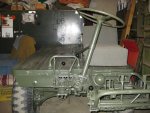
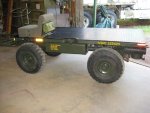
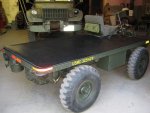
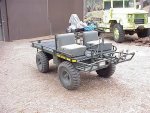
The two seater I did a few years ago is pictured and this one will look just like it when I am done with this project. I hope...

Here are some pics of the progress.
 

Attachments

Last edited:
74
1
8
Location
So.Calif
Great photos, thanks for posting them. I am currently in Tonopah Nevada right now and having bounced over several miles of off road trails yesterday in my mule, I can only imagine what that would have felt like with your temporary wooden seat..... It would be brutal.

looks like you are making good progress and your mule should be running in no time. Good luck.
 

maccus

Super Moderator
Super Moderator
Jim got a start on the blasting of the deck and rims. But got rained out. Looks like it will do the job of cleaning up the old deck. You can see that at sometime the support rod mount for the steering column got ripped out and someone moved the mount over one rib. There will be a small plate made to cover the existing holes and the mount will get mounted in its original spot. Thanks Jim.
 

Attachments

Last edited:

maccus

Super Moderator
Super Moderator
Have the chassis all cleaned up and sort of primed. I use the rust-oleum 279175 deep forest green rattle can as a sort of half-fast primer. Easy to use and just a light coat lets me know what the final Marine semi gloss will look like. It has worked for me on most all of my resto's. Just have to remove the muffler/air cleaner etc. and do a little masking and can paint the chassis when I get the deck and wheels this weekend from hndrsonj. By the way on areas that have seals etc. I take the time to strip all the old paint/junk off as I have had bad luck with blasting areas with seals/bearings etc.. And I hate to have to replace good seals/bearings cause I injected sand/media etc into them.

Only bad thing with stripping is when I did the 51 REO M34 I found 7 different color/coats of paint..........took forever to strip the cab. Seems the wild fire folks changed color at a whim rate.
 

Attachments

zout

Well-known member
7,744
154
63
Location
Columbus Georgia
WOW MACCUS - way to go brother. Looking outstanding as we would expect from a PRO.
Double teaming up with hndrsonj is righteous - no way to outdo that team effort.
 

maccus

Super Moderator
Super Moderator
Moving on...........Got the chassis all cleaned up an painted. Sure is a pain cleaning up the axles etc. Got back from Cheyenne with the blasted deck and wheel/rims on last Sunday. Painted the underside deck, basket and chassis on Tuesday. Painted the top deck and reassembled most of the detail stuff Thursday. Still need to mount the gas tank (have to fab new lines) and foot basket, and run the wiring harness to the back from the ignition switch . Need to add (forgot to order one, imagine that) the little plate with the acme thread for the top mounting screw for the basket. I see I need to give the basket a second coat of paint too. Almost forgot....need to fab a battery box.

Here are the latest pics. Starting to look more like a USMC motor pool Mule....ordered data plates yesterday and will order USMC markings today from Rick Larsen.
 

Attachments

maccus

Super Moderator
Super Moderator
Well a little farther on with the mule restore. Got the fuel lines done. Used soft copper for the return line just cause it is easier to work. Used steel brake line for the main fuel line to the carb.. Took a while to find a 1/8 inch flare that was not very expensive as most good flares like the one I have only go down to 3/16. Found a 3/8 ACME nut on the web and fabed a mounting plate for it for the top basket mount. I am lucky as this unit has the best fuel tank of all the mules I have had...........no dents, no leaks etc. and the cap is still perfect. Not sure how that happened. Dressed up all the cables/lines under the deck.

Started to try to recover the vertical mounts on the rails. They are a mess. Finally called John Emery and ordered 8 of the 4 hole vertical mounts. Mine were all but trash.

Made a plywood temporary cover for the deck engine cover. I will replace it if I can find a correct one. Not to big of a deal as I will get a rubber mat to cover the whole deck anyway.

Drives like it should. The last thing I will get is 4 new tires as mine are from different vendors and each are just a little different size from each other. Not a good thing when you do not have differentials in the axles. And I still need to get another basket and seat as this will be a 2 seater.

Some pics.
 

Attachments

maccus

Super Moderator
Super Moderator
A little more done on the unit. Added the data plates, decals and a deck mat. Will have to do a final trim on the mat in a few weeks after it lays down all the way. Every time I take some pics I see more spots I have missed on the paint job. Not a problem as the little 4oz. HVLP HF gun is a slick deal for spot painting. Very easy to use and if you take it apart after every use and really clean well it will last many years, mine has lasted for 15-20 years and is still going strong.

http://www.harborfreight.com/hvlp-detail-spray-gun-46719.html
 

Attachments

Last edited:
Top
AdBlock Detected

We get it, advertisements are annoying!

Sure, ad-blocking software does a great job at blocking ads, but it also blocks useful features of our website like our supporting vendors. Their ads help keep Steel Soldiers going. Please consider disabling your ad blockers for the site. Thanks!

I've Disabled AdBlock
No Thanks