• Steel Soldiers now has a few new forums, read more about it at: New Munitions Forums!

  • Microsoft MSN, Live, Hotmail, Outlook email users may not be receiving emails. We are working to resolve this issue. Please add support@steelsoldiers.com to your trusted contacts.


Newbie With a 1984 M923 - So many questions...

EmeryAndCompany

New member
21
13
3
Location
NAPLES Florida
Good Afternoon!
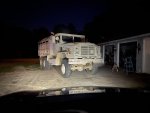
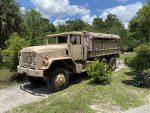
This is so exciting, been waiting and planning forever to score a m923.
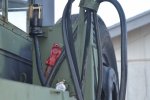
First of all, passenger side, under the dash, there are two electrical ports of some sort, what are these?
would love to get some auxiliary lights in place, wondering what the most logical way to install 12v leds on a 24v system...

Also, I’m in SW Florida, what kind of engine temps should I expect to run at? Seems to do great, but curious to hear others running temps.

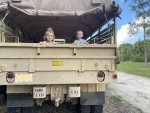
WATER! Had some heavy rains last night, and the interior is a puddle. On the ride down from Georgia, I had plowed through some rain storms and the interior was just soaked. The seals on the windshields and then somewhere below the windshields is definitely to blame. Looking at kits to replace all but they seem a bit pricey. Looking for alternative materials/ideas. Thank you all in advance, me and the fam are super excited to have this finally here.
Jack
 

Attachments

Elijah95

Certified Rookie
1,239
1,183
113
Location
Georgia
Best effective way to leak proof a cab is a hard top, and while you’re at it literally clean, paint and use a high quality mold resistant waterproof caulk under windshield frame, lock the windshields closed and caulk inside and out, seal firewall, caulk hard top gasket areas, and install new gaskets on sides of hard top where windows meet and adjust the window stops perfectly.

But then you lose 90% of the cool and cooling factor of the cab


Sent from my iPhone using Tapatalk
 
Last edited:

Bill Nutting

Well-known member
Steel Soldiers Supporter
569
1,267
93
Location
Chesterfield, Mi.
First off, welcome to to the hobby. You have made the first most important step by coming to this site. Join up and enjoy some of the best advise you can get from some very knowledgeable folks. I just gave you all the knowledge I have...
Now about that truck, that is a fine 5 ton! I have a five ton (M934) and a 3/4 ton (M37). They both leak like crazy. The M37 is stored indoors so I don’t worry about that one. When I drive it in the rain, I get wet. The M934 stays outside. I have sealed the windshield shut and I still have a puddle on the floor after a rain. Someday I might get around to finding the source... The thing to remember is this. The government didn’t buy these truck for the comfort of the soldiers that drive them. They are purpose built machines. They can be modified to be a bit more comfortable but at the price of loosing some of their charm.
This is a fun hobby! Enjoy working on and driving your truck. In time you will work out the bugs that matter. It looks like your kids are having fun too. They will have memories of this for the rest of their lives! There is song called “You’re going to miss this”. I don’t remember who recorded it, but have a listen to it... Come back here often, you will make great and lasting friends here...
 

Tracer

Well-known member
Steel Soldiers Supporter
6,395
13,488
113
Location
Hawthorne, NV.
Emery, it looks like you have a hard top. Check the seam at the top front window frame and the hard top, if it leaks there, try an RTV to seal the seam. Also as Elijah mentioned, check the area where the your side windows seal against the hard top. Now the window seals are probably your biggest culprit. You can buy the seal that goes around the windshield separate. Problem is you have to have a glass shop remove the window from the frame to replace the seal (gasket) then replace the glass. A complete new window, seal and all runs on average of about $150 to $180, give or take. I usually buy the whole complete window as we do not have a qualified glass shop in town. Last but not least is the windshield frame, hood cowl join. This area is just spot welded together, and there is a small gap that will leak, and then start to rust. I can't remember how many truck cabs I have seen damaged/ruined by rust in this area. On my M35A2 (cab is similar in this area in to yours), I clean the seam with Lacquer Thinner to remove all dirt and oil. Then get the standard dry time JB Weld, mix as directed, then apply with a tooth pick or very small screwdriver a small amount of JB weld along the seam, and then with a finger, smooth the JB Weld into the entire seam, about a foot at a time, and then let dry. With patience you will get a nice smooth seal that will stop any leaks you may have, and prevent any future rust from starting. Also get a can of desert tan paint for touch up. Hope this helps. Also, as Bill Nutting said welcome to the hobby. Lots of knowledge here and good people. Your in Florida so try to make the Georgia meet this fall. Lots to do, see, and learn. DSCF2537.JPGDSCF2538.JPG
 
Last edited:

EmeryAndCompany

New member
21
13
3
Location
NAPLES Florida
Emery, it looks like you have a hard top. Check the seam at the top front window frame and the hard top, if it leaks there, try an RTV to seal the seam. Also as Elijah mentioned, check the area where the your side windows seal against the hard top. Now the window seals are probably your biggest culprit. You can buy the seal that goes around the windshield separate. Problem is you have to have a glass shop remove the window from the frame to replace the seal (gasket) then replace the glass. A complete new window, seal and all runs on average of about $150 to $180, give or take. I usually buy the whole complete window as we do not have a qualified glass shop in town. Last but not least is the windshield frame, hood cowl join. This area is just spot welded together, and there is a small gap that will leak, and then start to rust. I can't remember how many truck cabs I have seen damaged/ruined by rust in this area. On my M35A2 (cab is similar in this area in to yours), I clean the seam with Lacquer Thinner to remove all dirt and oil. Then get the standard dry time JB Weld, mix as directed, then apply with a tooth pick or very small screwdriver a small amount of JB weld along the seam, and then with a finger, smooth the JB Weld into the entire seam, about a foot at a time, and then let dry. With patience you will get a nice smooth seal that will stop any leaks you may have, and prevent any future rust from starting. Also get a can of desert tan paint for touch up. Hope this helps. Also, as Bill Nutting said welcome to the hobby. Lots of knowledge here and good people. Your in Florida so try to make the Georgia meet this fall. Lots to do, see, and learn. View attachment 803450View attachment 803455
TRACER,
Great advise, I inspected the seam and sure enough, it is wide open. That is where the most alarming amount comes in while going down the road in the rain, and now I can see why! THANK YOU
 

fasttruck

Well-known member
1,265
622
113
Location
Mesa, AZ
While you are doing nothing check out the pubs relating to this vehicle which are available in the TM section on this site: operators' manual, organizational maintenance manual and related parts book, lubrication order. This truck has at least 40 grease points. Neglect them at your own peril. Grease is cheap, parts cost money. Caging pins for the rear wheel brakes present ? Know how and when to use them ? Check it out.
 

EmeryAndCompany

New member
21
13
3
Location
NAPLES Florida
While you are doing nothing check out the pubs relating to this vehicle which are available in the TM section on this site: operators' manual, organizational maintenance manual and related parts book, lubrication order. This truck has at least 40 grease points. Neglect them at your own peril. Grease is cheap, parts cost money. Caging pins for the rear wheel brakes present ? Know how and when to use them ? Check it out.
Thanks, yes I’ve been looking over, took yesterday to top off all fluids. I’ve got all the original documentation and I’ve got service manual as well. Appreciate the mention of the caging pins I’ll have to educate myself on those.
 

cucvmule

collector of stuff
1,139
575
113
Location
Crystal City Mo
Nice looking truck! A great group of Guys here that will give very good advice and steer you through any hardship encountered.

With the young Troopers you have it may be a good accessory to get a set of steps or ladder for the back of your M923.

Welcome and good rubber, brakes and fluids keep a ride moving along.
 

cucvmule

collector of stuff
1,139
575
113
Location
Crystal City Mo
Emery, it looks like you have a hard top. Check the seam at the top front window frame and the hard top, if it leaks there, try an RTV to seal the seam. Also as Elijah mentioned, check the area where the your side windows seal against the hard top. Now the window seals are probably your biggest culprit. You can buy the seal that goes around the windshield separate. Problem is you have to have a glass shop remove the window from the frame to replace the seal (gasket) then replace the glass. A complete new window, seal and all runs on average of about $150 to $180, give or take. I usually buy the whole complete window as we do not have a qualified glass shop in town. Last but not least is the windshield frame, hood cowl join. This area is just spot welded together, and there is a small gap that will leak, and then start to rust. I can't remember how many truck cabs I have seen damaged/ruined by rust in this area. On my M35A2 (cab is similar in this area in to yours), I clean the seam with Lacquer Thinner to remove all dirt and oil. Then get the standard dry time JB Weld, mix as directed, then apply with a tooth pick or very small screwdriver a small amount of JB weld along the seam, and then with a finger, smooth the JB Weld into the entire seam, about a foot at a time, and then let dry. With patience you will get a nice smooth seal that will stop any leaks you may have, and prevent any future rust from starting. Also get a can of desert tan paint for touch up. Hope this helps. Also, as Bill Nutting said welcome to the hobby. Lots of knowledge here and good people. Your in Florida so try to make the Georgia meet this fall. Lots to do, see, and learn. View attachment 803450View attachment 803455

Just to add on to what Tracer said, I will use a 3m product called Drip Check for body seems around sheet metal joints, been used by the car makers for years. The product works great for me, I use it around door edges allot as the old stuff wears out after 25 30 years and needs to be refreshed.
 

fasttruck

Well-known member
1,265
622
113
Location
Mesa, AZ
Reference post 11: caging pins are used to compress the springs in the double service brake chambers used on the rear wheels that serve as the parking brake by holding the wedges out against the brake shoes. Air pressure is required to release the parking brake so when towing a dead horse it is necessary to use the caging pins to cut out the parking brake if you don't have the air lines to charge the air system from the towing vehicle. The pins are stowed in brackets on the side of the brake chamber. As it is possible that some or all of them are missing you might have to make up the shortages from a truck parts house. A 3/4" box wrench is required to put them in and the procedure is described in the operators' manual. If you are putting fluids in I hope you have the relevant lube order so you use the right stuff. I recall the transmissions in these things can use either Dextron or OE10 but not both at the same time. No mixing. OE 10 in the power steering, OE 15-40 in the engine. GO 90 in the differentials.
 

fasttruck

Well-known member
1,265
622
113
Location
Mesa, AZ
Also your truck has Budd wheels which means the lug nuts on the driver's side have left handed threads which means turn to the right to loosen. The rear wheels also have inner and outer lug nuts so if you have to remove an inside tire you have to deal with 20 lug nuts on and off. Be sure to check and maintain the air pressure in all 11 tires. If your truck still has the OVM or on vehicle material it includes an air line to inflate tires which attaches to the emergency trailer glad hand on the right rear of the vehicle. The Army color codes the air connections to assist the troops to hook them up correctly: red for emergency, blue (formerly yellow) for the service connection.
 

Attachments

fasttruck

Well-known member
1,265
622
113
Location
Mesa, AZ
Another thought: This where the Army's belt and suspenders mentality helps: when the parking brake is caged you can secure the truck when parked with the hand brake on the transfer case. Civilian trucks do not have this so you have to chock it or take the caging pins out to keep it from rolling away.
 

fasttruck

Well-known member
1,265
622
113
Location
Mesa, AZ
Pic of caging pin in its' carrier on the side of a dual service brake chamber. Example shown is a M871A1 22.5t trailer but the one on a cargo truck is similar. The "T" shaped key on the end of the pin engages the spring in the brake chamber that holds the parking brake on when there is no air pressure. It is a touchey feeley process to get the pin engaged but once in, draw the nut up and it compresses the spring so the brake shoes will release the brake drum.
 

Attachments

fasttruck

Well-known member
1,265
622
113
Location
Mesa, AZ
Installing fording plugs is part of the prep for deep water fording ops. The plug as seen in the pic is in a dummy hole designed to store it when not in use. The adjacent hole in the bottom of the bell housing is where it goes when in use. The plug is a pipe end similar to the check and drain plugs in the driveline. The plug should be stowed for normal driving as it allows any seepage from the engine or the transmission to drain. With a vehicle with a manual clutch they keep water out of the clutch.
 

EmeryAndCompany

New member
21
13
3
Location
NAPLES Florida
Just wanted to follow up here and thank you all for all the info.

my caging pins are all present and stowed, I won’t be towing anything and still don’t quite understand when I should be caging the breaks.

my ignition has started to act up on me.... I have a feeling it’s the switch itself, but no rhyme or reason to it. It just seems to all of a sudden not send power to the starter when I’m trying to crank it over. No clicking or actuation noises or anything. Come back 2-3 minutes later and it will crank right over... not sure.

Carc paint on this rig has never been painted over. I found a commercial paint made by uline, really perfect match oil based enamel. Anyone have any pointers about prep? Retired army buddie told me that carc paint dust is super carcinogenic?

Super singles - seems like converting from the bud wheels over to the larger super singles would be quite the undertaking. Good idea or just run these?
 
Top
AdBlock Detected

We get it, advertisements are annoying!

Sure, ad-blocking software does a great job at blocking ads, but it also blocks useful features of our website like our supporting vendors. Their ads help keep Steel Soldiers going. Please consider disabling your ad blockers for the site. Thanks!

I've Disabled AdBlock
No Thanks