shotty
Active member
- 211
- 55
- 28
- Location
- Northern VA :(
93 NV4500 into an M1008. I went with the bell housing, hydraulic linkage bracket, clutch, pressure plate, and slave cylinder as recommended from Advance Adapters here: https://www.advanceadapters.com/pro...95-gm-nv4500-5-speed-adapter-bellhousing-kit/
I started posting about my clutch issues over on this excellent nv4500 swap thread but it's time to start my own since I am using a different bell housing and
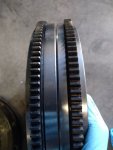
I got a LUK 6.5 flywheel which turns out is actually 1/4 inch thinner (and lighter) than the 6.2 flywheel. This explains why they are different part numbers despite the internet telling me they are interchangeable. While that may be true, they are also certainly different in some ways. I am having issues getting the clutch adjusted correctly with the above components. Too much preload on the throw out bearing and not enough travel to disengage the clutch.
I called AA today and this setup was designed for a 1" thick flywheel, which the 6.2 is but not the 6.5 I have installed. I was also told by the rep that I most likely need to shorten the pushrod. He seemed amazed they were still shipping the partially threaded pushrod in the hydraulic clutch linkage kit and not a piece of all thread. About to head out to the garage and install a new 6.2 flywheel then check pushrod length/engagement and cut it down 1/4 to 1/2 inch.
Oh I'm also going to adjust the pilot bearing depth. The instrauctions from AA said some applications might need to leave the pilot bearing exposed 3/16 of an inch instead of flushing it with the crank. After mounting my bellhousing and taking measurements I barely have any of the input shaft in the bearing. I'm going to pull the bearing out and put in a new one with 3/16 still exposed to capture more of the input shaft.
Once I get this all figured out I'll do up a thread with what I used and what ends up working...
I started posting about my clutch issues over on this excellent nv4500 swap thread but it's time to start my own since I am using a different bell housing and
I got a LUK 6.5 flywheel which turns out is actually 1/4 inch thinner (and lighter) than the 6.2 flywheel. This explains why they are different part numbers despite the internet telling me they are interchangeable. While that may be true, they are also certainly different in some ways. I am having issues getting the clutch adjusted correctly with the above components. Too much preload on the throw out bearing and not enough travel to disengage the clutch.
I called AA today and this setup was designed for a 1" thick flywheel, which the 6.2 is but not the 6.5 I have installed. I was also told by the rep that I most likely need to shorten the pushrod. He seemed amazed they were still shipping the partially threaded pushrod in the hydraulic clutch linkage kit and not a piece of all thread. About to head out to the garage and install a new 6.2 flywheel then check pushrod length/engagement and cut it down 1/4 to 1/2 inch.
Oh I'm also going to adjust the pilot bearing depth. The instrauctions from AA said some applications might need to leave the pilot bearing exposed 3/16 of an inch instead of flushing it with the crank. After mounting my bellhousing and taking measurements I barely have any of the input shaft in the bearing. I'm going to pull the bearing out and put in a new one with 3/16 still exposed to capture more of the input shaft.
Once I get this all figured out I'll do up a thread with what I used and what ends up working...