• Steel Soldiers now has a few new forums, read more about it at: New Munitions Forums!

  • Microsoft MSN, Live, Hotmail, Outlook email users may not be receiving emails. We are working to resolve this issue. Please add support@steelsoldiers.com to your trusted contacts.


Pertronix Conversion?

ems4ty

New member
344
0
0
Location
restricted/ca
Anyone ever done a points to Pertronix conversion on a M35? I have a 1953 Reo M35 with a Continental OA331 Gasser Motor. The distributor is a Delco-Remy M#
1111556, S# 3 B 11, CW Rotation, Military Ordnance # 7762685. Anyone have any leads or ideas on how to and what part numbers to use for a conversion to a Pertronix Pointless Ignition?

Just curious. I contacted Pertronix and they said that they can't find anything for it. Probably because I told them it was 24 Volts and they didn't look any further.

Thanks,
 

JasonS

Well-known member
1,643
126
63
Location
Eastern SD
I have modified both the Reo OA331 and Continental R6602 with the Pertronix. I'll have to double check but I am pretty sure that it was the 1167. I did one with a special ordered 24V module ($125) and another using the standard Pertronix with a 12V regulator epoxied into the large condensor (~$75 + regulator). I replaced the original coil with a 3 ohm pertronix. The R6602 starts better but my real recommendation is to get a civilian distributor. This is what I did with my Reo 400. It also got me a tach drive so that I can use the military tachometer. I got a noticeable improvement even after replacing relatively new and strong points system.
 

JasonS

Well-known member
1,643
126
63
Location
Eastern SD
It was the 1167 pertronix. The same as used in early GM inline six distributors. You will have to slightly modify the plate that the points mounted on. I believe that I had to remove the eccentric used to adjust point gap and drill and tap a hole to retain the pertronix.
 

ems4ty

New member
344
0
0
Location
restricted/ca
JasonS, Thank you soo much for your help. So if I got it right, all I need is a 1167 Pertronix unit and nothing else? Once I get the part, I need to modify the mounting/base plate to secure the new unit to my existing distributor. The 1167 works on 24v or do I need to rewire for 12v?

Thanks!

I'd hate to replace the distributor because I just bought this one NOS from either Saturn or Memphis Equipment. Cost me about $180.00 Plus Shipping.
 

JasonS

Well-known member
1,643
126
63
Location
Eastern SD
No, the 1167 will not work right out of the box. The pertronix takes the place of the points; using a pass transistor to make the circuit to ground. The pass transistor can tolerate the voltage but the control circuitry cannot. For this reason, you either need to drop the 28V supplied to the red wire of the pertronix using a voltage regulator or you need to purchase a 24V version. It would be easiest for you to purchase the 24V version ($125) if you are uncomfortable putting together an external voltage regulator. I used an LM7812 and mounted it inside the large can condenser/ capacitor.

You also need to use the 3.0 ohm pertronix coil to limit the current through the pertronix module.

I installed the 24V version in my brother's R6602. Everything fits within the stock ignition. I'll take some pictures later this week and post them.
 

ems4ty

New member
344
0
0
Location
restricted/ca
Awesome. I checked Pertronix Website and found the 1167 Iginition Module. This is what I found:

1167 IGNITOR DELCO 6 CYL (12V)
1167N6 IGNITOR DELCO 6 CYL 6V NEG GND
1167P12 IGNITOR DELCO 6 CYL POS GND
1167P6 IGNITOR DELCO 6 CYL 6V NEG GND

Nothing shows for 24V as you mentioned, do you have a part # for that particular model? Also couldn't find the LM7812 on their site. I did find the coils, something like a - 40611 40,000 VOLT FLAME-THROWER (3.0 OHM) BLACK EPOXY - but that's 12V as well. Am I dense? Hate to be a PITA but am seriously wanting to do this.
 

JasonS

Well-known member
1,643
126
63
Location
Eastern SD
OK, to simplify things I'll spare the details and just recommend what I think is the easiest way to get the pertonix in your stock disty. When I installed the pertronix in my brother's R6602, he special ordered the pertronix with the 24V option. I'll find out the details, get some pictures, and get back to you. You will also need the pertronix 3.0ohm coil (oil filled, not epoxy). This is all you will need. You will have to modify the mounting plate in the distributor, grind some off of the rotor, and fab up a spacer to go into the high voltage terminal of the coil which mates with the spring in the cap (I used a short screw/ bolt). Give me a few days to get back to you.
 

ems4ty

New member
344
0
0
Location
restricted/ca
Thank you for your help. What was getting me confused was the 24V option on the pertronix unit. When I check the website, they didn't show one available for the 1167 series units. I fully understand the basic 40,000V 3.0 Ohm Coil and having to modify the base of the disty to accomodate the pertronix unit as well as adding the spacer to the HV Output of the coil to the contact on the cap. I've got that all figured out. Just looking for the Part number used for the 24V Option of the pertronix unit.

When I sent an inquiry to Pertronix about 24V they said they didn't have one. It wouldn't be the first time where the sales rep didn't know one was available as 24V systems aren't used in their normal applications. Thank you so much for your patience JasonS. I really do appreciate all of your help! Look forward to your next response.

Cheers!
 

86-1ton

New member
29
0
0
kind of OT, but i put a pertronix kit in my '72 Chevelle with a 307v8... no modifications were needed on mine, and it was very simple... considering i'm kind of a loser in the electiral department, the directions were simple and made me confident...
 

ems4ty

New member
344
0
0
Location
restricted/ca
Yeah, I've done a pertronix conversion before and it was very simple. I have a 1927 Ford Model-T Hotrod with a Chevy 350 motor. That one has a Pertronix Conversion and was pretty much just drop in place and plug-N-play. Really easy. Just never done it on the deuce with a 24V system before. Pertronix makes really great and effecient products and have never had any problems with them before.

Thanks,
 

krick3tt

New member
31
0
0
Location
Denver, CO
petronix

I have a 24v Petronix in my 73 Pinzgauer. Swiss military uses 24v. No problems. Check with Expedition Imports in Calif. they sell the kits.
Also had a Petronix in my '63 Unimog 404.

Morris
 

Capt.Marion

Active member
1,811
15
38
Location
Atlanta, GA
RE: petronix

Aye, I did a ptronix conversion on the ford flathead in my tractor, works real good, real easy to do as well. Don't even need choke to start it when its been sitting for a week...
 

jakinabx

New member
4
0
0
Location
lancaster va.
modify r6602

I have modified both the Reo OA331 and Continental R6602 with the Pertronix. I'll have to double check but I am pretty sure that it was the 1167. I did one with a special ordered 24V module ($125) and another using the standard Pertronix with a 12V regulator epoxied into the large condensor (~$75 + regulator). I replaced the original coil with a 3 ohm pertronix. The R6602 starts better but my real recommendation is to get a civilian distributor. This is what I did with my Reo 400. It also got me a tach drive so that I can use the military tachometer. I got a noticeable improvement even after replacing relatively new and strong points system.
i was wondering if you could send me all the info i need to change my r6602 over to electronic i know about the 1167 24v unit i just needed to know witch coil # you used and how you did the lm7812 thanks jack my e-mail is jakinabx@yahoo.com
 

dwyanehicks

New member
1
0
0
Location
Neodesha, KS
Did you make your Petronix conversion for the Delco-Remy distributor? How did it go? I have the same distributor on a 5-ton 6x6, and Petronix is still in the dark about this subject.
Thanks,
dwyanehicks
 

m139h2otruck

Member
569
5
16
Location
NH
Two years ago, I had M Series Rebuilders install a unit in an extra dist. unit we had for our M139 R6602. Not cheap, but it works great. They advertise in the MV mag for M38 upgrades, so I sent down the R6602 unit, so they could see what the differences were. Petronix # on the part is 07AA-24vn and it is also marked 24 volts. Rotor was a little tight to the cap, but some light sanding fixed it.
 

jakinabx

New member
4
0
0
Location
lancaster va.
pertronix conversion

yes i use the delco-remy dist. that came with the truck i had to ream the hole that the coil sets in because the 3 ohm coil is a little larger in diameter i called a place called cbs performance in colorado and told them what i wanted a 1167 with a 24v module and a 3 ohm coil oil filled only mounting the pick up plate was a little tricky cause you have to set rotor on #1 line up pick up and set to 25 thous and you have to grind bottom of rotor so it will not hit pick up other than that once i was done the truck starts and runs like brand new i am able to start without pumping gas or useing choke started right up even when it was still a little cold out i love it
 

58weiss

New member
1
1
0
Location
hammond, LA.
What civiilan dist did you get for your R6602, I have the R6602 in a firetruck and would like to convert. Also I have dual distributors on this gasser, any advice would be appreciated
 

Dave911

New member
44
1
0
Location
Fort Wayne, IN
I thought I would continue this thread since it has gone on for a while and it is lacking details.
I have a M51 5 Ton dump with the R6602 Gas engine. I converted the spark plug wires to civy wires ( covered in another thread ) and I have changed the points and condenser but the ignition
has been a downer for this truck. Even with new parts (likely Chinese junk) the points pit and become erratic after only a few hours of operation and that results in missing, fouled spark plugs, rough running and even more fuel consumption. Points suck.

So this is what I started with, the standard Delco Mil distributor with likely the original '62 coil.
View attachment 656144

I left the distributor in the truck to do the conversion and that worked out fine. Remove all of the parts including the coil. Once the coil is unclamped, get under the truck with a stick and tap the coil out of the distributor. It slides out but it didn't want to come out after 50+ years..

View attachment 656145

So after all of the parts are removed I realized that the breaker plate is held in by two screws and is removable! :)
It has to be rotated counter clockwise just a little so that it can be removed without shearing off the incoming power wire.
I used a drill and removed the cam that is used to adjust the breaker points. Once that is out of the way, the plate that comes with the Pertronix kit slips over the brass points pivot pin.
There is a predrilled hole in the Pertronix plate and I lined up with center holes after the pertronix plate was slipped over the brass pin and drilled and tapped a 8-32 hole for a screw. There is an existing 8-32 screw hole in the original ste
View attachment 656146
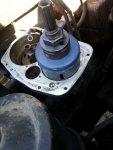
So there is an issue with the original distributor housing. The replacement coil I wanted to use is slightly larger in diameter than the original Delco coil (which is obsolete).
This is how I dealt with the hole size issue. A 2 1/2" hole saw enlarged the shoulder in the casting. And a sanding drum opened up the hole for the coil body.
20161129_142745 (Medium).jpg
20161129_142758 (Medium).jpg
I used a battery powered 1/2" drill to do the enlarging. I get better control from the battery drills than a big honking 1/2" AC powered drill.
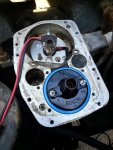
So here is the coil in place. I think the hole saw was 2 1/2" in diameter and the sanding drum was probably a 2" unit. I wore out one sleeve enlarging the hole. Not bad.
I did have to tap the coil into place with a piece of wood as it was a snug fit, but that is fine.
20161129_144339 (Medium).jpg
Here is the assembled unit.
20161129_160438 (Medium).jpg
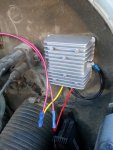
This Pertronix unit is a standard 12 volt unit. I used a voltage converter externally to drop the voltage to the distributor.
This is mounted in the corner of the firewall next to the generator regulator box. I cut the 24 volt feed to the distributor and ran it to the red wire on the converter. The ground wires are tied under a screw next to the box - 8-32 worked fine again. The Yellow wire feeds the distributor power at 12 volts. Very simple.
20161129_154635 (Medium).jpg
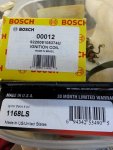
This is the coil and the Pertronix kit I used. The Bosch Blue coil is known to be bullet proof and has 3.5 to 4 ohms of resistance. It is epoxy filled.
I would avoid the Pertronix coil. A company that sells kits for sailboat engines was selling the Pertronix coil and dropped it due to issues.
20161129_161908 (Medium).jpg
This is the power converter I used from Amazon. I tested the converter for several days with a 50 watt load - two 25 watt, 12 volt light bulbs... It runs very cool.
Power Converter.jpg

So after the conversion I thought I would start up the truck and hope that it ran so I could time the engine. There is a pointer at the front of the engine and there are two marks on the belt pulley. (Really, they are there but you will need to scrape to find them and then put chalk into the grooves so you can see them with a timing light) The first mark is the 5 degree before top dead center mark. That is the one you want to set the distributor to. What was incredible is that after the conversion, the timing was exactly correct !! Likely Pertronix designed their system this way but I was really not expecting that! Nice surprise. So I never had to adjust the timing. It just worked! :)
Results of this conversion so far look good. The coil was likely going bad (guess) and the truck was missing, the points were pitting in less than 10 hours. It was bad.
After the conversion the trucks runs amazingly well. I was able to idle the engine down to about 500 rpm which was not previously possible due to missing. It looks like a great conversion so far. I've installed another Pertronix on a gas sailboat engine and that was a huge improvement also.

So besides the parts described here you will need an 8-32 tap and drill and a couple 8-32 screws. Some misc wire.. I used 14 gauge THHN stranded wire. Some crimp butt connects and some ring terminals.

I understand that the 2 1/2 ton gas engines use an almost identical distributor so perhaps all of these parts will also work with those as well.

I am going to put another Pertronix kit into my spare parts along with another 24 to 12 volt converter. Getting stuck on the side of the road with a 5 ton sucks and spare parts are good to have on hand.

The Pertronix kit cost $85 off Amazon, the Bosch Blue 00012 coil was $45. The 24 to 12 volt, 10 amp converter was only $16. This is a very cheap conversion considering the cost of running these trucks.
 
Last edited:
Top
AdBlock Detected

We get it, advertisements are annoying!

Sure, ad-blocking software does a great job at blocking ads, but it also blocks useful features of our website like our supporting vendors. Their ads help keep Steel Soldiers going. Please consider disabling your ad blockers for the site. Thanks!

I've Disabled AdBlock
No Thanks