• Steel Soldiers now has a few new forums, read more about it at: New Munitions Forums!

  • Microsoft MSN, Live, Hotmail, Outlook email users may not be receiving emails. We are working to resolve this issue. Please add support@steelsoldiers.com to your trusted contacts.


Trailer Brake Controller Install (Redarc)

Coug

Well-known member
Steel Soldiers Supporter
2,834
4,048
113
Location
Olympia/WA
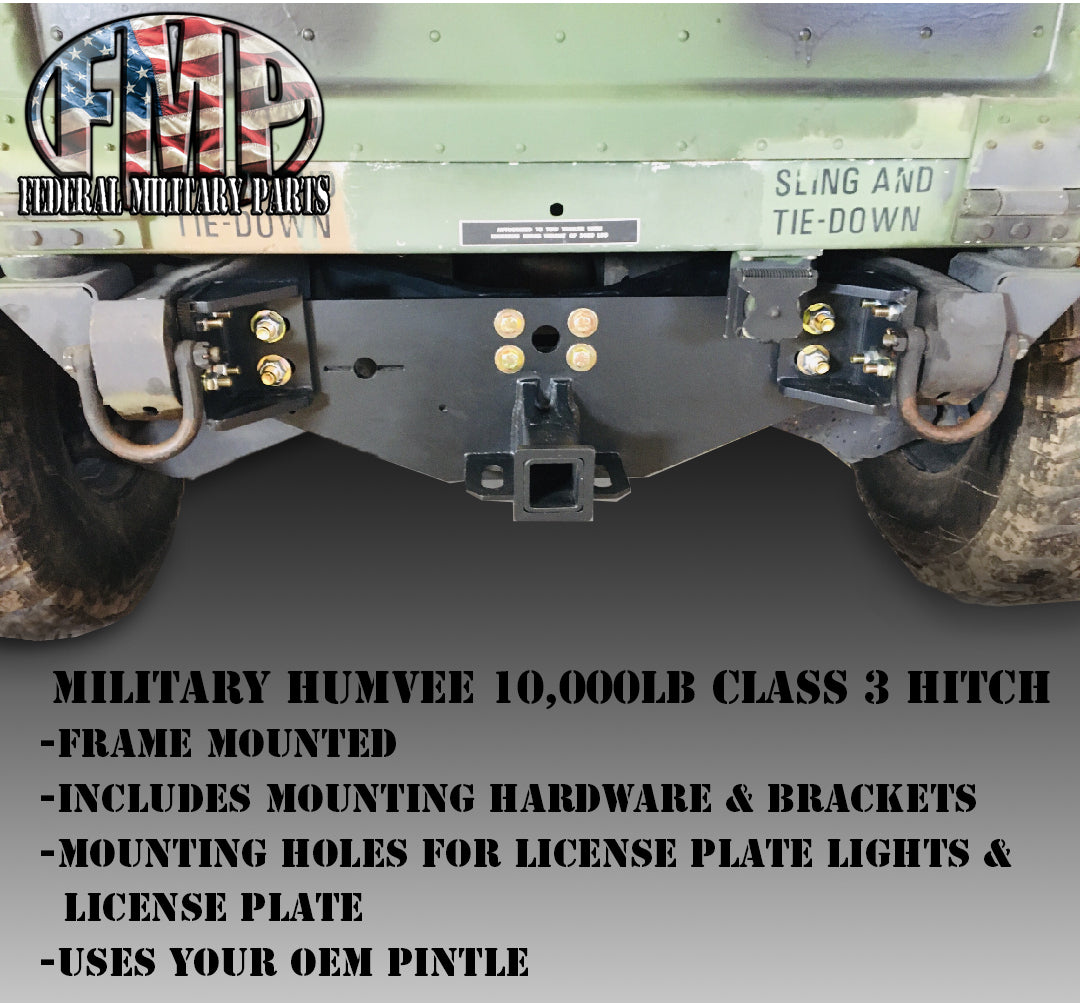
A couple days back I installed the Federal Military Parts class 3 heavy duty 2" receiver I picked up from another member here who decided to go a different route. Doesn't work with airlift bumper, which is fine with me, as I don't have one. Got it installed and was waiting on the other parts to be able to tow civilian trailers with it.

link to hitch:
(note for the link, the description of what you receive and the text in the pictures of what you receive are 2 different things. The pictures all say the license plate wiring/light are included, the description says it does not, and it was not included. Another note, there are no instructions included, and I got more bolts and washers than are in the pictures, but I finally figured it out)

a link to the hitch. I hit a snag with my truck (M1123) that I have a thicker rear crossmember where the pintle bolts to (2" thick), so I don't have a bracket on the front side. I have one on order and hope to get it in a week or so.
56e2e3c34e767b8f45f04b77b9c4689dedf28906-1.jpg


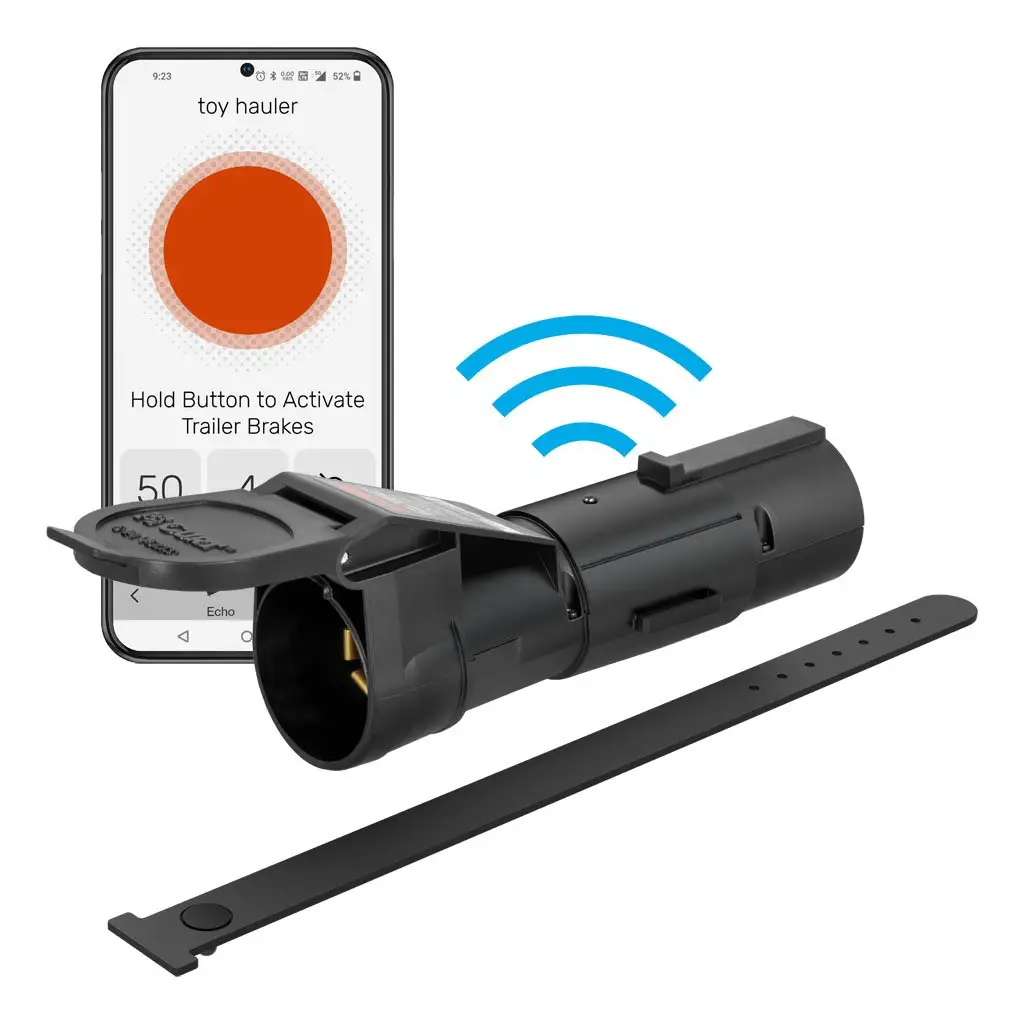
So as I mentioned in the "what did you do to your HMMWV today" thread, I found a trailer brake controller that will work with 24V trucks towing trailers with 12V electric brakes.

This is a 2 part controller, a control knob/button and the actual controller unit are separate. makes for a much smaller impact on space/visibility.
The controller isn't sealed, so I wanted to put it as high as possible. I ended up deciding to put it above the pedals and steering. Fortunately the Redarc controller can be installed in any orientation, as long as it's solidly mounted.

I found a clear space under the dash, and nothing on the opposite side, so set it on the accessible side in order to mark and drill the holes needed. I used some 10-32 (I think) self tapping screws 1/2" long I had left over from another project (can't remember if they were from the windshield on the HMMWV or housing of the MEP802A)
56e2e3c34e767b8f45f04b77b9c4689dedf28906-9.jpg

Here it is installed on the opposite side of the bulkhead from the first picture. Camera is looking straight up from the driver's floorboard, tucked way up out of the way. The pigtail is facing the front of the truck, right towards a grommet. (wires not put through the grommet yet)
56e2e3c34e767b8f45f04b77b9c4689dedf28906-6.jpg

I used a Posi-Tap to tap into the brake light wire. I used a multimeter to make sure this was the side activated by the switch (I still need to adjust the switch to come on sooner)
(I ordered from ebay, but here is a link for the Posi-Taps I used, they barely fit on the wire)
56e2e3c34e767b8f45f04b77b9c4689dedf28906-2.jpg

These next two are how I ran the other three wires. The white wire is ground, so I put it straight to the supplemental harness ground on top by the cadillac valve. The other two are power and brake, power comes from a breaker in the battery box, brake wire goes straight back along the frame to the rear of the truck.
I considered just running the power lead to the generator as there is the large 24V cable off of it, but decided that I'd rather minimize the movements of wires and connectors, especially before the breaker was wired in, and there was nowhere nearby to secure the breaker to the engine.
56e2e3c34e767b8f45f04b77b9c4689dedf28906-7.jpg56e2e3c34e767b8f45f04b77b9c4689dedf28906-4.jpg
(I don't show it here, but using 1/4" stiff pex tubing with the wire run inside of it makes running the wires a breeze. Just push the wire through, then bend over the end so it doesn't come out, and slide it wherever you want)

Here we have the breakers I installed in the batter box. Pollak 30 amp breakers. The front breaker is for the controller, the second one is wired to 12V for trailer accessories. I have the 200 amp generator so shouldn't be an issue. I just preferred to wire the brake controller for 24V to keep things simple/minimize 12V draw. (I shortened the studs on the rearward breaker as they stuck out quite a ways, and they are much longer than needed for only one or two wires.)
56e2e3c34e767b8f45f04b77b9c4689dedf28906-5.jpg
56e2e3c34e767b8f45f04b77b9c4689dedf28906-3.jpg


Here is the knob installed between the start switch and the windshield hinge. Very minimal, and has a multicolor LED to let you know what's going on.
1/4" lower would have been better, I had to oversize the top hole I drilled in order for the piece behind it to fit properly as there is a second piece of metal behind the first right at that spot and towards the top.
56e2e3c34e767b8f45f04b77b9c4689dedf28906-8.jpg

That's it for the moment, my XM381 converter got delayed in shipping so I can't finish wiring everything up until tomorrow when it's supposed to get here.
 
Last edited:

Coug

Well-known member
Steel Soldiers Supporter
2,834
4,048
113
Location
Olympia/WA
Got the trailer light converter box in today.

So first thing I did was to disassemble the plug portion, and add a pigtail for the 12V accessory wire I was adding. There was already a pigtail for the brake line, but it was only 14 awg wire, I replaced it with the 10 awg I had run back from the brake controller to keep things consistent. No pictures of this part, as it's pretty simple, just undo all the bolts, remove the plastic housing, and add the wires in the correct slots.


I was looking up under the back of the truck, and didn't see anywhere good to mount the box. It's a hefty little box, the mounted ruggedized version of the converter, so needed something solid to mount to.
Finally sasw in the rear structural frame member there were 2 holes with threads in them in the center between the 2 pieces, facing up. I made a bracket from a leftover piece of steel that I could bolt to that spot. If I didn't already have something it would have been very simple to drill a couple holes in a piece of angle iron, then weld a flat plate to one side to holt the converter to.

Here is the piece of metal I used just sitting in place.
dbb48c31e92dede2b8e6dee616f041bf7b789a11-5.jpg

Holes drilled and painted (only the 4 small corner holes on the large face are for mounting it, the others were already there.)
dbb48c31e92dede2b8e6dee616f041bf7b789a11-6.jpg

Here is how it looks from directly above the hitch looking in
dbb48c31e92dede2b8e6dee616f041bf7b789a11-4.jpg

And looking up from under the hitch
dbb48c31e92dede2b8e6dee616f041bf7b789a11-1.jpg


Then here is how I mounted the plug. I flipped the bracket around and turned it 90 degrees so set the plug receptacle back further. If I had left it how it came then it would have been sticking out over an inch further from where it is. The 90 degree turn was just to let me open the cover further and without it I wouldn't have been able to fit the bolts through (side note, I don't like the little bolts these types of plugs come with, so I drilled it out to 1/4 inch holes)
it sits about even with the 12 pin NATO plug.
aa7ed505d80cba2c3c10fb0ef59d26a6389bfb73-1.jpg
aa7ed505d80cba2c3c10fb0ef59d26a6389bfb73-2.jpg

Eventually I'll wire the brake controller over to the NATO plug as well (pin M according to the instructions) but probably not until I convert a trailer to electric over hydraulic and actually need the brakes through that plug.


To add, all the wiring I added for the brake controller and the aux 12V line is 10 gauge marine rated wire. While I doubt that I will ever tow a trailer that requires full 30 amps for either the brakes or the aux line, I still wanted to do it because the brake controller called for a 30 amp breaker. I could probably have gotten away with smaller wire and smaller breakers.
Also, it's definitely not military looking, but my 12V wire is red to distinguish it from all the other wires running through the truck, in case I ever need 12V for anything else.

oh, and as usual, I used 20 mil PVC tape anywhere that I was putting steel plates against aluminum body pieces. In this case it was only the receptacle mounting bracket, but still something to keep in mind.

2 in. x 50 ft. 20 Mil Pipe Wrap Tape


Coug

Well-known member
Steel Soldiers Supporter
2,834
4,048
113
Location
Olympia/WA
One more thing to add about the hitch itself. It came with a couple holes that were too far over to mount the license plate, then has a steel plate you bolt to those holes that lowers the plate several inches and moved it over. I thought it looked stupid to be that low and offset from where the light goes, so I just punched a couple new holes in my license plate and put it in the upper position as seen above.

as it is the bottom edge of the plate is a couple inches below the rest of the hitch, if I used their mounting plate it would have been almost 4 inches below the bottom edge of the hitch. As it is, the bottom edge of the hitch is pretty much the same height as the bottom of the rest of the centerline of the truck, so I don't lose any ground clearance except maybe departure angle a little. With the plate just bolted there by itself, if I catch it on anything it will easily bend up out of the way, and then I just bend it back. If I put the steel plate there I'd have to use a hammer to get it back down flat.

40c246b46e397db408560f8f3c4b6dd3cc551193-4.jpg

correction, looks like the bottom of the hitch is about an inch above the bottom of the frame structure, bottom edge of license plate is right at the same level as the guards over the brake discs.
 
Last edited:

MattNC

Well-known member
222
270
63
Location
Raleigh, NC
Very nice write up. I have both the 10K hitch you have and the xm381. Both have worked great for over a year. I mounted my xm381 to the underside of the bed using carriage bolts. The heads are covered by a removable bedliner. I haven't yet done the brake controller but its on my to-do list and wondered what model to use. This thread will help a lot.
 

TOBASH

Father, Surgeon, Cantankerous Grouch
Steel Soldiers Supporter
3,254
2,985
113
Location
Brooklyn, NY
Color me confused...

Your write-up is excellent, but why such an extensive unit?

I bought a 60-70 dollar unit from E-bay that is super robust and maintains the pintle for my M1101 as well as allows civilian use with trailers.


There is a SteelSoldiers thread [I will look for it later and add to this response] on how to make a step-down converter for less than $40 as a DIY project re.: civilian voltages and functional signal lights.

The stock wiring should allow for installation in back by the rear bumper. Brake lights, power, all there by the trailer wiring cluster.

There is also a "Ready Brake" device for pulling cars and trailers with mechanical brakes. It uses the forward momentum of the trailer to activate the trailer or car brakes when the front vehicle slows down. It works great! I used my Durango to pull my BJ-44 LandCruiser 2200 miles and it was amazing even during rapid deceleration (although I did not try it out on ice or slick roads.)


Again, awesome write-up but it seems to be a complicated solution. Maybe I'm missing something?
 

Coug

Well-known member
Steel Soldiers Supporter
2,834
4,048
113
Location
Olympia/WA
Color me confused...

Your write-up is excellent, but why such an extensive unit?

I bought a 60-70 dollar unit from E-bay that is super robust and maintains the pintle for my M1101 as well as allows civilian use with trailers.


There is a SteelSoldiers thread [I will look for it later and add to this response] on how to make a step-down converter for less than $40 as a DIY project re.: civilian voltages and functional signal lights.

The stock wiring should allow for installation in back by the rear bumper. Brake lights, power, all there by the trailer wiring cluster.

There is also a "Ready Brake" device for pulling cars and trailers with mechanical brakes. It uses the forward momentum of the trailer to activate the trailer or car brakes when the front vehicle slows down. It works great! I used my Durango to pull my BJ-44 LandCruiser 2200 miles and it was amazing even during rapid deceleration (although I did not try it out on ice or slick roads.)


Again, awesome write-up but it seems to be a complicated solution. Maybe I'm missing something?
The pinball receiver would not work with my hitch, as my crossbar is one of the newer thicker ones a 2 1/4" thick, so the pintle is too short to add another 1/2" piece of metal in there ( With the safety chain eyelets, the pintle will handle 2 1/2" of mount, with the pinball I'd be at 2 3/4 without anywhere to hook the safety chains, or 3" with the safety chain loops).


The older style appears to be thinner with a bracket on the back side to stabilize the pintle. I have the bracket on order to take up the space. I also wanted it to be strong enough to handle a winch installed in it. While I'm sure the pintle bolt is strong enough to handle a winch in the pinball type receiver and the twisting forces involved, I just prefer to have everything as a single piece if possible, and this receiver does that.

And yes, I COULD make a converter for a bit cheaper. But time is money. By the time I acquired all the pieces (almost entirely made in China), all the connectors, wires, and did all the work to put it all together, then mount it in a nice, weathertight case, I'd be ahead a bit monetarily, but not necessarily overall. My rig is intended to be a work truck, and everything HAS to work properly when I need it to, so I'd rather pay the money up front than spend the time later on in case I screwed something up or some of those chinesium parts failed on me.


Your comment of "The stock wiring should allow for installation in back by the rear bumper. Brake lights, power, all there by the trailer wiring cluster." is confusing me a little bit. The converter IS in the back, less than a foot from the hitch centered under the truck in a sheltered location, wired into all of the stock wires that are back there.


As for the brake controller, I wanted/needed electric brakes, as I tow trailers with my other vehicles regularly. The mechanical one you linked would be fine if I was doing flat tows on other vehicles like you did, but it won't stop a utility trailer with electric brakes. It also costs about twice what I have into the controller and wiring.

I could have done an in-line brake controller like this one:
but to do anything with it requires it to be bluetooth connected to your phone to set up and do any changes, and would require the same 30 amp 12V power wire I installed for AUX power above, but wouldn't be able to be wired over to the NATO socket (might need that on a possible future project), and still costs more than the REDARC did. While the install is a lot simpler, it wouldn't do what I might need it to in the future. As for the phone connection, I much prefer to not have it's screen on when driving, especially at night, and I'd have to have it mounted and power supplied to it. Only having a single knob to deal with makes things simpler.


I don't think it's so much of you missing something as to why it seems so complicated a solution, it's just a matter of personal preference. I prefer electric brake controllers, wanted something that didn't stand out a lot, would work on 24V (U.S. made DC-DC converters are expensive, the chinese ones are cheap, I just prefer to stay away from Chinese made products), not made in China, and relatively simple. I think the only reason it seems so complicated is the amount of time I did on the write up and trying to get everything right, as well as some of my thought processes as to why I did what I did.

EDIT: I do expect to need the brake controller to work off road and in winter driving conditions as well, which this one is able to change braking method (proportional vs user controlled) at the push of a button, as well as manual activation as well, which were also important to me, and not available with surge braking.
 
Last edited:

TOBASH

Father, Surgeon, Cantankerous Grouch
Steel Soldiers Supporter
3,254
2,985
113
Location
Brooklyn, NY
So you try to avoid buyIng products that support the country that brought us COVID-19... GOOD.
 

Ajax MD

Well-known member
1,571
1,420
113
Location
Mayo, MD
@Coug Fantastic write-up and exactly what makes the forums so good. I will be able to follow this almost exactly, when I do this to our HMMWV.

One question:

There is a pintle/ball combination hitch that will replace the existing pintle hitch. You went with a receiver hitch. Is there such thing as a pintle receiver in case you ever decide to tow a military trailer?
 

Coug

Well-known member
Steel Soldiers Supporter
2,834
4,048
113
Location
Olympia/WA
@Coug Fantastic write-up and exactly what makes the forums so good. I will be able to follow this almost exactly, when I do this to our HMMWV.

One question:

There is a pintle/ball combination hitch that will replace the existing pintle hitch. You went with a receiver hitch. Is there such thing as a pintle receiver in case you ever decide to tow a military trailer?
This one is still able to mount the original pintle above the receiver, I'm just waiting on the bracket to give me the correct thickness to mount it. As soon as it comes in (supposedly tomorrow according to freight tracking) I'll add a couple more pictures.

Yes, there are pintles that will fit into a 2" receiver, and there are plates to mount a pintle or pintle/ball combination hitch to them that will fit the receiver, then you can adjust the height to whatever you need. I could have just gone to a straight 2" receiver bolted in place of the pintle but I didn't want to lose the pintle (if nothing else it makes a great spot to use with a kinetic rope for recovering vehicles)
 

MattNC

Well-known member
222
270
63
Location
Raleigh, NC
I agree with Coug's preference for electronic controllers. Night and day difference once you get a decently heavy trailer. Also really nice to turn it down when the trailer is empty so you don't lock up the brakes every time you stop. Once heavy you can crank it to the right setting for the load.
 

Coug

Well-known member
Steel Soldiers Supporter
2,834
4,048
113
Location
Olympia/WA
So latest update having to do with the hitch assembly.

I don't know if the mount points on the frame rails are different on the M1123 I have or that their kit is messed up, but the brackets that go from the pintle diagonal forward to the frame are too long with the pintle bracket installed. They do not physically fit into the space.

I measured them, and compared them to the braces I removed. The ones in the kit are a full 1" longer than the ones that were installed. Even with a little creative grinding on one of them to make it fit the pintle bracket better (there is a ridge on each side of the bracket for strength that doesn't match the brace( it still doesn't fit.
The only thing I can think is maybe for some reason the angled braces get sandwiched by the pintle bracket, but that would require the 1 1/2" bracket, and I have the 2" bracket. I can't imagine that's what it is supposed to be though.
(in the TM there is a difference between the Army rear bumper (airlift) and the USMC and MWO 9-2320-280-20-7 rear bumpers, mine is the USMC) , so maybe this kit is intended for the A0/A1 rear bumper before the MWO was applied? I dunno.

So for now, until I can take the braces to a welding shop to have a few modifications done to them (shorten by 3/4", extend the single rear hole forward 1/2", fill in last 1/2" of rear slot that is now open to the end from being shortened), and bevel the forward edge to match the taper of the pintle bracket) I put the ones that are for the USMC bumper back in. They were just barely long enough to fit.
Likely I won't even bother. Unless I start showing some signs of things being twisted out of place I suspect the original brackets are more than strong enough for 99% of the use I could potentially put it to.

So these are the braces I am talking about (TM just calls them "brackets" like about 20% of all the parts in the truck). This is the ones I removed with the original bumper/crossmember (I've been calling it a crossmember through this whole thread, but the TM calls it the bumper)
562acfb35f7beef6e784ef951148dba7db7ac338-1.jpg


Here is the one that came off the truck and went back in, metal is around 3/16" I think, but reinforced at the angles. Was barely long enough, and I think the proward end angle ended up slightly different so it is slightly bending/tensioning when the bolt through the frame was torqued down.
562acfb35f7beef6e784ef951148dba7db7ac338-4.jpg

Here is the one that came in the kit. Metal is full 1/2" thick, which makes it even harder to fit.
562acfb35f7beef6e784ef951148dba7db7ac338-5.jpg


So here is with the pintle installed. I think I can call this project completed now (though that doesn't mean I won't change things in the future)
562acfb35f7beef6e784ef951148dba7db7ac338-3.jpg
 

Ajax MD

Well-known member
1,571
1,420
113
Location
Mayo, MD
I like the "stacked" hitches. Many civilian trailers will be lower, and the receiver being lower will help accommodate that.
 

Coug

Well-known member
Steel Soldiers Supporter
2,834
4,048
113
Location
Olympia/WA
I like the "stacked" hitches. Many civilian trailers will be lower, and the receiver being lower will help accommodate that.
Yup, it's the same as adding a pinball type hitch for how everything works, it's just a single piece and heavier overall, so hopefully ends up as stronger overall.
I have a 10k rated adjustable drop hitch on order and a 12k rated 2" ball.

Next weekend everything will get a decent test when I pull a car trailer with it as part of a "1/4 ton run" we're having in the local area for jeeps and jeep variants. As far as I know I'll be the only full size, but there might be a growler showing up and then the Alley Cat (That's what the owner calls it, an experimental/test rig using M151 parts I think)

As soon as the hitch gets here I'll take everything for a short shake down drive with the car trailer to make sure it's good before going on the run, because it would be mildly embarrassing to be the newest truck there and be the one to break down.
 

Attachments

Coug

Well-known member
Steel Soldiers Supporter
2,834
4,048
113
Location
Olympia/WA
So it has been a few months since I installed the hitch, thought I'd give an update.

No pictures as I haven't done anything spectacular, but I've towed a car trailer a couple of times with small cars on it, along with some other trailers. No issues with the hitch itself, or the wiring or brake controller. The heaviest I've towed is about 5k lbs, so not much over the military cross country rating for this truck, and combined gross weight would be right around 14.5k lbs with everything in/on my truck.

Only issue I had was even having the license plate mounted up higher I've still bent it a few times. Last time was in the snow.
 
Top
AdBlock Detected

We get it, advertisements are annoying!

Sure, ad-blocking software does a great job at blocking ads, but it also blocks useful features of our website like our supporting vendors. Their ads help keep Steel Soldiers going. Please consider disabling your ad blockers for the site. Thanks!

I've Disabled AdBlock
No Thanks