• Steel Soldiers now has a few new forums, read more about it at: New Munitions Forums!

  • Microsoft MSN, Live, Hotmail, Outlook email users may not be receiving emails. We are working to resolve this issue. Please add support@steelsoldiers.com to your trusted contacts.


Winter Fronts instalation

GoHot229

Member
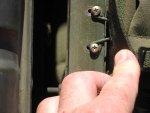
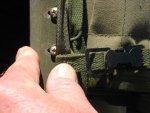
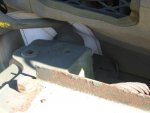
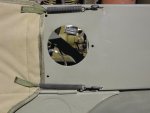
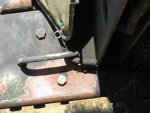
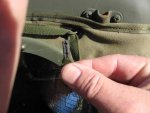
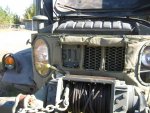
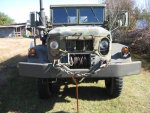
You must be wondering "where do the clips go" Well recently a SS forum member 'Clinton' scored a 'grip' ( thats young kid talk ) ( and means alot ) and theres no instructions ! ? ? Well heres what you will need: a drill of course, a two-pac of drill bits a sharpie to mark with and philips screwdriver or cordless drill/screwdriver. Open the hood and secure it. Unfold the cover out of the box and determine the outside face, place in relative position. Now you will have to fish it down between the winch and radiator, go easy, you'll be rubbing the radiator itself and you don't want to flatten the fins. Now fishing it down is a really tight fit, just be patient. What would work killer at this point would be some really long needle nose's you know, the ones that are about a foot long, like mechanics have. Then you could crawl under the front and latch on-to the cover and pull it in-between and down where you want it. But if you don't have them, just wriggling and tugging and pushing will get it into place. Now useing the center clip reciever hole in the cover and the safety catch place as a center on the grill as a starting point, Id hold the cover in place, you will see then that 'no way, nowhere to drill for the clip.?.... so you will go to the first two outboard clips from the center...... determining distance with the clip in the cover to hold the clip to that spot and work the cover off ( not hard) and now having the clip in place as it fit with the cover on, mark the loop holes with the sharpie, thus the other side, back and forth from side to side until you'v done them all......that is to say. do each fit/mark/drill/ in pairs & screw one then the next, that way you won't have mis-marked as you progress and the cover gets tugged one way or the other, making your previous marks wrong.....thats why I say do one at a time, jumping back and forth fron one side to the other on each marking/drilling. Heres word of Caution: Once you'v marked the clips with the sharpie and folded or let sag forward, the cover, take and move the clips as forward as you can, still inline of course with your sharpie marks, to the front-most that you can to drill the grill say between an 1/8 and a 1/4 inch back from the leading edge, really 1/8 is near perfect. The reason to get the clips as outside as you can is this: the cover will have loop-holes that corespond to the clips you have installed, and for them to fully come through the openings on the cover and the cover fit as deep onto each clip, you MUST have as much clip as possable to push through so the cord can weave through to secure the cover.....so its imperative the clips are as close to the edge as possable........... It may sound a hassel, but its not really, once you discover the location of each clip as they corespond to the cover, and then as I'v indicated mount as close to the edge as possable.....
DRILL BITS ARE size 9/64 cranemat had sucess with 5/32....no bigger, no smaller.....this size works perfect with the 'self-tapping' screws.. 9/64 and 5/32 must then be a vapors size difference, half an 'nth
 
Last edited:

cranematt

New member
29
0
0
Location
thorndike me
Excellent instructions, wish i had them two weeks ago. The tm is a little fuzzy on the install. I found that a 5/32 drill bit to be the correct size for the self tapping screws. Its also a good idea to remove the cover and take a shop vac to it to get rid of all the metal stuck to it after drilling the all the holes
 

GoHot229

Member
How right you are about the fileings, fortunatly I had a little 1x2" rectangle magnet setting right next to the drilling, or on the sides, below where I was drilling so as to catch by gravity and magnetic pull.
Heres another thought: you may want to remove the (info) plate on the left front of the grill as it may not let sufficient air through when you have the mask rolled up, of course with the flap down its moot. There is in the TM's a section on how to mount it (info plate) on the front fender.
Another thing: if your Deuce is a non-winch model it is considerably easier, no fishing the mask between the winch and radiator.................
You will see my first attempt to drill, where I discovered that I was too close to center of the grill flatbar, and how I there-after drilled outward closer to the leading edge.
You can see then that more clip is pushing through the canvas.
You can see the metal end on the lace, that tip has to be able to have enought loop room to go through the loop when the canvas is on.
Here you can see how close it is to both the winch and unseen, the radiator.
Next you can see how I drilled the Sides, you could use existing scoop holes, but it tended to pull twards the center thuss bunching. (unsightly)
Also you can see how I did the botom, however I dont believe this to be the proper intended way to do it? ....I will drill a hole on the triangular fender brace there so the spring loop can be connected and have less likelyhood of being pushed/bumped off.
As I said about the info placard, I will remove mine alltogather I believe.
Lastly, the hood spring-clamps were easier to un-bolt and fish through the canvas and re-bolt, though akward on the one bolt/nut
Mabe someone can clarify the botton spring mounting the correct way?
JUST a note: your looking at the cover and wonder what the heak holds the thing on , what goes in the clips...? Well its that flat lace that is sewn to the top canter of the cover, hence you see why the loops have to be deep enough so's that the little metal dealie will lace through..... you see now......hmm....that bottom left picture.
 

Attachments

Last edited:

cranematt

New member
29
0
0
Location
thorndike me
A magnet would be by far better than a shop vac. Now im really wishing i had seen this before i installed mine. It took me longer to clean it than it did to install
 

Carl_in_NH

Member
834
7
18
Location
Wilton NH
Thanks for posting this GoHot; I bought one of the winter front kits, and when I went to test fit it I found out how difficult it was to get the material down between the winch and the radiator. It was obvious that it should fit - because of the re-enforcement patch where the winch lever rubs against it - but I thought I might be doing something wrong because it was so tight. I aborted that attempt to install it, figuring I'd look into it later. Now you've given me the encouragment to go try again.

I'm wondering if a thin full-width piece of cardboard against the radiator might make this somewhat more easy to install - since that would protect the radiator fins while getting the cover into place, and then the cardboard could be slipped out from the top. Damaging the radiator is the only thing that worries me about the install.
 

steelandcanvas

Well-known member
6,187
85
48
Location
Southwestern Idaho
I also would like to thank GoHot for his suggestions on installing the Winter cover. My kit did not have the clips in it, nor any directions. A friend of mine gave me the clips, so I'm good to go. I believe they make another cover that is specifically for winch equipped trucks, FYI. The buddy that I got the clips from, just bought that style of cover.:-D
 

GoHot229

Member
Thanks for posting this GoHot; I bought one of the winter front kits, and when I went to test fit it I found out how difficult it was to get the material down between the winch and the radiator. It was obvious that it should fit - because of the re-enforcement patch where the winch lever rubs against it - but I thought I might be doing something wrong because it was so tight. I aborted that attempt to install it, figuring I'd look into it later. Now you've given me the encouragment to go try again.

I'm wondering if a thin full-width piece of cardboard against the radiator might make this somewhat more easy to install - since that would protect the radiator fins while getting the cover into place, and then the cardboard could be slipped out from the top. Damaging the radiator is the only thing that worries me about the install.
Exactly, exactly...... the cardboard is the perfect idea.
 
Last edited:

gimpyrobb

dumpsterlandingfromorbit!
27,785
747
113
Location
Cincy Ohio
I had done the same as Coyyotegrey, but now have the loops and springs.

Your deuce needs a cane too!? Wow what are the chances? :-D
 

ABN173

Active member
1,842
11
38
Location
FT Bragg, NC
Despite everyone saying "just search" it took me awhile to locate this thread with installation instructions/pics. It's almost Winter so figured I'd bump this useful thread!
 

Dipstick

Well-known member
1,101
1,266
113
Location
Effort PA
Just put my winter front on today. I had to replace a few missing clips. GoHot229 your pictures were invaluable. I had no idea how to put it on myself, but your pictures made it a piece of cake! Thanks!
 
Top
AdBlock Detected

We get it, advertisements are annoying!

Sure, ad-blocking software does a great job at blocking ads, but it also blocks useful features of our website like our supporting vendors. Their ads help keep Steel Soldiers going. Please consider disabling your ad blockers for the site. Thanks!

I've Disabled AdBlock
No Thanks