The crane is made by Vestil, you can get it in galvanized which I liked but I wanted to weld on it easily (without dying) and have paint be able to stick, which I have yet to do. It pivots with a one finger push even when loaded, and has a friction type locking lever built into the base.
The winch is made by Superwinch. My family has used their products for Jet Ski hoists, outdoors for 20 years, never covered once, and they still work like they are new. I just Google'd Superwinch 24V and picked one that had a free-spool lever, remote control, and a pinch over the rated capacity of the hoist. Other big names are probably good also, I just don't have experience with them so I stuck with what I knew. Purchased on eB*y new from a vendor.
I want the crane to be setup and removable without tools, so the 3 or so large bolts which hold the beams and bottle jack on will be replaced with tractor type pins of same diameter. Same reason, I mounted the winch on a piece of Telestrut which uses a locking pin, and welded the corresponding mate piece of strut to the crane arm. It still retains the crank winch mount plate if desired. I store the entire setup in my GreenLee box.
It was a balance between cost/function/weight. The Auto-Crane's are really nice that people have, but I don't have easy access to acquiring one for cheap/free. I wanted it to be easily removable for full bed usage, and even though the truck weighs 23,500lbs, and I am trying not to add too much additional weight which makes it more difficult to be city traffic cooperative. I know this sounds corny, but there are a lot of grief comments about take-off speed of an M936, unloaded! So, I want to minimize the weight increase of the additions I do. Thinking about dropping from 4 batteries down to 2, etc...
The steel bed floor flexes somewhat when the crane is loaded, so I need to add some beefy angle iron on the bottom side of the bed where the crane mount pad is, I expected this though.


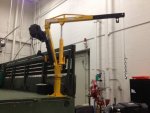 41.9 KB Views: 352
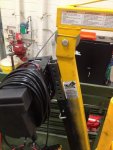 50.8 KB Views: 299
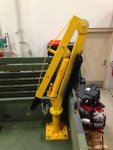 48.8 KB Views: 300


