

B-Dog
Well-known member
- 166
- 293
- 63
- Location
- Denver, CO
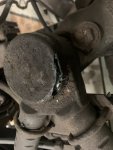
The boots on my V-links were all cracked and various stages of disintegration. I couldn't find replacement boots, only entire V-link replacements with boots of unknown condition. I contacted a couple companies about custom boots and the replies were none or too expensive. So, I made my own; approximate cost $120 + 8 hours labor. Here's a picture of the best one, I guess I didn't get a picture of the worst but imagine the boot being completely gone save for a clamp holding a ring of rubber around the outside.

Parts all sourced from McMaster:
Rubber cap for 3 1/2" OD PN 6448K115 $5.25/ea. 10 required if you replace the top covers where the V mounts to the axles - [lets call that the 'base' from here on out]
Rubber cap for 4" OD PN 6448K116 $6.40/ea. 2 required if you replace the bottom covers on the base
Pinch clamps for 3 1/2"-3 5/8" PN 52545K112 $6.22 pkg of 10. You'll need 12 clamps if you replace the top and bottom covers on the base
The rubber caps are too tall. I separated the dome and cylinder portion of the cap. A home depot HDX mixing cup worked great for this by sliding the cap over the cup and cutting along the line left from the molding process. Then using a short piece of 1 1/4" OD steel tube as a pattern, I cut a hole in the center of the dome. Filled the joint with grease and attached the dome to the joint with the pinch clamp. I allowed the dome to slide down the shaft to the smaller section and then bubble outward as pictured below. Alternatively, you could use clamps on the shaft as well (MMC PN 54285K55) but I didn't.


the caps on the top of the base are the same but without the hole in the middle of the dome. I don't think there even needs to be a cap there, it appeared to me that the joint was sealed on the top. I think you might even be able to drill and tap a hole for a grease zerk (sorry, I didn't get any pictures of what was under the cap). But alas, thinking it was silly, I packed it full of grease and put a new cap on anyway.

The bottom boots are far less elegant because I couldn't get the nut removed. I didn't have the massive tank mounted vise to hold the base and remove the nut. Even if I was able to remove the nut, I wasn't sure if the base would come off the shaft so I did the best I could and it's certainly better than the old rotted boots.
I did the same process as above but using the larger boots. I cut a 1 3/4" hole in the center of the dome and slit the dome so that it could be wrapped around the joint. The boot overlaps about 1" with some stretching and I used CA glue to hold it in place. I had to trim some of the overlapped rubber to get the clamp on. You'll need to make sure the clamp splits but the PN's listed above are that style.


Cheers,
Parts all sourced from McMaster:
Rubber cap for 3 1/2" OD PN 6448K115 $5.25/ea. 10 required if you replace the top covers where the V mounts to the axles - [lets call that the 'base' from here on out]
Rubber cap for 4" OD PN 6448K116 $6.40/ea. 2 required if you replace the bottom covers on the base
Pinch clamps for 3 1/2"-3 5/8" PN 52545K112 $6.22 pkg of 10. You'll need 12 clamps if you replace the top and bottom covers on the base
The rubber caps are too tall. I separated the dome and cylinder portion of the cap. A home depot HDX mixing cup worked great for this by sliding the cap over the cup and cutting along the line left from the molding process. Then using a short piece of 1 1/4" OD steel tube as a pattern, I cut a hole in the center of the dome. Filled the joint with grease and attached the dome to the joint with the pinch clamp. I allowed the dome to slide down the shaft to the smaller section and then bubble outward as pictured below. Alternatively, you could use clamps on the shaft as well (MMC PN 54285K55) but I didn't.
the caps on the top of the base are the same but without the hole in the middle of the dome. I don't think there even needs to be a cap there, it appeared to me that the joint was sealed on the top. I think you might even be able to drill and tap a hole for a grease zerk (sorry, I didn't get any pictures of what was under the cap). But alas, thinking it was silly, I packed it full of grease and put a new cap on anyway.
The bottom boots are far less elegant because I couldn't get the nut removed. I didn't have the massive tank mounted vise to hold the base and remove the nut. Even if I was able to remove the nut, I wasn't sure if the base would come off the shaft so I did the best I could and it's certainly better than the old rotted boots.
I did the same process as above but using the larger boots. I cut a 1 3/4" hole in the center of the dome and slit the dome so that it could be wrapped around the joint. The boot overlaps about 1" with some stretching and I used CA glue to hold it in place. I had to trim some of the overlapped rubber to get the clamp on. You'll need to make sure the clamp splits but the PN's listed above are that style.
Cheers,

")

.jpg")


.JPG")
.JPG")