• Steel Soldiers now has a few new forums, read more about it at: New Munitions Forums!

  • Microsoft MSN, Live, Hotmail, Outlook email users may not be receiving emails. We are working to resolve this issue. Please add support@steelsoldiers.com to your trusted contacts.

923A2 Cab makeover - new seats!

Buffalobwana

Well-known member
Steel Soldiers Supporter
1,394
177
63
Location
Frisco Texas
I'll keep it short and use lots of pics. That's the way I like to read them!

"Ol' Yeller" ... yeah, I know, not very original. But that's what she's called now.

So, Yellers batteries were toast (didn't take photos, this is my 923a2 in Idaho) so I removed them. Tip: hire a kid to haul these batteries out. My back hates me.
image.jpg

"Set" two group 31's in there so I can move it. Didn't strap down, because I'm not sure where they will wind up.
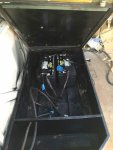
image.jpg
Woke up today and said, "let's remove everything from the cab today."
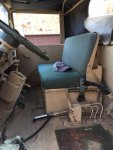
Took out drivers seat.
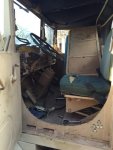
image.jpgimage.jpgimage.jpg
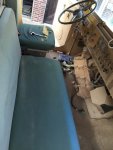
Then took out passengers bench. To be replaced with spring ride seat for passenger. Man, the crap that collects in these cabs is incredible. Found two tiny bottles of tabasco from MREs behind seat, among many other things.
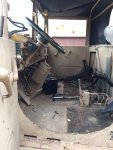
image.jpg
 

Buffalobwana

Well-known member
Steel Soldiers Supporter
1,394
177
63
Location
Frisco Texas
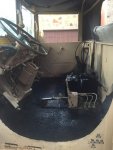
Pulled out the mat and scrubbed it clean. Got the hose, broom, huge bottle of Dawn soap and went to work on removing 25 years worth Of dust and sand that collected in all the nooks and crannies. Disconnected the two batteries so I could clean and remove seats. Left them in there so I can easily hook up and start and run the truck.
image.jpg
I was quite pleased with the condition of the floor. Some rust at the edges, but that is to be expected. I'll hit it with a handheld wire brush first to see what comes up, and use a cup wire brush on an angle grinder on difficult parts. In all, very nice cab.

I commented in another thread that I want to convert one to a double cab. Maybe this one? It's a great start. I like the truck so far. Very clean, runs great, starts immediately, drives great, no real problems that I see yet. It's a truck you use to build off of as your one "Keeper". Although, I really love the 923A2 in Idaho that we are using as our Mission 22 Truck. It is a gem! I might cry if I had to sell that one. ( www.mission22truck.org if you haven't seen it yet. Yes, I did ask permission from the moderator first about spreading the word about our non-profit fundraiser. )
 

Buffalobwana

Well-known member
Steel Soldiers Supporter
1,394
177
63
Location
Frisco Texas
So, I bought some seats from 4Wheel Parts. I tried one of the Corbeau seats. At 6'0" and 205 lbs, there was no way this one would work. Bolsters were way too narrow. Would not make it 10 miles before hip bones were bruised. They make one like this for "bigger boned" people. I may try one of those. This seat is for a 150-170lb 18 year old kid. So, I sent them back.

image.jpg

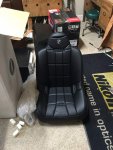
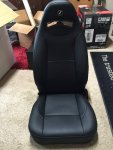
.... and bought this one. This one seems very comfortable. So, I'm in the process of mounting this one to the stock military spring seat base. If I don't like that ride, I'll get an air ride base. I don't see a huge difference in the spring base and an air ride base. The shock absorber does a great job of keeping the ride smooth.

image.jpg
 

Buffalobwana

Well-known member
Steel Soldiers Supporter
1,394
177
63
Location
Frisco Texas
I could use advice on a couple things.

1. What products have you used to touch up the bedliner that they use on the floor. I need to do some work at the edges and want to apply liner over the metal when done to protect it. You guys use the quick bedliner in a can, spray liner? Or a roll on?

2. Suggestions on replacement mat material. Since the box seat is out, and a smaller spring seat will be installed, now there is a huge hole in my floor mat. Where do you find a product that is similar to these floor mats?

Ill likely manufacture a metal box that will go in the center. On it I'll mount a seat/console. It will house the batteries and have a fold down seat/center console.

This is is the plan at least.
 

Cape Coastie

CWO4 ENG/MSS, USCG, RET.
528
124
43
Location
Sandwich, MA
Hey Buffalo, nice work you are doing. An idea I had for a floor mat replacement was a stall mat I saw at Tractor supply. Looks to be heavy duty rubber and comes in different sizes. I am sure you could custom cut it to fit the floor perfectly and give you some pretty good sound deadening and insulation. Just my idea of a replacement mat. Also considered putting them in the bed as a liner. Keep up the good work.
 

Buffalobwana

Well-known member
Steel Soldiers Supporter
1,394
177
63
Location
Frisco Texas
Hey, that's a good idea. They are heavy duty! Heavier than the 5-ton mats that go in there. They are about 5/8" or so. But, the void is a square, so I could cut a square out of the mat and drop it in the void and after some paint, nobody would complain too much!

thanks. If I don't get a perfect match to the standard mat, that might be the route I take.
 

603hellmutt

Member
272
5
18
Location
New Hampshire
I moved my batteries to the passenger side step box, pulled everything out and am in the process of applying about 120 coats of bedliner before I mount in new seats. Been looking at some mrap air ride seats
 

Buffalobwana

Well-known member
Steel Soldiers Supporter
1,394
177
63
Location
Frisco Texas
I moved my batteries to the passenger side step box, pulled everything out and am in the process of applying about 120 coats of bedliner before I mount in new seats. Been looking at some mrap air ride seats
I looked at some, actually bought some on Ebay, but the shipping wasn't quoted. Afterward, I found that shipping was more than the seats! The guy was super nice to deal with, he let me cancel. I started looking at his store and found the spring base seats that are standard in the 5 ton and bought a couple.
 

Buffalobwana

Well-known member
Steel Soldiers Supporter
1,394
177
63
Location
Frisco Texas
I also ordered a new soft top for this truck. It's green, wanted a tan one, but I'll swap out with the other truck later when I can get my hands on a tan one. I want to keep the new seats protected from the elements. And it was a huge pain to drive it with the entire front of the top flopping in the wind. Not a pleasant driving experience when the entire front seam has been ripped up.
 

603hellmutt

Member
272
5
18
Location
New Hampshire
I have applied 8 coats of bedliner as of today. When I get a free moment when I get back in town Wednesday I'll try and fab up some mounts I worry they may sit to far forward but I'll have to wait and see
 

Buffalobwana

Well-known member
Steel Soldiers Supporter
1,394
177
63
Location
Frisco Texas
I have applied 8 coats of bedliner as of today. When I get a free moment when I get back in town Wednesday I'll try and fab up some mounts I worry they may sit to far forward but I'll have to wait and see
Your seat may sit to high after all the bedliner!

Why 8? Are you trying to replicate the thickness of the mat and use it as a vibration/sound dampening media? Sounds like a good idea.
 

Buffalobwana

Well-known member
Steel Soldiers Supporter
1,394
177
63
Location
Frisco Texas
The Corbeau seats come with 3 different holes at each of the 4 sides to accommodate many jeep makes and models. I selected the holes that I thought would work the best with my base and dreamed up a few different welded together bases. All of them were viable, but most were labor intensive and I need 4.

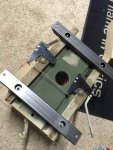
Rethunk it and came up with this. Two pieces of 1x2, cut ends at 45 deg angle, Mark all holes, say a prayer and drill. This time it worked. (step bit standing by in case they didn't.) Put mounting holes for seat 1/2" from end so you can easily access from bottom with fingers.

image.jpg

Take a 1" hole Dozer, a lot of oil and patience and bore out a hole big enough for a socket to fit (7/8" would have worked too FYI). To mount the mounts to the base.

This is time it worked out perfect. The holes for the seat are 1/8" off set to the center to accommodate a 7/16" difference in bolt pattern from the base to the seat.
 
Last edited:

Buffalobwana

Well-known member
Steel Soldiers Supporter
1,394
177
63
Location
Frisco Texas
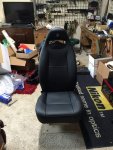
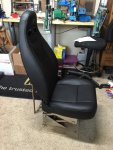
Set seat on base, try to remember which holes you are going to use (might not hurt to mark them in the future) and insert bolts. Loosely at first, then go around and tighten all of them. Lots of "moving parts" so to speak to drill 8 holes and pray they all work, but this time the tape measure didn't let me down.

image.jpgimage.jpgimage.jpg
There is not much room to recline in a 923a2 so I mounted the seat a bit forward to accommodate some recline if I wanted to give up some forward space.

I have not not put it in the truck yet, so, not sure how it will fit, but measurements show it should be ok. You really have limited space to work with in the cab. So you can't expect too much recline.

So so far in pretty pleased, but it's not in the truck yet!

sorry for the messy cave. I have the Mission 22 Truck fundraiser stuff piling up, building an adventure trailer, lots of parts and pieces stored in there and plus I'm a bit messy to start with.
 
Last edited:

srodocker

Well-known member
6,549
68
48
Location
Lacey, Washington
Buffalobwana thats exactly what I did with my spring base. Had it welded on instead, got my holes drilled for the seat and realized that the back of the seat fit in the holes but the front had the nut welded on the actual seat so I have to drill those out so I can put a bolt in there and then tighten it down. It will have to get done today as the kids and I have a truck show next weekend and need all 3 seat bases in.
 

Buffalobwana

Well-known member
Steel Soldiers Supporter
1,394
177
63
Location
Frisco Texas
Yeah, without the slider, you have a male and a female bolt/nut on opposing ends. Add the slider and you have 4 bolts sticking up.
 

Buffalobwana

Well-known member
Steel Soldiers Supporter
1,394
177
63
Location
Frisco Texas
Why drill through it? Why not use it to your advantage? Can you attach bracket to base first and then attach seat to bracket?

I guess it's hard to answer without seeing the setup.

I wouldnt try to drill through a nut. I'd just pick another place and drill new holes through base and bracket.
 
Top