• Steel Soldiers now has a few new forums, read more about it at: New Munitions Forums!

  • Microsoft MSN, Live, Hotmail, Outlook email users may not be receiving emails. We are working to resolve this issue. Please add support@steelsoldiers.com to your trusted contacts.

Addition of 1 Ton Bed Crane

74M35A2

Well-known member
4,145
330
83
Location
Livonia, MI
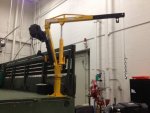
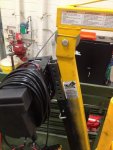
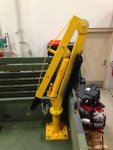
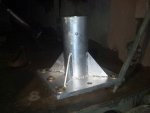
Added a pivoting bed crane. Decent unit, has a tapered roller bearing in the base. Fully removable to store away. Also used 24V winch which can be added and removed without tools. Power to be supplied via slave cable (thanks for the idea WildChild467).

Thank you for pic fix.
 

Attachments

Last edited:

VPed

Well-known member
Steel Soldiers Supporter
1,108
303
83
Location
Clint, TX
That is nice. I have been wanting that style of hoist to replace the stock spare tire davit on my truck. Where did you get the 24V winch?
 

74M35A2

Well-known member
4,145
330
83
Location
Livonia, MI
The crane is made by Vestil, you can get it in galvanized which I liked but I wanted to weld on it easily (without dying) and have paint be able to stick, which I have yet to do. It pivots with a one finger push even when loaded, and has a friction type locking lever built into the base.

The winch is made by Superwinch. My family has used their products for Jet Ski hoists, outdoors for 20 years, never covered once, and they still work like they are new. I just Google'd Superwinch 24V and picked one that had a free-spool lever, remote control, and a pinch over the rated capacity of the hoist. Other big names are probably good also, I just don't have experience with them so I stuck with what I knew. Purchased on eB*y new from a vendor.

I want the crane to be setup and removable without tools, so the 3 or so large bolts which hold the beams and bottle jack on will be replaced with tractor type pins of same diameter. Same reason, I mounted the winch on a piece of Telestrut which uses a locking pin, and welded the corresponding mate piece of strut to the crane arm. It still retains the crank winch mount plate if desired. I store the entire setup in my GreenLee box.

It was a balance between cost/function/weight. The Auto-Crane's are really nice that people have, but I don't have easy access to acquiring one for cheap/free. I wanted it to be easily removable for full bed usage, and even though the truck weighs 23,500lbs, and I am trying not to add too much additional weight which makes it more difficult to be city traffic cooperative. I know this sounds corny, but there are a lot of grief comments about take-off speed of an M936, unloaded! So, I want to minimize the weight increase of the additions I do. Thinking about dropping from 4 batteries down to 2, etc...

The steel bed floor flexes somewhat when the crane is loaded, so I need to add some beefy angle iron on the bottom side of the bed where the crane mount pad is, I expected this though.
 
Last edited:

Swamp Donkey

The Engineer
Steel Soldiers Supporter
1,450
120
63
Location
Gray, GA
I found your thread while looking for mounting ideas and since the crane I bought and mounting location will be the same as yours, I had some questions to save from reinventing the wheel. I just purchased the galvanized version and it should be here is 7-10 business days.

Did the bed require reinforcement in that spot or is it sturdy enough as it is? There is one cross member I can bolt through but that leaves one side of the plate supported only by the floor.

Any problems with it mounted in that location as far as access and clearances go?

Is the swing bearing greasable from the outside and how easy is it to remove from the mount for storage? Or is that even possible? I've already planned a cover for it to keep it out of the elements but might also want to remove it at some point without taking the base with it.

I like the winch idea but went a different route to power it up and down. I'll use the hand winch but purchased the air operated hydraulic cylinder from Harbor Freight to raise and lower the boom. It'll run off the emergency glad hand. The cylinder was only about $70 while on sale and using a coupon so I'll see how it works out.
 

MtnSnow

New member
1,466
14
0
Location
NSL, UT
Swamp Donkey,

If the crane you purchased does not come with any angle iron to use as a backing plate hit your hardware store and get some. You will want some backing plate to help spread the torque loads so you don't pull the bolts up thru the floor.
 

Rmtaunton

Well-known member
1,510
31
48
Location
Smyrna, ga
Mine just got delivered today , it is also the galvinized one , and I got a cheap 12v atv winch a battery box and a solar panel to put on top of box
 

Swamp Donkey

The Engineer
Steel Soldiers Supporter
1,450
120
63
Location
Gray, GA
Swamp Donkey,

If the crane you purchased does not come with any angle iron to use as a backing plate hit your hardware store and get some. You will want some backing plate to help spread the torque loads so you don't pull the bolts up thru the floor.

I don't think it comes with anything. I was more concerned about the floor flexing than the bolts pulling through. I have all the materials to make anything I might need. I was just curious how substantial I need to make the backing plate. I'm trying to fab everything before it gets here so I can just bolt and go.
 

Swamp Donkey

The Engineer
Steel Soldiers Supporter
1,450
120
63
Location
Gray, GA
Mine just got delivered today , it is also the galvinized one , and I got a cheap 12v atv winch a battery box and a solar panel to put on top of box
I would like to see pics of the install if you don't mind. Measurements for placement of the base from the side and tailgate with them in the raised position would be much appreciated. That's if your placing it in the back...
 

Rmtaunton

Well-known member
1,510
31
48
Location
Smyrna, ga
No problem swamp it will be next week as I am heading to camp house for a week. But I will do a write up and pictures on bracing
 

74M35A2

Well-known member
4,145
330
83
Location
Livonia, MI
I found your thread while looking for mounting ideas and since the crane I bought and mounting location will be the same as yours, I had some questions to save from reinventing the wheel. I just purchased the galvanized version and it should be here is 7-10 business days.

Did the bed require reinforcement in that spot or is it sturdy enough as it is? There is one cross member I can bolt through but that leaves one side of the plate supported only by the floor.

Any problems with it mounted in that location as far as access and clearances go?

Is the swing bearing greasable from the outside and how easy is it to remove from the mount for storage? Or is that even possible? I've already planned a cover for it to keep it out of the elements but might also want to remove it at some point without taking the base with it.

I like the winch idea but went a different route to power it up and down. I'll use the hand winch but purchased the air operated hydraulic cylinder from Harbor Freight to raise and lower the boom. It'll run off the emergency glad hand. The cylinder was only about $70 while on sale and using a coupon so I'll see how it works out.
SD, your concerns about the floor are correct. At first I just used large bolts with large washers to mount the base. Looked ok, but then when tested picking up a 4 cylinder car engine and trans, the floor does flex considerably. So, you should plan to add large angle iron on the underside, I'd go as fore and aft as each bed stringer, and then at least equal length on the width. Drill those on a drill press ahead of time to save effort.

Right rear corner works great for me, but make sure it clears your troop seats at full rotation, consider the winch and such you will have on it. My troop seats clear the base completely with the crane removed and base left installed, which is what I wanted. Obviously the troop seats have to be up to setup and use the crane. I can give you the dimension of where I mounted my base, but I am swinging a large power winch around on the back of it, so really I'd suggest you just C-clamp the base down and do a few trial, and go from there.

The tapered pivot bearing is nice, and greaseable from the outer grease fitting, but I think doing it that way will completely fill the base with grease, a big mess. I just have a light coat of oil on mine to reduce the mess, and it will never turn more than 90 degrees anyway. It is not a wheel bearing with huge load and high rotational speed. It really only needs to be kept from rusting in my opinion.

The crane is very easily removable, I keep my stored away in a box on the truck. I replaced all 4 assembly pivot bolts (not the mounting bolts) with PTO hitch type tractor pins. That way the crane can be put up and down without tools. Even my winch mount and dismounts without tools using Unistrut and pins. I power that with a slave cable, and the 30' wired winch remote is perfect for controlling it from the ground. I have a small cover that goes over the base post opening so it doesn't fill with goobers.

An air cylinder won't work. That is only 120psi x the cylinder area, and then that leveraged out against the load depending where placed. The hydraulic jack cylinder is 1000's of psi. I don't even use the cylinder on mine now that it has a power winch for up/down. A brace to hold the crane at 90 degrees or slightly higher would work just as well for me now, to replace the cylinder completely.

Hope this helps some. Ask more if unclear or I missed anything.
 
Last edited:

Swamp Donkey

The Engineer
Steel Soldiers Supporter
1,450
120
63
Location
Gray, GA
Picking a way of modifying the troop seats to keep them functional was one of the things I was undecided on. I like the way you did yours and will keep that in mind.

No problem swamp it will be next week as I am heading to camp house for a week. But I will do a write up and pictures on bracing
I'll do the same.
 

Rmtaunton

Well-known member
1,510
31
48
Location
Smyrna, ga
I think he means an air powered hydraulic cylinder which will operate the same as a normal one but hands free, and I plan on LOTS of bracing , 2000lbs with a 3 foot reach is probably 7000 at base, if not more.
 
Last edited:

Swamp Donkey

The Engineer
Steel Soldiers Supporter
1,450
120
63
Location
Gray, GA
SD, your concerns about the floor are correct. At first I just used large bolts with large washers to mount the base. Looked ok, but then when tested picking up a 4 cylinder car engine and trans, the floor does flex considerably. So, you should plan to add large angle iron on the underside, I'd go as fore and aft as each bed stringer, and then at least equal length on the width. Drill those on a drill press ahead of time to save effort.

Right rear corner works great for me, but make sure it clears your troop seats at full rotation, consider the winch and such you will have on it. My troop seats clear the base completely with the crane removed and base left installed, which is what I wanted. Obviously the troop seats have to be up to setup and use the crane. I can give you the dimension of where I mounted my base, but I am swinging a large power winch around on the back of it, so really I'd suggest you just C-clamp the base down and do a few trial, and go from there.

The tapered pivot bearing is nice, and greaseable from the outer grease fitting, but I think doing it that way will completely fill the base with grease, a big mess. I just have a light coat of oil on mine to reduce the mess, and it will never turn more than 90 degrees anyway. It is not a wheel bearing with huge load and high rotational speed. It really only needs to be kept from rusting in my opinion.

The crane is very easily removable, I keep my stored away in a box on the truck. I replaced all 4 assembly pivot bolts (not the mounting bolts) with PTO hitch type tractor pins. That way the crane can be put up and down without tools. Even my winch mount and dismounts without tools using Unistrut and pins. I power that with a slave cable, and the 30' wired winch remote is perfect for controlling it from the ground. I have a small cover that goes over the base post opening so it doesn't fill with goobers.

An air cylinder won't work. That is only 120psi x the cylinder area, and then that leveraged out against the load depending where placed. The hydraulic jack cylinder is 1000's of psi. I don't even use the cylinder on mine now that it has a power winch for up/down. A brace to hold the crane at 90 degrees or slightly higher would work just as well for me now, to replace the cylinder completely.

Hope this helps some. Ask more if unclear or I missed anything.
That's very helpful. The floor flexing was my biggest concern, and rightfully so from your experience. I'd rather only have to drill and install once, if you know what I mean.

I think he means an air powered hydraulic cylinder which will operate the same as a normal one but hands free, and I plan on LOTS of bracing , 2000lbs with a 3 foot reach is probably 7000 at base, if not more.
Yes. This is the one I got. It's rated for 8 tons which should be what's on there already. It's a replacement for their 2000# shop crane and should fit right in. The air mechanism just works the hydraulic cylinder so you don't have to pump the handle. I'll try this method as its cheap and easy. If it doesn't work as planned I'll go the winch route.

www.harborfreight.com/8-ton-long-ram-air-hydraulic-jack-94562.html
 

74M35A2

Well-known member
4,145
330
83
Location
Livonia, MI
Happy to help. I better understand you air over hydraulic cylinder now. I wanted to be able to power lift items from the ground to the bed, example being a SeaDoo, so that is why I went the winch route. Your cylinder will power lift. Check the range of motion and make sure it will lift what you want the height you desire, otherwise you should be ok.

My troop seats work as designed with the crane removed and the base present. Obviously they won't fold down with the crane erected.
 

Swamp Donkey

The Engineer
Steel Soldiers Supporter
1,450
120
63
Location
Gray, GA
Happy to help. I better understand you air over hydraulic cylinder now. I wanted to be able to power lift items from the ground to the bed, example being a SeaDoo, so that is why I went the winch route. Your cylinder will power lift. Check the range of motion and make sure it will lift what you want the height you desire, otherwise you should be ok.

My troop seats work as designed with the crane removed and the base present. Obviously they won't fold down with the crane erected.
I'm still going to end up with a winch on there. I just ran out of gift cards and the cylinder was the cheaper option for now haha. I'll end up having both on there in the end, as long as the cylinder works out.

Do you happen to have the collapsed dimensions of the top without the base? I need to start looking for a storage box. I'm going to a surplus yard tomorrow but won't have it in front of me to measure by then.
 

74M35A2

Well-known member
4,145
330
83
Location
Livonia, MI
I'm still going to end up with a winch on there. I just ran out of gift cards and the cylinder was the cheaper option for now haha. I'll end up having both on there in the end, as long as the cylinder works out.

Do you happen to have the collapsed dimensions of the top without the base? I need to start looking for a storage box. I'm going to a surplus yard tomorrow but won't have it in front of me to measure by then.
You can just use the dimensions given in the above post or off their website, as when the crane is removed from the base, it really is just as tall as it was in the base, since it goes down to the bottom of the base when seated.
 

Swamp Donkey

The Engineer
Steel Soldiers Supporter
1,450
120
63
Location
Gray, GA
My crane finally showed up. I finished installing the base last night. I'll put the rest together this evening.

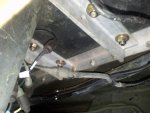
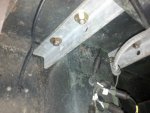
Here's some pictures of the underside bracing. Basically the floor supports have a flange that is welded to the bottom of the bed, but the flange is only on one side. The rear most support is facing correctly but the next one forward is on the wrong side. To utilize the strength of the supports for my bracing and compensate for the missing flange on one end I made a flange out of 2" x 2" x 1/8" angle and bolted it to the support. This allows both supports to carry the load and gave me a matching flange thickness on the other end.

I used some 2" x 2" x 3/8" angle to run between the supports. Grade 8 hardware was used to assemble everything. She's solid as a rock.

I'll swap in the air over hydraulic cylinder tonight, along with the wireless winch I picked up. Then it'll be time for a test run...

Forward support
IMG_20150114_022359_545.jpg

Rear support
IMG_20150114_022410_328.jpg

Finished base
IMG_20150114_022422_131.jpg
 

74M35A2

Well-known member
4,145
330
83
Location
Livonia, MI
Sweet-chuck. We'll be waiting for load test results. No picking up in-laws allowed!

I was going to pick up WildChild467 by the hole in his underwear, but I didn't need a garter belt looking BVD elastic band wound up in my new 24V crane winch.
 
Top
AdBlock Detected

We get it, advertisements are annoying!

Sure, ad-blocking software does a great job at blocking ads, but it also blocks useful features of our website like our supporting vendors. Their ads help keep Steel Soldiers going. Please consider disabling your ad blockers for the site. Thanks!

I've Disabled AdBlock
No Thanks