• Steel Soldiers now has a few new forums, read more about it at: New Munitions Forums!

  • Microsoft MSN, Live, Hotmail, Outlook email users may not be receiving emails. We are working to resolve this issue. Please add support@steelsoldiers.com to your trusted contacts.

exciter wire crossover?

sikkst9

New member
6
0
0
Location
Tunkhannock, PA
I have been working on a DCNR owned 1986 M1028, that is currently being used as a brush truck by my fire dept. I've been doing a lot of repairs, and modifications to keep it in service. However as long as I've been working on it I still can't figure out why there are two wires coming off the exciter wires, and going to a switch. They've been there as long as we've had the truck and no one has been able to tell me what they're for. Any help would be appreciated. Thank you.
 

sikkst9

New member
6
0
0
Location
Tunkhannock, PA
To clarify, wire A is spliced into the existing exciter wire on gen 1, wire B is spliced into existing exciter wire on Gen 2. Wire A, and Wire B both end at a switch on the dash. We've always been told to leave it in the off position. I'd like to just eliminate those wires and that switch if there's no good reason to have them. I've been trying to fix what somebody else chopped up for quite awhile now.
 

cucvrus

Well-known member
11,473
10,432
113
Location
Jonestown Pennsylvania
Sir can you post some pictures or where the wires come from and where they end up? Please. I could send you pictures of an un-chopped vehicle wiring harness in the same area if that would help. It's worth a try.
 

sikkst9

New member
6
0
0
Location
Tunkhannock, PA
20150406_150651.jpg20150406_150720.jpg20150406_150609.jpg20150406_150900.jpg

The two white wires around the air cleaner are my main concern. they both end on opposite sides of the switch in the dash. Gen 2 was rebuilt last year and Gen 1 is new.
 
Last edited:

Warthog

Moderator
Super Moderator
Steel Soldiers Supporter
13,774
232
63
Location
OKC, OK
Remove it. We will help you get it working correctly.

Pull the exciter plug from both alternators and take some readings.

This is what you should have
GEN1 (driver side)
red wire - 12v at all times
brown wire - 12v when the key is in the run position

GEN2 (pass side)
red wire - 24v at all times
brown wire - 24 with the key in the run position

Also post a picture of the wires on the plugs. Looks like they have been "modified" and we need to make sure they are hooked up correctly
 

Warthog

Moderator
Super Moderator
Steel Soldiers Supporter
13,774
232
63
Location
OKC, OK
For now just remove the white wire. You will want to fix the splices at a later time.
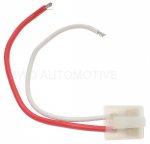
You may also want to install new plugs. ~$5 at the parts house. Red goes to red and White goes to the brown wire.

pigtail1.jpg

Okay it looks like the GEN1 circuit will be okay for now but the GEN2 circuit is not working.

Things to check:
1 - #12 24v fuse at the bottom of the fuse box
View attachment CUCV Fuse Panel.pdf

( disconnect batteries before proceding. Things may spark when taking the following items apart)
2 - Make sure the GEN2 relay is installed. It is mounted on a plate at the center bottom of the dash, above the large diagnostic plug (yours may be removed) Also on the plate is the starter relay and the voltmeter relay
3 - GEN2 diode behind the voltmeter on instrument cluster/dash cover
4 - Pull the firewall plug apart and clean all the contacts
 
Last edited:
Top
AdBlock Detected

We get it, advertisements are annoying!

Sure, ad-blocking software does a great job at blocking ads, but it also blocks useful features of our website like our supporting vendors. Their ads help keep Steel Soldiers going. Please consider disabling your ad blockers for the site. Thanks!

I've Disabled AdBlock
No Thanks