FAV engine rebuild

Mogman

Moderator
Staff member
Moderator
Steel Soldiers Supporter
3,705
4,962
113
Location
Papalote, TX
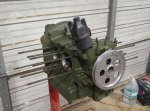
I thought I would start a thread on the engine rebuild of serial #10
So far these are the specs I have for the engine, it does not look like the original engine as I have not found any green paint on the long block so far, (there is green paint on the engine tin), only the two desert colors, the tan and that hideous salmon color that the FAV was painted last.
You could eat off of the inside, the engine appears to not have too many miles on it, would probably have run just fine but after sitting for 20 years I thought it would be prudent to at least do a refresh.
So the stated engine size of 2L is correct, at least in this case.

Bore 90MM, these are no longer manufactured but the case and heads are clearanced at 96MM for the case and 98MM for the head which means the now available 90.5 and thin wall 92MM piston/cylinder sets will fit.

Stroke 78MM, this is a modded German crank, possibly made by DPR, it clearly has the counterweights welded onto the crank, DPR has a rep for building the best cranks out there. Waiting to split the cases to see if it is marked.

Total CC 1985

Rods, Japanese made J331 clearanced for stroker,, said to be really good rods.

Cam, 260 deg @ .050",, total lift at valve .375"

Deck height 2.4MM, shim under cylinder .25MM (0.010")

Head (Brazilian casting 040) combustion chamber (taken from published data not yet confirmed) 52CC

Calculated compression ratio 8.4:1

Engine cases, Brazilian magnesium single relief clearanced for stroker and big bore cylinders.

I am waiting on some little clips that will allow me to split the cases without dropping the high side lifters, it is important to keep them in the same order they have been run in because I will likely run the original cam and lifters if they are as good as they look so far.
 
Last edited:

Mogman

Moderator
Staff member
Moderator
Steel Soldiers Supporter
3,705
4,962
113
Location
Papalote, TX
So I think I have enough information now to declare this as likely being a "depot" reconditioned engine, likely a failed FAV engine that was sent back to be reconditioned.
The first clue was the rod bearings are 1st under (.25MM) normally a rebuilt/stroked standard German forged crank would have standard rod journals seeing as they have to weld the crap out of the journal to be able to extend the stroke, why would anyone grind all that down to undersize? also the mains which do not get modified usually get turned to the first under. this crank has been turned to second under (.5MM).
But the big clue is the cases have been line bored .5MM.
Generally speaking in the VW world that is a big no no.
Not that there is some sound engineering reason just that in is difficult to do correctly and the line bored cases have a poor reputation for reliability.

I am also in communication with the cam builder Schneider as the specs they gave me do not jive with what I am measuring and it is possible that the cam was also reground.

SO...
We have a reground crank, the problem with that is the guys that originally stroked that crank hardened the journals and many times that is only about .005" of an inch deep and it is possible the crank has been ground past the hardened surface.
ADD to that the line bored case and I have two choices.

1st Choice is to build a bullet proof engine from basically scratch, cost at post COVID prices about 3-4K, dang cases are $1500, used to be $400 a decade ago.

2nd choice is just do a cheap refresh on this engine and see how well it does, cost around $500.

The main reason I did not even try and run this engine is because it sat for so long and I did not want to have something simple turn into a problem that say busted the what I perceived to be valuable cases etc,,, well that is out the window.

So if it blows up I am out just around $500, $650 if that cam turns out to be a regrind.

This engine would have run fine as is, I did not find any acidic bearing damage for example and it has very few hours on it, you could eat off of the inside.
Knock $200-250 off that refresh if I can find new rings for those 90MM pistons, one has a very minor scuff but they look like new
 
Last edited:

Mullaney

Well-known member
Supporting Vendor
6,347
15,719
113
Location
Charlotte NC
So I think I have enough information now to declare this as likely being a "depot" reconditioned engine, likely a failed FAV engine that was sent back to be reconditioned.
The first clue was the rod bearings are 1st under (.25MM) normally a rebuilt/stroked standard German forged crank would have standard rod journals seeing as they have to weld the crap out of the journal to be able to extend the stroke, why would anyone grind all that down to undersize? also the mains which do not get modified usually get turned to the first under. this crank has been turned to second under (.5MM).
But the big clue is the cases have been line bored .5MM.
Generally speaking in the VW world that is a big no no.
Not that there is some sound engineering reason just that in is difficult to do correctly and the line bored cases have a poor reputation for reliability.

I am also in communication with the cam builder Schneider as the specs they gave me do not jive with what I am measuring and it is possible that the cam was also reground.

SO...
We have a reground crank, the problem with that is the guys that originally stroked that crank hardened the journals and many times that is only about .005" of an inch deep and it is possible the crank has been ground past the hardened surface.
ADD to that the line bored case and I have two choices.

1st Choice is to build a bullet proof engine from basically scratch, cost at post COVID prices about 3-4K, dang cases are $1500, used to be $400 a decade ago.

2nd choice is just do a cheap refresh on this engine and see how well it does, cost around $500.

The main reason I did not even try and run this engine is because it sat for so long and I did not want to have something simple turn into a problem that say busted the what I perceived to be valuable cases etc,,, well that is out the window.

So if it blows up I am out just around $500, $650 if that cam turns out to be a regrind.

This engine would have run fine as is, I did not find any acidic bearing damage for example and it has very few hours on it, you could eat off of the inside.
Knock $300 off that refresh if I can find new rings for those 90MM pistons, one has a very minor scuff but they look like new
.
Well dang...
Makes you wonder why something so neat could be so fouled up.
Private Snuffy wouldn't generally be working on stuff like this.

At least - based on your latest post - I think I woud have to agree.
Put the power plant back together on the cheap and go have fun!
 

Mogman

Moderator
Staff member
Moderator
Steel Soldiers Supporter
3,705
4,962
113
Location
Papalote, TX
I have been having a conversation with Jerry Cantrell at Schneider cams, he said that Don Hatz built 200 engines for Chenowth to be used in the FAV with Schneider cams in them.

Here is the original cam specs,
272 duration 234 @ .050” ..363” lift 108 lobe center

I had heard from other sources in the SOCAL off road community that Don had built the FAV engine, I guess this puts it in the likely fact column.
200 sounds like a reasonable number of engines with spares for 120 vehicles.

However since the FAVs sent to Nevada likely served longer than the FAVs in Army service it is very likely they just sent the engine from #10 out to a local shop, I am positive a shop like Don Hatz would never have line bored a set of VW cases.

EDIT I did see some old picture of the machine shop at HATZ, they are line boring a set of cases so my first assumption about these cases may be wrong.
 
Last edited:

Mogman

Moderator
Staff member
Moderator
Steel Soldiers Supporter
3,705
4,962
113
Location
Papalote, TX
Well I got the cases together, the "lower end" if you will
I ended up using a Scat C35 cam kit, this would be a "hot street/off road" grind.
I purchased the best bearings available at this time, made in Brazil but when I started specking everything out I decided to go with the original German bearings, there was virtually no wear and they all were actually a few ten thousands of an inch "tighter"
I have been consulting with a guy that has been working and racing VW based vehicles since the 70s, mostly retired now and just bored enough to put up with my queries.
He told me that he has also re-used bearings because of the lack of quality in today's bearings, a sad thing for sure.

EDIT, I have never in my life thought I would be re-using a "plain" bearing...

It went together really nice, I also learned that one NEVER turns the crankshaft on a VW type 1 engine with the distributor removed, fortunately I learned this while dissembling the engine so it did not cost me too much.

So I have plenty to to until the tools I bought get here to make it easier to build the heads, I go to CC tomorrow and pick up the flywheel which I had ground and have much to do with the cooling tin/alt and external oil system.

Originally the engine was delivered with the aluminum parts natural, but the Army painted what they could see and because it is not a good idea to bead blast the cases and I am just too lazy to take the time to try and restore the cases to a like new state using other methods,, it got paint:confused:
 

Attachments

Last edited:

Mogman

Moderator
Staff member
Moderator
Steel Soldiers Supporter
3,705
4,962
113
Location
Papalote, TX
This weeks update...

I went through the heads and as with the rest of the engine it was obvious they had very little time on them, cleaned them up and lapped the valves and they are good to go.
The margins on the valve faces are wider than I would like but I do not have any seat grinding stones that are small enough to use in these valves so it will have to do, no doubt this is how they were set up to begin with as there was zip,zero, nada wear on the valve guides and valve faces.
IMG_20230114_130029456.jpg
So I got the top end together today.
IMG_20230115_130549659.jpg
Interesting that this engine has so few hours on it but has already been rebuilt twice seemingly supporting the assertion that these engines did not last long.
I am assuming the first "rebuild" had to do with the crank/main bearing issue as the crank had been turned and the cases line bored.
This time it had a badly scored piston and the clutch had been abused to the point the friction material on the disk had fractured.
IMG_20221214_085901331.jpg
I also have discovered as I built this engine that some modest compromises had been made.
First it used stock 040 head castings, these heads have a 52cc chamber, great for a 1600cc engine but not so good for a 2 liter engine.
The reason is the deck height of .094" was needed to keep the compression to a modest 8.4:1, Ideally for a flat top piston the deck height should be as close to .000" as possible, this allows initial combustion to take place solely in the combustion chamber which is the most efficient for this style piston.
Also the intake manifold is necked down to the original 1600cc dia. before going through the rubber couplings to the end castings, so it is sucking through a 1600cc straw.
To fix the deck height issue I would have needed to replace the heads with 64cc ones and changed the length of (replace) the rods, there was only a .010" shim under the cylinders so the deck height could only be reduced to .084" by removing them.

As it is I used .030" shims because I went from 90MM pistons to 92MM pistons and the thicker shims were needed to keep the compression ratio at around 8.4:1, if I built it without the sims I would be close to 9.0:1 which would likely require premium fuel and with all the other compromises did not seem to be worth the trouble.

So as is I would expect the stock FAV engine only made around 75HP, with better flowing heads, a better deck height and a better intake manifold it would make 100+HP

This still should push the 1600lb FAV along very nicely :)

One "improvement" I have made is in the cooling tins, when the VW engine was built for off road they removed some of the factory tin and this compromised the engine cooling especially when driving slowly as it depended on air flow under the engine, it originally just had a "deflector" mounted to the underside of the cylinders to deflect the air coming down between the cylinders to force some air across the bottom of the cylinders.
deflector.jpg
That worked OK for 52HP but when they developed the type three (fastback) and gave it a few more ponies they had heating problems so they developed the type 3 cooling tins which have been modified for off road I am installing these on this engine, it takes the air coming down between the cylinders AND the air lost by removing some of the original tin that is blown down the front and rear of the cylinders and forces it around the cylinders, supposed to be a major improvement for the off road engines.
IMG_20230115_130637200.jpg
IMG_20230115_130648753.jpg
The new alt should be here mid week, then I can get the top side tin sorted out. Until then I need to set the crankshaft end play and install the rear seal and flywheel.
 

Mogman

Moderator
Staff member
Moderator
Steel Soldiers Supporter
3,705
4,962
113
Location
Papalote, TX
Not much to report this week, I thought I was going to get the engine installed by this weekend but the pair of .013 flywheel shims I ordered turned out to measure .0115, you would think the Chicoms could at least get that right, that extra .003" of end play put it out of spec (.003-.007" end play) I was shooting for .005 and ended up with .0075" SO I ordered a pair of .0142" surly with that combination I can get close to the spec I want, should be here Tue.
The engine is starting to look like a bug engine.
IMG_20230122_134530761.jpg
And I modified a Derale combination cooler/fan and it turned out great.
IMG_20230122_140014625.jpg
IMG_20230122_140038441.jpg
I always nick name my rides, no too creative (Duramax powered Humvee becomes the DuraVee etc.) so I have come up with a nick name for the FAV.
MULLET! with the 50 cal mounted it will be all business up front and with the shiny little hot rod bug engine all party in the rear!! :cool:

OH yes almost forgot! the custom PRP seats will be here tomorrow!!
 

Mogman

Moderator
Staff member
Moderator
Steel Soldiers Supporter
3,705
4,962
113
Location
Papalote, TX
I installed the engine I did not install the push rods/rockers as I wanted to get oil pressure up a couple times before putting the lifters in contact with the cam, it has a special lube on it and the cam manufacturer recommends "very little cranking" before firing it up and going immediately to 2-3000 RPM for 30 min.

It has been probably a decade since I have built an engine up from scratch and I cannot find my special vessel that I can put oil in and pressure feed the engine to prime the oil system.
So I said heck I will just use the tap the military had on the oil filter and gravity feed in some oil, worked like a champ, I fed about 1.5QT that way, topped it off and when I hit the starter it had oil pressure in just a couple seconds.
IMG_20230127_180446780.jpg
I ran the oil pressure up for 10-15 seconds at a time several times letting the starter cool each time, then I installed the push rods and rockers, set the valve clearance and today I got set up and did the 30min@ 2-3000RPM break in!

I evidently have way too much fuel pressure for the IDF carb, I set it up with a new Chicom Weber clone while on of the original Weber's gets the kid glove treatment in CA.

So first impressions are a little skewed because of the fuel issue, it is running too rich at idle to run well.

It is not balanced as well as I hoped for, but the engine is rigidly mounted in the frame so any imbalance will be pretty obvious

It seems very "peppy" really revs up quickly for sure!

Exhaust tone is nice, not too loud or too quiet.

The only oil leak I can see is where the temporary oil gauge is installed where the oil sender will be installed.

So I am going to order a fuel regulator, I should have done that a long time ago, these carbs are very sensitive to fuel pressure.
IMG_20230130_175620134.jpg
The guys at the Skunk works in WA did a pretty slick job of tucking that muffler into the header pipes

So there you go a running engine, I will update after I get the fuel issue fixed.
 

Mogman

Moderator
Staff member
Moderator
Steel Soldiers Supporter
3,705
4,962
113
Location
Papalote, TX
Again not much to report, I had an accident in the shop that is going to pretty much side line me for the next 5-6 weeks.
I did get the wife to help me install a fuel pressure regulator today and the major fuel issues went away, motor runs nice, idles smoothly.
It is not perfect but hopefully when the "spare" Weber comes back from CA it will be perfect.
I still need to change the break in oil and readjust the valves.
I had to crack up, the break in oil says it is good for "dyno testing", "400 miles of street driving" or "one night of racing"
I should have changed the oil, filter and readjusted the valves right after the 30 min. break in run but I guess it will have to wait.
At least I can go out and run it now to occupy some of my time!

EDIT, the original fan was the smaller 36HP unit, when I re-built it I used a "Super Bug" fan which will move allot more air and it fit perfectly in the aluminum fan housing.
 
Last edited:
Top
AdBlock Detected

We get it, advertisements are annoying!

Sure, ad-blocking software does a great job at blocking ads, but it also blocks useful features of our website like our supporting vendors. Their ads help keep Steel Soldiers going. Please consider disabling your ad blockers for the site. Thanks!

I've Disabled AdBlock
No Thanks