• Steel Soldiers now has a few new forums, read more about it at: New Munitions Forums!

  • Microsoft MSN, Live, Hotmail, Outlook email users may not be receiving emails. We are working to resolve this issue. Please add support@steelsoldiers.com to your trusted contacts.

HMMWV electrical help needed

17 Legion

New member
46
1
0
Location
North Carolina
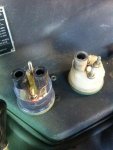
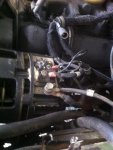
I put some new guages in the HMMWV. The old ones were hard to read especially at night so these new ones went in and I lost some of that "been in a war zone" pantina. My old voltometer guage only had one connection in use, the new one has two. I reconnected every wire correctly and still have the same "yellow" reading. The reading was the same on both old and new guages. I've never had to charge the batteries. Am I missing a connector? This reading seems low. First picture shows guages at idle engine speed. Thank you for all the help in advance.
 

Attachments

deuceaid

Banned
915
149
0
Location
Yucaipa CA
its hard to see in the picture, but I am guessing the one on the right is the old one, does it have some kind of grounding bar going from the far right terminal to the mounting screws?
 

17 Legion

New member
46
1
0
Location
North Carolina
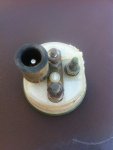
Yes. In the original post, the one on the right is the old one. Here's a better picture. Is this the way all voltmeters are wired on 24 volt military systems? How are other members guages on this board connected. Any HMMWV owners with low volt readings?
 

Attachments

jwaller

Active member
3,724
19
38
Location
Columbia, SC
I'm a v owner but never had that issue. Does your truck have the aux grounding harness? if not you need to make/install one.
Have you used a real voltmeter to check what your getting to see if it's a gauge error or an alt issue?
 

deuceaid

Banned
915
149
0
Location
Yucaipa CA
I think Your missing a ground wire.... a safe way to check would be to place a piece of wire on that bare terminal... run it out to a 24 volt light bulb, and then ground the other lead of the light bulb....... either the bulb lights up and/or the meter swings a little. (just think of it as grounding the meter,,, but the bulb acts as a current limiting safety) if you have a test light probe that you can put a 24v bulb in that would be perfect.
 

nattieleather

Well-known member
1,882
144
63
Location
Cleveland, OH
do you have the -20 manual? Read the troubleshooting section for low read on the altinator gauge and follow the steps to find the problem. If charging correctly the needle should be hitting the white line in the middle of the green section. Also the manual will show you how many wires are suppose to be going to the gauge and where that wire goes. I.e. to ground or to a voltage source etc.
 

sandcobra164

Well-known member
2,999
295
83
Location
Leesburg, GA
I noticed the temp gauge is bottomed out, my work truck drops in the yellow when the glow plugs kick back in after a cold start. It'll jump back up to green when they release and then jump back to yellow when they engage again. After all that, it'll jump just to the right of the line in the green. If the truck is not driven much and does this while warmed up, I'll check the alternator and especially the voltage regulator on top of the alternator. It's got 2 wires going to terminals on the side of it and a connector with several wires that plugs into the end of it. Be sure to get one for a HMMWV, the ones for the MRAP Caiman's, Buffulo's and the FMTV are a different NSN, they look about the same but are slightly different from what I've been told.
 

17 Legion

New member
46
1
0
Location
North Carolina
Update:

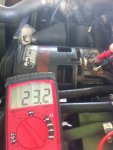
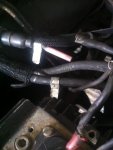
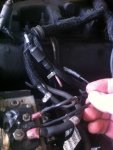
I checked the voltage at the alternator with the engine running and read the first picture. Then with the engine not running and the ingition on.
I got the same reading both times so that means the reading is for the batteries. Alternator was the taken off to be diagnosed.
 

Attachments

Warthog

Moderator
Super Moderator
Steel Soldiers Supporter
13,774
232
63
Location
OKC, OK
According to the Universal Wiring Numbering Guide, 568 is the Ignition Switch to Alternator wire.

I haven't found the HMMWV wiring diagram yet but will keep looking.
 

Attachments

Warthog

Moderator
Super Moderator
Steel Soldiers Supporter
13,774
232
63
Location
OKC, OK
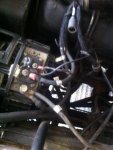
Found the wiring diagram. It is in the back of TM 9-2320-280-20-3.

Can't tell by the pictures but it looks like the loose wire is suppost to plug into the male connector.

VERIFY all the wire numbers before proceeding.
 

Attachments

Last edited:

nf6x

Feral Engineer
1,630
50
48
Location
Riverside, CA, USA
A reading of 23.2 volts while the engine is running indicates that the alternator is not charging; it'd be up around 27.6 volts if charging correctly. A broken ignition-to-alternator wire would certainly cause that symptom, so that might be your whole problem. Consult the TMs and study the pictures carefully to make sure you correctly identified both ends of the correct circuit. It looks to me like your dash voltmeter is correctly indicating a problem, which you have verified with a multimeter and visual inspection.

Good luck! I hope that the broken wire is the whole problem.
 

jwaller

Active member
3,724
19
38
Location
Columbia, SC
as others have said 568 needs to be connected and is in fact the wire we discussed on the phone. that is the wire that tells your alt it's time to start charging.
 

17 Legion

New member
46
1
0
Location
North Carolina
Warthog, and others, thank you for the reply. That's the same information I just now found. We just relocated so finding all my docs can be a challenge.
As always I knew this board and it's members would be reliable help.
I'm having the alternator rebuilt and will reinstall it later this week.
I'll post who re-built it for me after success. Maybe someone else will need alternator help in the future.
 

17 Legion

New member
46
1
0
Location
North Carolina
Well guys, I'm going to pick-up the still busted alternator. It charges without the regulator, but the guys who have it can not figure out how to get it to work with the regulator in place.
They even talked to the Prestolite rep. Still nothing.
Any ideas? I need to get this one working and not buy a new one. I'm in NC,
so any locals get their alternator rebuilt please chime in with who does it. Really helps if they work on 28 volt alt.
 

emmado22

Moderator
Super Moderator
Steel Soldiers Supporter
7,058
147
63
Location
Mid Hudson Valley NY
There has got to be some auto electrical shop around Ft Bragg that deals with these on a daily basis. Google it and then call them!
 

Army Kid

Banned
47
0
0
Location
SW
Warthog, and others, thank you for the reply. That's the same information I just now found. We just relocated so finding all my docs can be a challenge.
As always I knew this board and it's members would be reliable help.
I'm having the alternator rebuilt and will reinstall it later this week.
I'll post who re-built it for me after success. Maybe someone else will need alternator help in the future.
Just an FYI, I had the exact same issue.. volt gauge always in the yellow.
I started the truck, warmed it up, turned the headlights on, engaged the accelerator 'cruise control' handle to keep it just above idle, removed the set-screw next to the wire terminals on my prestolite alternator, plugged my Fluke meter from ground to hot, and spent about 20 mins trying to 'breathe' on the adjustment screw with my screw driver to adjust the voltage to within spec. (28V)
(Just followed the TM below) & now i'm in the green & everything is perfect.
1. Using hex-head driver, remove pipe plug (12).
2. Connect battery ground cable (para. 4-73).
3. Start engine (TM 9-2320-280-10).
4. Raise engine speed above idle.
5. Put a load on the alternator by operating driving lights (TM 9-2320-280-10).
6. Using a multimeter, check alternator (15) output voltage. Connect black test lead to ground
lead 3B (18). Connect red test lead to lead 5A (16). Output voltage should be 28 volts ± 0.5 volts. If
adjustment is required, go to step 7. If no adjustment is required, go to step 11.
7. Turn adjusting screw (17) counterclockwise to increase voltage or clockwise to decrease voltage.
8. Turn off driving lights (TM 9-2320-280-10).
9. Return engine to idle.
10. Stop engine (TM 9-2320-280-10).
11. Apply sealing compound to pipe plug (12) threads. Using hex-head driver, install pipe plug (12) and
tighten to 30-40 lb-in. (3-4 N•m).
12. Remove battery ground cable (para. 4-73).
13. Seal terminal connections using adhesive sealant.
14. Install terminal cover (7) on alternator (15) with two lockwashers (5) and screws (6).
 

Retiredwarhorses

Well-known member
Steel Soldiers Supporter
4,397
4,178
113
Location
Brentwood, Calif
As Army pointed, the adjustment to the Gen output is easy....A good way to see what going on is to take voltage measurement at the batteries first with engine off, you should have 25-26volts pos of battery one to Negative of battery 2. Start the truck and take same measurement...you should be getting 27.5 volts or so....if nothing...you have no Gen Output, if you see that you are getting Gen output but your gauge is not on the in the Green on the white line, go to the Gen,take of the wire cover off, unscrew the Hex cap, clamp your leads on the Groung lug and Pos Lug of the Gen output with your Meter, you should see the same voltage as you did at the Batteries with engine running, put a phillips head into the hole where you removed the Hex cap, slowey...and i mean slowly turn it till you see the voltage go up...have your kid or wife errr whatever sit in the cab and tell you when the needle is in line with the white line....done.
Also, the 60amp Gen is the easiest and carefree of the Generators...if you have the 100 or 200amp...get rid of them. you will need a new Gen bracket for the 60amp and rear Gen support bracket....Just MHO.
 
Last edited:
Top
AdBlock Detected

We get it, advertisements are annoying!

Sure, ad-blocking software does a great job at blocking ads, but it also blocks useful features of our website like our supporting vendors. Their ads help keep Steel Soldiers going. Please consider disabling your ad blockers for the site. Thanks!

I've Disabled AdBlock
No Thanks