


- 2,627
- 8,403
- 113
- Location
- Alexandria, La
All- I've linked Wes' video in this, but I know sometimes we don't have time to watch a video or we have limited connection, so after rebuilding my PCB today, I decided to put it in thread form:
This is assuming you've diagnosed the problem is your PCB. My symptoms were: No power to the dash, no power to the starting system. I was able to jump the truck by zip tying the fuel shutoff valve in place, disconnecting the main wiring harness from the PCB, jumping the two big wire holes together and shorting out the starter to get home.
Task: rebuild PCB
Time: approximately 1 hour
Tools needed:
Grinder
3/8" socket and combination wrench
1/2" socket and combination wrench
(Use 3/8 or smaller ratchet as the work areas are tight)
Sealant (I used "Seal All" sealant and adhesive)
An electrical protectant spray (I used "CRC Wire Dry")
4 1" 1/4"-20 bolts, nuts, flat washers and split (lock) washers.
2 24vdc constant supply solenoids (I used Cole Hersee, they are $25-$35 at O'reillys)
A couple of desiccant bags from old electronics
First, disconnect the main wiring harness from the PCB and move the washer fluid reservoir out of your way.

Then, using your 1/2 sockets, remove the 4 bolts holding the PCB to the firewall. They are tapped, so there are no backing nuts.
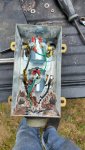
Once you have your PCB on your work bench/tail gate/work area, use your grinder to remove the 4 rivets holding the solenoids in:

Next use the 3/8" socket/combination wrench to remove the small wires and diodes from the old solenoids and use the 1/2" combination wrench to remove the larger wires.
**Note** It helps to take pictures so you can note where the diodes, wires and chassis grounds go. There are wires that were held in place with the rivets that will be held afterward by the bolts.

After that, clean out the old sealant around and use your new sealant to seal the box.

Next, reinstall your solenoids. It helps to do the bottom (starting solenoid) first then your top (ABS solenoid) second. Be sure to put your grounds where they belong on the 1" 1/4"-20 bolts under the solenoid frame. Don't tighten the the solenoid down all the way to the box until you've installed your wires and you may have to slide it back and forth to get your wrench in.
After you have installed your new solenoids, tighten the 4 box bolts, use your sealant and them and reinstall the PCB in the truck.
**Note, with the spacers behind the box, it's easiest to start with the lower left bolt so you can wiggle the box to find the thread hole.
After you reconnect the truck and siluccessfully test it, put your desiccant bags (they absorb moisture) in the PCB. Then put sealant around the edge of your PCB lid and reinstall.
Enjoy your fixed truck!

This is assuming you've diagnosed the problem is your PCB. My symptoms were: No power to the dash, no power to the starting system. I was able to jump the truck by zip tying the fuel shutoff valve in place, disconnecting the main wiring harness from the PCB, jumping the two big wire holes together and shorting out the starter to get home.
Task: rebuild PCB
Time: approximately 1 hour
Tools needed:
Grinder
3/8" socket and combination wrench
1/2" socket and combination wrench
(Use 3/8 or smaller ratchet as the work areas are tight)
Sealant (I used "Seal All" sealant and adhesive)
An electrical protectant spray (I used "CRC Wire Dry")
4 1" 1/4"-20 bolts, nuts, flat washers and split (lock) washers.
2 24vdc constant supply solenoids (I used Cole Hersee, they are $25-$35 at O'reillys)
A couple of desiccant bags from old electronics
First, disconnect the main wiring harness from the PCB and move the washer fluid reservoir out of your way.
Then, using your 1/2 sockets, remove the 4 bolts holding the PCB to the firewall. They are tapped, so there are no backing nuts.
Once you have your PCB on your work bench/tail gate/work area, use your grinder to remove the 4 rivets holding the solenoids in:
Next use the 3/8" socket/combination wrench to remove the small wires and diodes from the old solenoids and use the 1/2" combination wrench to remove the larger wires.
**Note** It helps to take pictures so you can note where the diodes, wires and chassis grounds go. There are wires that were held in place with the rivets that will be held afterward by the bolts.
After that, clean out the old sealant around and use your new sealant to seal the box.
Next, reinstall your solenoids. It helps to do the bottom (starting solenoid) first then your top (ABS solenoid) second. Be sure to put your grounds where they belong on the 1" 1/4"-20 bolts under the solenoid frame. Don't tighten the the solenoid down all the way to the box until you've installed your wires and you may have to slide it back and forth to get your wrench in.
After you have installed your new solenoids, tighten the 4 box bolts, use your sealant and them and reinstall the PCB in the truck.
**Note, with the spacers behind the box, it's easiest to start with the lower left bolt so you can wiggle the box to find the thread hole.
After you reconnect the truck and siluccessfully test it, put your desiccant bags (they absorb moisture) in the PCB. Then put sealant around the edge of your PCB lid and reinstall.
Enjoy your fixed truck!
Attachments
-
 96.9 KB Views: 22
Last edited: