• Steel Soldiers now has a few new forums, read more about it at: New Munitions Forums!

  • Microsoft MSN, Live, Hotmail, Outlook email users may not be receiving emails. We are working to resolve this issue. Please add support@steelsoldiers.com to your trusted contacts.

installing a batt. disconnect switch

Kenneth Cole

Active member
186
42
28
Location
Wapiti Wyoming
Hi
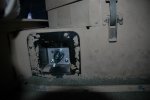
This I know is not new but I installed a disconnect switch today in my 1991 Humvee. I removed the slave connector from the passenger seat base along with its cables. Then using the connectors mounting holes made and mounted a plate to cover the hole and then drilled out the center to except the switch. Then I got 6 feet of 02 cable and terminals from a welding supply store. The switch that I used was from Jags P/N 10307. It's a beast and maybe overkill. The nice thing about this setup is the switch is recessed so you can't bump it with your foot and you can't easily see it for security.

Ken
 

Inspector 1

Active member
105
73
28
Location
Spring Texas
Could you send some clear pics of the wiring for your disconnect switch. I tried installing one on mine and evidentially had it configured wrong. When I turned switch on it blew to Kingdom Come.
Thanks...
 

sue

Active member
427
346
43
Location
tulsa OK
P.M me and we along with others are
not smart enough to post pictures.
But we have a not that noticeable
switch that was cheap and easy to
hook up.
 

Coug

Well-known member
Steel Soldiers Supporter
2,958
4,311
113
Location
Olympia/WA
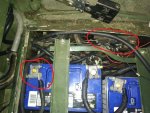
Remove the battery cable that goes from the negative terminal on the rearward battery to the negative shunt (looks like 2 blocks with multiple thin bars between it, bolted to the side of the battery box)
f53e465c3da712fb9070701192669eb876b7d23d-1 edit.jpg
(This is with 2 24 series batteries, but will be the same cable with 6t series, just find the shunt, find the cable that goes to the batteries, and remove it)
(And yes, I have a few extra cables in the box here for the BEOD I currently have on the truck)

Take battery disconnect switch, with 2 cables attached to it.

Run one cable to the shunt, the other cable to the battery negative (in other words, the two spots you just removed the battery ground cable from)

That's all there should be to it. Just make sure the new cables you installed aren't rubbing against anything, if the one connected to the battery shorts to ground it bypasses the switch and since it won't be a good connection, bad things will happen.

Could you send some clear pics of the wiring for your disconnect switch. I tried installing one on mine and evidentially had it configured wrong. When I turned switch on it blew to Kingdom Come.
Thanks...
If it blew up immediately when you turned it on without doing anything else, my guess is you managed to wire it to both a positive and negative connection.
Not shown in my picture above is there is are several isolation bolts towards the front of the battery box from the shunt. Those are positive voltage, if you hook to one of them then ground you'll definitely blow the disconnect switch.
 
Last edited:
36
13
8
Location
boise, id
Good thread. I've used similar devices on RVs and have always wired them to the ground side of the circuit. There are different schools of thought, however. If you wire it to the ground side like I do, then the switch itself is not at risk of shorting out to the chassis. For example, if you accidentally touched a piece of metal to the switch and the chassis, nothing would happen. On my RV, the battery and switch was on a storage rack and I didn't want to risk something metal touching if it was wired on the positive side.
 

Inspector 1

Active member
105
73
28
Location
Spring Texas
Remove the battery cable that goes from the negative terminal on the rearward battery to the negative shunt (looks like 2 blocks with multiple thin bars between it, bolted to the side of the battery box)
View attachment 790582
(This is with 2 24 series batteries, but will be the same cable with 6t series, just find the shunt, find the cable that goes to the batteries, and remove it)
(And yes, I have a few extra cables in the box here for the BEOD I currently have on the truck)

Take battery disconnect switch, with 2 cables attached to it.

Run one cable to the shunt, the other cable to the battery negative (in other words, the two spots you just removed the battery ground cable from)

That's all there should be to it. Just make sure the new cables you installed aren't rubbing against anything, if the one connected to the battery shorts to ground it bypasses the switch and since it won't be a good connection, bad things will happen.


If it blew up immediately when you turned it on without doing anything else, my guess is you managed to wire it to both a positive and negative connection.
Not shown in my picture above is there is are several isolation bolts towards the front of the battery box from the shunt. Those are positive voltage, if you hook to one of them then ground you'll definitely blow the disconnect switch.
Thanks for all replies and pics. Forgive me for my ignorance but you talk of a "Shunt". I'm assuming that this is the rectangular box on the inside of the battery box? If I understand you correctly I need to totally disconnect the negative cable that connects from the battery to the "Shunt". Remove that negative cable. Install the cable from the disconnect switch to the "Shunt". Install the other cable from the disconnect switch to the negative battery terminal.
Sincerely...
 

Coug

Well-known member
Steel Soldiers Supporter
2,958
4,311
113
Location
Olympia/WA
Thanks for all replies and pics. Forgive me for my ignorance but you talk of a "Shunt". I'm assuming that this is the rectangular box on the inside of the battery box? If I understand you correctly I need to totally disconnect the negative cable that connects from the battery to the "Shunt". Remove that negative cable. Install the cable from the disconnect switch to the "Shunt". Install the other cable from the disconnect switch to the negative battery terminal.
Sincerely...
Yes, that is what I am trying to say (sometimes words aren't really very good for explaining a concept, but I think we are both saying the same thing here)


f53e465c3da712fb9070701192669eb876b7d23d-2 edit.jpg
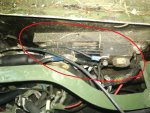
Here is a little closer picture of the Shunt. The actual nomenclature in the manual might be different, I haven't looked it up.
It's a device that measures the amount of voltage drop over a gap with known resistance (in this case all those flat bars), then the gauge is what uses that voltage drop to tell you how many amps are being either charged or discharged through that shunt.
 

Inspector 1

Active member
105
73
28
Location
Spring Texas
Yes, that is what I am trying to say (sometimes words aren't really very good for explaining a concept, but I think we are both saying the same thing here)


View attachment 790629
Here is a little closer picture of the Shunt. The actual nomenclature in the manual might be different, I haven't looked it up.
It's a device that measures the amount of voltage drop over a gap with known resistance (in this case all those flat bars), then the gauge is what uses that voltage drop to tell you how many amps are being either charged or discharged through that shunt.
Thank you!! Got it!! I will reconnect at my 1st opportunity. Thanks again for all of your help.
Sincerely...
 

Mogman

Moderator
Staff member
Moderator
Steel Soldiers Supporter
6,870
9,510
113
Location
Papalote, TX
Hi
This I know is not new but I installed a disconnect switch today in my 1991 Humvee. I removed the slave connector from the passenger seat base along with its cables. Then using the connectors mounting holes made and mounted a plate to cover the hole and then drilled out the center to except the switch. Then I got 6 feet of 02 cable and terminals from a welding supply store. The switch that I used was from Jags P/N 10307. It's a beast and maybe overkill. The nice thing about this setup is the switch is recessed so you can't bump it with your foot and you can't easily see it for security.

Ken
I am assuming you meant JEGS, not overkill at all.
It appears to be a standard battery switch, how did you recess the switch?, pics would be nice.
 

Kenneth Cole

Active member
186
42
28
Location
Wapiti Wyoming
Mogman
Hi
Yes , sorry I ment Jegs. The slave switch is located in the front of the passenger seat base. After I removed the slave connector I mounted the disconnect switch in that pocket. I had to make a plate for the switch to mount in. I hope this makes sense.
Sorry I don't know how to post pictures. If someone could help me with posting pics that would be great.
Ken
 

Coug

Well-known member
Steel Soldiers Supporter
2,958
4,311
113
Location
Olympia/WA
Mogman
Hi
Yes , sorry I ment Jegs. The slave switch is located in the front of the passenger seat base. After I removed the slave connector I mounted the disconnect switch in that pocket. I had to make a plate for the switch to mount in. I hope this makes sense.
Sorry I don't know how to post pictures. If someone could help me with posting pics that would be great.
Ken
For images you can drag the file directly to the text window, or you can use the "insert image" button (right next to the smiley face button at the top of your text input window) or press "ctrl + P" to bring up the insert image box.
 

Casasenita

New member
8
1
3
Location
Ohio
Tell me if I am correct... If you use a solargizer on your batteries and install the cutoff switch, the solargizer is taken out of the loop and is ineffective when the cutoff switch is in the off position.

I have a solargizer and would like a cutoff, but it seems counterproductive if used together.


Sent from my iPhone using Tapatalk
 

osteo16

Well-known member
Steel Soldiers Supporter
585
585
93
Location
Evansville, IN
Correct on the wiring.. always interrupt the neutral side of the power loop..that way the disconnect (switch) can never get shorted to ground.. but on a different note, will a disconnect switch hurt my ESSS in any way ? Just wondering with current being switched on and off.....

Ocho out
 

86humv

Well-known member
Steel Soldiers Supporter
1,696
498
113
Location
Texas
I put a temp cutoff switch , but left the slave plug live, so I can attach a charger without turning switch on.
 
Top
AdBlock Detected

We get it, advertisements are annoying!

Sure, ad-blocking software does a great job at blocking ads, but it also blocks useful features of our website like our supporting vendors. Their ads help keep Steel Soldiers going. Please consider disabling your ad blockers for the site. Thanks!

I've Disabled AdBlock
No Thanks