• Steel Soldiers now has a few new forums, read more about it at: New Munitions Forums!

  • Microsoft MSN, Live, Hotmail, Outlook email users may not be receiving emails. We are working to resolve this issue. Please add support@steelsoldiers.com to your trusted contacts.

M-37 "Engineer" Re-build Help

Baron3-6

New member
62
2
0
Location
KY/TN
Hi All! Just had a few questions as I am reworking a 1952 M37 W/W. I bought it from a gentleman who rebuilt the engine, but had lost interest once the block was installed. So far, I've rebuilt and installed the manifold, water pump, fuel pump, generator, etc, etc. Yes, I've got a copy of the re-build TM and -20, which are awesome.

1. Oil Pump: Priming of the pump for assembly/start up....last owner told me to submerge it in the 30WT Oil and spin it until no bubbles are seen, then install. A good friend (USMC VN Vet who owned an M-37), told me to pack it full of Vasoilene, as this would insure it picked up the oil on the first start-up and the Vasoilene would dissolve into the oil. Thoughts?

2. Finding TDC - Engine turns over freely with plugs out, its got a full coating of STP re-build compound. Haven't gotten the trick of finding TDC. Can't feel too much of a pressure change with thumb over #1 cylinder, can't see much of a height change with a dowel rod sitting in the plug hole resting on #1. I'm not sure if my pulley markings are mounted correctly either. Suggestions?

3. Finally, if any one has any pictures of M37's with Engineer units in Vietnam (or anywhere else) I'd love to see them. I plan on marking mine up as 984 EN CO (Land Clearance) in Vietnam. I've got a soft spot for that company as I served with them in Afghanistan.

Thanks!
 

Oldfart

Active member
1,063
26
38
Location
Centennial,CO
You won't get movement with a dowel in the spark plug hole. It is not centered over the piston. Over the #6 pistion there is a small plug in the head for the purpose of finding TDC. Use that with your dowel rod. #1 and #6 come to the top of the bore at the same time.
Try to feel the compression on #1 while watching the dowel come to the top in #6. When you have the engine to TDC, then install your oil pump (I use vasoline, but oil will prime it as well) so that the offset drive tang for the distributor is positioned to put the distributor rotor to the bottom left as you face the engine. That should make everything match so your plug wires and rotor positon match the TM
 

vtdeucedriver

Well-known member
2,523
38
48
Location
Vermont
I just had my oil pump out, I submerged my pump and installed it. When you get ready to start it, hit the starter without the switch on. Then give it a start and you should be ok! Now remember that your distributor is indexed with the pump. If your off a tooth on the pump then the timing will be out as well.

Vtdeucedriver@yahoo.com
Send me a e mail on the eng. Markings.
 

steelypip

Active member
769
68
28
Location
Charlottesville, VA
Providing you used assembly lube when building the engine (and a shot of oil down each plug hole), cranking with the switch off will get you oil pressure before any excitement happens. Something that really helps is to leave all the spark plugs out - that speeds up cranking and gets the oil moving around better. Once you know you got oil pressure, put the plugs in and hook up the ignition, then start.
 

Bill W

Well-known member
1,985
45
48
Location
Brooks,Ga
As oldfart stated theres a 1/8" threaded plug over #6 cyl which is there fore that purpose ( checking tdc ), when #1 is at tdc compression stroke then #6 will be at tdc of its exhaust stroke. Also remember the ( military ) dist shaft slot is offset and can only go into the oil pump one way otherwise you'll have a wobbly dist when she's running.
 

Attachments

Last edited:

Baron3-6

New member
62
2
0
Location
KY/TN
Thanks for the info guys! Did not know about the hole near #6. I am tracking the offset slot on the oil pump and dist. The guy who had it before me actually mounted the drive gear upside down on the oil pump shaft....that was a !@#$@% to get off...and when turned around the tolerance between the gear and pump body were off....finally got that fixed but opened the pin hole up slightly, I figure if a 14" pry bar and hammer cant budge it, the potential for play in the retaining pin is minimal.
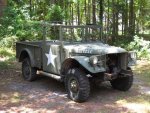
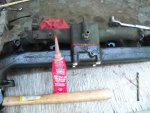
Here is a picture of her....she is great shape. Someone in the GA NG was thoughtful enough to paint her in the 70's and she has survived with minimal rust....only 2 golf ball sized holes in the battery compartment, all else is minor surface rust. Looking to have her repainted 24087 after she's road worthy.
 

Attachments

Oldfart

Active member
1,063
26
38
Location
Centennial,CO
Good looking truck. My m37 is hands down, the best truck I own. A lot of fun to drive. Good luck with it.


:ditto:

A word about pre-lubing the engine. My daughter is currently installing an M43 engine rebuilt 12 years ago by a reputable rebuilder. Given the age of the rebuild, we went the extra step of pre-filling the oil filter and making sure oil was poured into the oil galley connection so that the cam bearings would have something more than old pre-lube. We did get oil all the way to the end of the galley so we assume we got some to the oil pump as well. You might try pre-oiling the oil galley if your assembly has some time on it.
 
Last edited:

Baron3-6

New member
62
2
0
Location
KY/TN
Oldfart, the assembly has roughly 4 months on it, so I am not too worried. I am putting 5 Qts in the pan and 1qt is going to pre-soak the oil filter and fill the housing. Plan on putting some Marvel Oil down the cylinders too.

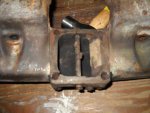
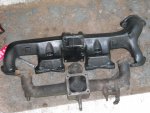
Thought I would post something I got a little creative with, not sure how it will function, but might be a solution for others too. Previous owner complained that it wouldn't start after running long periods. After looking at the manifold, I discovered the Carb heat valve was frozen in full winter position...after getting the intake away from the exhaust, I found that THERE WAS NO HEAT VALVE....so it had been running in artic mode in the GA heat creating super vapor lock (Pic #1). My exhaust manifold is not in the best of shape, and getting the frozen shaft out without messing it up totally would've been a long shot. Here's what I did.
Took the gasket for the exhaust/intake manifold and used it as a template to make "permanent summer position valve" Used the red heat rtv to seal it on both sides, and sandwiched it between the intake and exhaust (Pic 2 &3). I don't plan on driving much in the winter, so cost wise it made sense.

Thanks!
 

Attachments

Oldfart

Active member
1,063
26
38
Location
Centennial,CO
Your heat riser modification ought to work. There are actually two types of risers. The one I have seen most often on military 230 Dodge engines is a manually adjustable where you loosen a screw and move the riser deflector and tighten the screw. The other is a bimetallic spring that opens or closes depending on the heat next to the manifold. Even in GA you probably need some heat to keep carb ice from forming in the carb throat. If your modification results in some icing, it would be simple to drill a few small holes in the plate to allow some exhaust to bleed through to heat the carb.
 

vtdeucedriver

Well-known member
2,523
38
48
Location
Vermont
Old fart is exactly right!!!!! In the spring and fall here, on a initial start we will get carb ice bigtime and only until she warms up will I get the throttle to work again. Drill some holes, For you GA boy, make a restrictor plate..lol
 

Oldfart

Active member
1,063
26
38
Location
Centennial,CO
After all my talk about offset tangs on the distributor and offset slots on the oil pump, my daughters rebuild sheared the teeth off the oil pump gear about 20 minutes after the start up due to the motor shop installing a civilian oil pump. Oddly enough, the off set tang was able to index into the civilian pump. We still had the new melling oil pump box and it was clearly marked M37, but the pump did not have the offset slot. The really bad news is the camshaft oil pump drive gear was damaged in the process, so a new cam is required as well as an oil pump gear and the offset slot oil pump shaft.
 

Bill W

Well-known member
1,985
45
48
Location
Brooks,Ga
After all my talk about offset tangs on the distributor and offset slots on the oil pump, my daughters rebuild sheared the teeth off the oil pump gear about 20 minutes after the start up due to the motor shop installing a civilian oil pump. Oddly enough, the off set tang was able to index into the civilian pump. We still had the new melling oil pump box and it was clearly marked M37, but the pump did not have the offset slot. The really bad news is the camshaft oil pump drive gear was damaged in the process, so a new cam is required as well as an oil pump gear and the offset slot oil pump shaft.
Man that hurts :cry:
 

T. Highway

Well-known member
Steel Soldiers Supporter
1,229
53
48
Location
S.E. WI & S.E. TN, USA - Earth
After all my talk about offset tangs on the distributor and offset slots on the oil pump, my daughters rebuild sheared the teeth off the oil pump gear about 20 minutes after the start up due to the motor shop installing a civilian oil pump. Oddly enough, the off set tang was able to index into the civilian pump. We still had the new melling oil pump box and it was clearly marked M37, but the pump did not have the offset slot. The really bad news is the camshaft oil pump drive gear was damaged in the process, so a new cam is required as well as an oil pump gear and the offset slot oil pump shaft.
That is very odd, normally you will only wreck the offset distributor shaft and bushings with a civy pump installed. You may want to dig deeper.
 

Oldfart

Active member
1,063
26
38
Location
Centennial,CO
That is very odd, normally you will only wreck the offset distributor shaft and bushings with a civy pump installed. You may want to dig deeper.

This whole situation is odd indeed. I have done several M37 engine rebuilds including a distributor modification to make a 265 Chrysler Industrial engine fit in an M37 and look correct. I am still trying to figure out how it could have gone together. ~~~ It appears the distributor shaft at the offset tang was able to index into the oil pump slots (only one way I might add) and as it rotated, it would drag against the collar of the oil pump. This bind was once per rotation and it appears was enough to load the oil pump gear to a fail point. When I get more time, I plan on checking the oil pump collar to see if it is centered with the oil pump shaft. ~~ I have seen an M37 oil pump that sheared the oil pump gear drive pin and I would have thought that would have been the fail point rather than breaking teeth off the gear.
 

Baron3-6

New member
62
2
0
Location
KY/TN
Sorry to hear this!
One thing that concerned me when test fitting my oil pump was the fact where the hole was drilled for the pin made the distance between the gear and the oil pump body way out of spec according to the rebuild manual. Have you checked how this looked on the civilian oil pump? Or the overall length of the civilian pump body vs. military pump body? The drive gears being miss-alinged would bring things to a halt rather quickly.

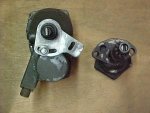
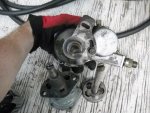
Here is a picture of my pump issues. This is after I removed the drive gear mounted on upside down. Right is the old shaft the previous owner removed...slot is definitely off-set. He installed a new shaft into the oil pump housing. Now on the left, the new shaft slot had some manufacturing burrs to it and had to be opened up. (It doesn't look off-set here, but it definitely is after being opened up). The guy I got it from was getting most of his parts from Midwest Military, so I'm not too concerned about it. I think it was more a matter of him not taking the time to read the TM and test fit things!!!
 

Attachments

Top