clinto
Moderator, wonderful human being & practicing Deuc
Staff member
Administrator
Super Moderator
Steel Soldiers Supporter
Supporting Vendor
- 12,596
- 1,129
- 113
- Location
- Athens, Ga.
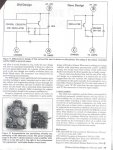
So, everyone is familiar with the standard M-series flasher relay? 2 bolts, 3 pin cannon connector, attaches to the drivers side firewall or inner fender, depending on model.
This one:
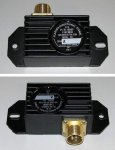
How many of you realize that the current replacements are absolutely worthless trash? Well, they are! I’ll bet in the last 5 years I’ve had to buy 30 of them. Easily 50% of the deuces I’ve gotten from GL needed one.
And the worst part is, the modern ones have a lifespan measured in months. Everyone knows I buy and refurbish trucks, mostly deuces and I keep them anywhere from 6-24 months before I sell them. I’ve had several trucks where I bought a new flasher relay when the truck came home, then before I sold the truck, had to put a new one on because the replacement died.
Certainly there will be somebody who will say “Well Clinto, I’ve never had this problem, so obviously you’re doing something wrong”.
Let me tell you-every one of these I have installed has had the mounting surface cleaned with a wire wheel and new, correct, mil-spec, hardened star washers used to ensure a good ground. The pins in the cannon connector are cleaned and dielectric grease used. The bolts/screws/nuts/washers cleaned with a wire wheel as well. So it’s nothing I’m doing.
Maybe it’s load related! Hogwash-several of these trucks have never had their 4 way flashers engaged and several of them never had a trailer hooked to them. You’re going to tell me the load of 2 turn signal bulbs is enough to kill one?
So at the end of the day, I think it’s safe to say they suck. Like everything else in this Country, corporate America has figured out how to make things cost 10 times as much as they used to while simultaneously lasting 10 times shorter than they used to. I’ve owned lots of Sixties cars that had their original flashers still in them. Good luck buying any flasher relay today that will last 30 or 40 years.
Now, if they were $5 or $10, it wouldn’t be the end of the day. But about the cheapest I can buy them regularly is $45 shipped and you have to wait a week for it to show up.
Why am I babbling about all this?
I sold a deuce the other day I’ve had for about 2 years. And when I bought it, it needed a relay, so I put a new one in it. And literally, the morning the guy is coming to look at it-I get in it and it has no turn signals. So I stole the one off my personal truck, HQ43, an ’87 M35A2C and put it on the truck for sale. This left my personal truck with no flasher and I really didn’t want to put a crappy repro on it that would die in a few months.
So I started trying to find an alternative. As with all of my modifications, there were several parameters that had to be met before I could continue:
The modification had to improve the vehicle significantly enough that it was worth doing. I like my stuff factory correct, whether it’s a Road Runner or a Deuce, so in order to modify it, it has to fix a really glaring problem or create an enormous payoff.
The modification has to be completely undoable-anyone who has owned a Sixties musclecar knows what I am talking about-having to plug weld a hundred holes in the firewall that Johnny Redneck drilled for aftermarket gauges, choke cables, beer drains, smoke exits, whatever. So I try to never modify a factory wiring harness and I try to never drill holes or weld on a vehicle. So the stock cannon connector had to stay and preferably no holes be drilled in the inner fender.
The modification has to be reasonably priced-if the factory relays are $50 and the new one is $500, you might as well keep buying the factory one.
With all that in mind, I went off to see what others had done. I found other people on the forum who had already come up with a good solution, so I basically stole their idea and refined it.
http://www.steelsoldiers.com/showthread.php?132184-Economical-turn-signal-flasher-repair-option was a great help and on the M35A2 Facebook page, some users shared their pictures of their solutions.
Once I had these, I had to decide if I wanted to carefully remove the sealer from the factory relay and install a civvy flasher in there and then I needed to decide if I did it this way if I wanted to “re-seal” the new one or leave it in there. Alternatively, I could purchase or fabricate a new “casing” for the civvy relay and remove the cannon connector from the factory case and install it on the new housing.
Once I spent all afternoon trying to remove the nuclear sarcophagus grade sealer from the factory case, the amount of Heineken I had to drink to calm me down enough to not want to hunt down everyone ever involved in the factory relay design and kill them all brought work to a screeching and stumbling halt. The next day, I decided a new case was in order because leaving the factory case on my truck might be a psychological trigger and I don’t want to deal with that.
So off to Home Despot to see what they’ve got. I take the old relay housing to match up dimensions. I had an idea of using a gangbox because it was plastic (wouldn’t rust), it would be water tight and it would be cheap. And I find that this standard gangbox mounting hole dimensions line up with the factory relay!

So I am thinking I am a clever dude. More on this later.
So, got my gangbox and cover, went to Napa and ordered an EG23 relay, got a generic 3 pole headlight connector (NAPA 787100) and started. In testing the EG23 3-pole relay, I released the smoke monster. Not sure if I had it hooked up wrong or if it was defective.
So I ordered the EG22, which is a 2 pole relay. It is nice that it doesn’t have a ground, so the issues of potentially bad grounding are out of play. EG22 simply has power in and flashing power out. I read somewhere it isn't polarity sensitive as well. Haven't tested that myself.
So, the actual job:
Parts list:
Gangbox
NAPA 787100 headlight connector
Tridon EG22 or EG23 relay
Screws to attach cannon connector to gangbox
Solder, heat shrink tubing
Heineken, Guinness or similar moderate quality beer
Procedure:
Ultimately, the cannon connector from the relay needs to be installed in the gangbox. If you can’t find one to buy somewhere, you’ll need to remove yours. You have to get the connector with it’s 3 pins out of the relay housing. I tried both the cheesy “Mapp gas” type torch and my Oxygen/Acetylene torch and neither melted the sealer, so it’s a drill, a flat blade screwdriver and patience. Once you’ve got the connector out, it will look like this:


Luckily, the one thing the manufacturer did right was soldering the wires to the 3 pins, so heat them up and remove the existing wires.


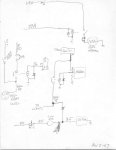
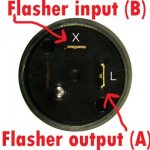
The 3 pins in the connector are A, B and C. C is circuit 90, the ground. If you’re using the EG22 relay, you can leave this one open. B is the flasher input (solid power) and A is the flasher output (flashing power). So you’ll need to connect the B pin to the X terminal on the EG22 and the A pin to the L terminal on the EG22. The circuit letters are molded into the rubber and can be very hard to read, so I have applied my phenomenal photoshop skills in an effort to help you identify which circuit is which.

I soldered the wire ends of the NAPA headlight connector onto the pins, then added shrink wrap. The pins pull out of the back of the cannon connector, so you can do this easily on a workbench.


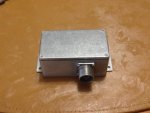
You also need to mount the cannon connector to the gangbox. I cut the connector off the end of the gangbox, opened it up just a hair with a deburring tool on a drill and attached the connector here.


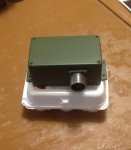
Here's where I screwed up. I hadn’t anticipated the connector mounting on the end wouldn't fit behind the rear fender brace. After I had built the first box, I tried every way to mount it but it just wouldn't clear. I decided to build an adapter, a mounting plate that would mount in the stock holes on the inner fender that would allow the box to move over enough to make room for the connector. I finally gave up on an adapter plate and bought another gangbox.
The last of the how-to is in post #2 to make room for pictures.
This one:

How many of you realize that the current replacements are absolutely worthless trash? Well, they are! I’ll bet in the last 5 years I’ve had to buy 30 of them. Easily 50% of the deuces I’ve gotten from GL needed one.
And the worst part is, the modern ones have a lifespan measured in months. Everyone knows I buy and refurbish trucks, mostly deuces and I keep them anywhere from 6-24 months before I sell them. I’ve had several trucks where I bought a new flasher relay when the truck came home, then before I sold the truck, had to put a new one on because the replacement died.
Certainly there will be somebody who will say “Well Clinto, I’ve never had this problem, so obviously you’re doing something wrong”.
Let me tell you-every one of these I have installed has had the mounting surface cleaned with a wire wheel and new, correct, mil-spec, hardened star washers used to ensure a good ground. The pins in the cannon connector are cleaned and dielectric grease used. The bolts/screws/nuts/washers cleaned with a wire wheel as well. So it’s nothing I’m doing.
Maybe it’s load related! Hogwash-several of these trucks have never had their 4 way flashers engaged and several of them never had a trailer hooked to them. You’re going to tell me the load of 2 turn signal bulbs is enough to kill one?
So at the end of the day, I think it’s safe to say they suck. Like everything else in this Country, corporate America has figured out how to make things cost 10 times as much as they used to while simultaneously lasting 10 times shorter than they used to. I’ve owned lots of Sixties cars that had their original flashers still in them. Good luck buying any flasher relay today that will last 30 or 40 years.
Now, if they were $5 or $10, it wouldn’t be the end of the day. But about the cheapest I can buy them regularly is $45 shipped and you have to wait a week for it to show up.
Why am I babbling about all this?
I sold a deuce the other day I’ve had for about 2 years. And when I bought it, it needed a relay, so I put a new one in it. And literally, the morning the guy is coming to look at it-I get in it and it has no turn signals. So I stole the one off my personal truck, HQ43, an ’87 M35A2C and put it on the truck for sale. This left my personal truck with no flasher and I really didn’t want to put a crappy repro on it that would die in a few months.
So I started trying to find an alternative. As with all of my modifications, there were several parameters that had to be met before I could continue:
The modification had to improve the vehicle significantly enough that it was worth doing. I like my stuff factory correct, whether it’s a Road Runner or a Deuce, so in order to modify it, it has to fix a really glaring problem or create an enormous payoff.
The modification has to be completely undoable-anyone who has owned a Sixties musclecar knows what I am talking about-having to plug weld a hundred holes in the firewall that Johnny Redneck drilled for aftermarket gauges, choke cables, beer drains, smoke exits, whatever. So I try to never modify a factory wiring harness and I try to never drill holes or weld on a vehicle. So the stock cannon connector had to stay and preferably no holes be drilled in the inner fender.
The modification has to be reasonably priced-if the factory relays are $50 and the new one is $500, you might as well keep buying the factory one.
With all that in mind, I went off to see what others had done. I found other people on the forum who had already come up with a good solution, so I basically stole their idea and refined it.
http://www.steelsoldiers.com/showthread.php?132184-Economical-turn-signal-flasher-repair-option was a great help and on the M35A2 Facebook page, some users shared their pictures of their solutions.
Once I had these, I had to decide if I wanted to carefully remove the sealer from the factory relay and install a civvy flasher in there and then I needed to decide if I did it this way if I wanted to “re-seal” the new one or leave it in there. Alternatively, I could purchase or fabricate a new “casing” for the civvy relay and remove the cannon connector from the factory case and install it on the new housing.
Once I spent all afternoon trying to remove the nuclear sarcophagus grade sealer from the factory case, the amount of Heineken I had to drink to calm me down enough to not want to hunt down everyone ever involved in the factory relay design and kill them all brought work to a screeching and stumbling halt. The next day, I decided a new case was in order because leaving the factory case on my truck might be a psychological trigger and I don’t want to deal with that.
So off to Home Despot to see what they’ve got. I take the old relay housing to match up dimensions. I had an idea of using a gangbox because it was plastic (wouldn’t rust), it would be water tight and it would be cheap. And I find that this standard gangbox mounting hole dimensions line up with the factory relay!

So I am thinking I am a clever dude. More on this later.
So, got my gangbox and cover, went to Napa and ordered an EG23 relay, got a generic 3 pole headlight connector (NAPA 787100) and started. In testing the EG23 3-pole relay, I released the smoke monster. Not sure if I had it hooked up wrong or if it was defective.
So I ordered the EG22, which is a 2 pole relay. It is nice that it doesn’t have a ground, so the issues of potentially bad grounding are out of play. EG22 simply has power in and flashing power out. I read somewhere it isn't polarity sensitive as well. Haven't tested that myself.
So, the actual job:
Parts list:
Gangbox
NAPA 787100 headlight connector
Tridon EG22 or EG23 relay
Screws to attach cannon connector to gangbox
Solder, heat shrink tubing
Heineken, Guinness or similar moderate quality beer
Procedure:
Ultimately, the cannon connector from the relay needs to be installed in the gangbox. If you can’t find one to buy somewhere, you’ll need to remove yours. You have to get the connector with it’s 3 pins out of the relay housing. I tried both the cheesy “Mapp gas” type torch and my Oxygen/Acetylene torch and neither melted the sealer, so it’s a drill, a flat blade screwdriver and patience. Once you’ve got the connector out, it will look like this:


Luckily, the one thing the manufacturer did right was soldering the wires to the 3 pins, so heat them up and remove the existing wires.


The 3 pins in the connector are A, B and C. C is circuit 90, the ground. If you’re using the EG22 relay, you can leave this one open. B is the flasher input (solid power) and A is the flasher output (flashing power). So you’ll need to connect the B pin to the X terminal on the EG22 and the A pin to the L terminal on the EG22. The circuit letters are molded into the rubber and can be very hard to read, so I have applied my phenomenal photoshop skills in an effort to help you identify which circuit is which.


I soldered the wire ends of the NAPA headlight connector onto the pins, then added shrink wrap. The pins pull out of the back of the cannon connector, so you can do this easily on a workbench.


You also need to mount the cannon connector to the gangbox. I cut the connector off the end of the gangbox, opened it up just a hair with a deburring tool on a drill and attached the connector here.


Here's where I screwed up. I hadn’t anticipated the connector mounting on the end wouldn't fit behind the rear fender brace. After I had built the first box, I tried every way to mount it but it just wouldn't clear. I decided to build an adapter, a mounting plate that would mount in the stock holes on the inner fender that would allow the box to move over enough to make room for the connector. I finally gave up on an adapter plate and bought another gangbox.
The last of the how-to is in post #2 to make room for pictures.
Attachments
-
32.4 KB Views: 222
-
28.3 KB Views: 217
-
34.1 KB Views: 244
-
26.3 KB Views: 200


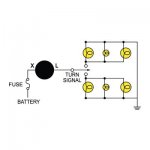


 ). Approximately 100 miles when we went to the BBQ Saturday with Andy3 and the guys. Pulling Dave's equipment trailer with my 24-12 GI adapter and going through a lot of traffic and a lot of turns, no problems whatsoever.