

- 1,957
- 417
- 68
- Location
- Culver City, CA
This past week and ending on Sunday I embarked on a fuel tank cleaning and replacement project on my M818. Last September I installed an under bed tool box replacing the left side fuel tank rendering the tank surplus.
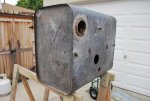
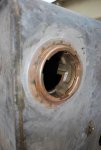
After some thought I decided to take the extra tank to a radiator shop and have the tank stripped and cleaned out. They had it for about three days. All paint and rust was removed. The areas around the filler hole, return line fitting and breather lines were all soldered. One small pin hole where the frame bracket rusted the tank was also soldered.
The tank was gray primered and repainted 686 Sand. The filler cap was cleaned of rust, gray primered, painted 686 Sand and fitted with a new rubber seal. The fill strainer screen was ripped so I swapped the two out. The mounting straps were lightly sanded, primed and repainted. I also replaced all the felt cushioning on the straps with new adhesive-back felt to include new brass split rivets all ordered from McMaster-Carr. New rubber coated tubing clamps were installed on the breather tubes.
A note about the brass return line 90-degree fitting: be careful removing or repositioning this fitting. I mashed one all up with the wrench jaw. Luckily I had two. I used a 15" crescent wrench the second time around to turn the fitting. The end of the jaw extended beyond the fitting eliminating to much pressure on the soft metal.
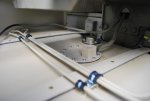
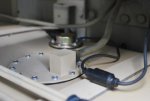
The vent/pick-up tube was removed, cleaned and repainted. I purchased a B/N sending unit from Erik's. The vent/pick-up tube and sending unit were reinstalled with new rubber seals (custom cut) and stainless steel screws and lock washers. I attached a grounding wire with a quick disconnect to the sending unit that I bolted directly to the frame to eliminate any grounding issues.
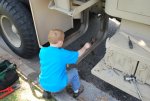
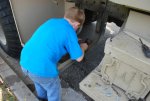
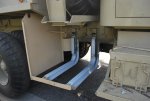
The "old" tank was drained of fuel (saved) and removed. With help from my Soldier B, Spencer, I removed the old felt from the frame brackets. The brackets were scraped and lightly wire brushed to remove felt residue and rust. I spot primed and painted the brackets to help keep rust from forming in the future. New felt was installed on the bracket using the adhesive only.
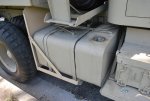
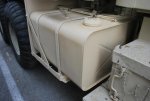
The tank was reinstalled by connecting return line, supply line, breather tubes and mounting straps in that order. I did use new grade 5 bolts and lock nuts to connect straps to the frame.
I started to fill the tank and discovered the drain plug was leaking. I grabbed my second plug and washer wrapped it with yellow pipe thread tape and installed. No more leak. The tank was then filled with the saved fuel. I cranked up the truck and it came to life right away with no priming necessary.
After some thought I decided to take the extra tank to a radiator shop and have the tank stripped and cleaned out. They had it for about three days. All paint and rust was removed. The areas around the filler hole, return line fitting and breather lines were all soldered. One small pin hole where the frame bracket rusted the tank was also soldered.
The tank was gray primered and repainted 686 Sand. The filler cap was cleaned of rust, gray primered, painted 686 Sand and fitted with a new rubber seal. The fill strainer screen was ripped so I swapped the two out. The mounting straps were lightly sanded, primed and repainted. I also replaced all the felt cushioning on the straps with new adhesive-back felt to include new brass split rivets all ordered from McMaster-Carr. New rubber coated tubing clamps were installed on the breather tubes.
A note about the brass return line 90-degree fitting: be careful removing or repositioning this fitting. I mashed one all up with the wrench jaw. Luckily I had two. I used a 15" crescent wrench the second time around to turn the fitting. The end of the jaw extended beyond the fitting eliminating to much pressure on the soft metal.
The vent/pick-up tube was removed, cleaned and repainted. I purchased a B/N sending unit from Erik's. The vent/pick-up tube and sending unit were reinstalled with new rubber seals (custom cut) and stainless steel screws and lock washers. I attached a grounding wire with a quick disconnect to the sending unit that I bolted directly to the frame to eliminate any grounding issues.
The "old" tank was drained of fuel (saved) and removed. With help from my Soldier B, Spencer, I removed the old felt from the frame brackets. The brackets were scraped and lightly wire brushed to remove felt residue and rust. I spot primed and painted the brackets to help keep rust from forming in the future. New felt was installed on the bracket using the adhesive only.
The tank was reinstalled by connecting return line, supply line, breather tubes and mounting straps in that order. I did use new grade 5 bolts and lock nuts to connect straps to the frame.
I started to fill the tank and discovered the drain plug was leaking. I grabbed my second plug and washer wrapped it with yellow pipe thread tape and installed. No more leak. The tank was then filled with the saved fuel. I cranked up the truck and it came to life right away with no priming necessary.
Attachments
-
 57.7 KB Views: 40
 -
 43.7 KB Views: 37
 -
 56.7 KB Views: 36
 -
 63.2 KB Views: 37
 -
 56.1 KB Views: 34
 -
 69.6 KB Views: 39
 -
 48.9 KB Views: 38
 -
 46.1 KB Views: 42
 -
 32.5 KB Views: 37
 -
 31 KB Views: 37

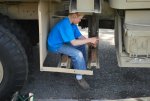
") . The little guy jumped right in and got to work. He loves getting dirty working on "his" truck.
. The little guy jumped right in and got to work. He loves getting dirty working on "his" truck.