• Steel Soldiers now has a few new forums, read more about it at: New Munitions Forums!

  • Microsoft MSN, Live, Hotmail, Outlook email users may not be receiving emails. We are working to resolve this issue. Please add support@steelsoldiers.com to your trusted contacts.


M818 w/ bed taillight relocation

MyothersanM1

19K M1 Armor Crewman
Steel Soldiers Supporter
1,954
401
68
Location
Culver City, CA
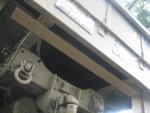
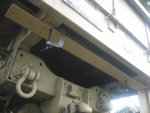
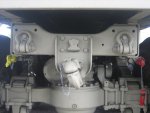
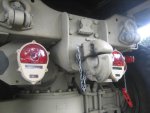
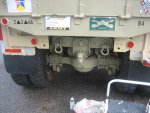
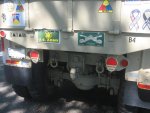
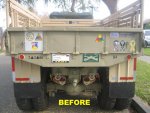
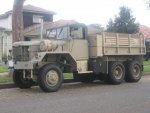
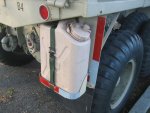
Since purchasing my truck, I haven’t been satisfied with the location of the taillights. My truck is an M818 with a sectioned Deuce bed. It’s original configuration as a tractor places the taillights low on the rear frame crossmember, which is fine for a bobtailed tractor. However, the Deuce bed installed with a modest overhang off the rear crossmember, I find the lights a little to hidden and low in this original location to be readily visible.

Safety being paramount and my extreme distrust of these “head-up-the-@$$” Los Angeles drivers, I pondered many new locations and mounting systems to relocate the lights to a higher and more visible spot. I also decided this would be a good time to install a custom lighted license bracket. I will chronicle the fabrication and installation of this project here in this thread.

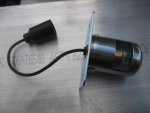
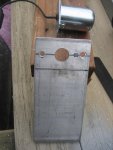
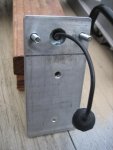
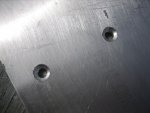
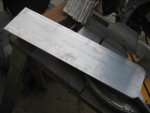
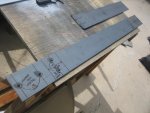
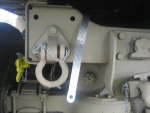
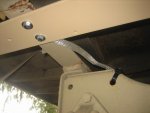
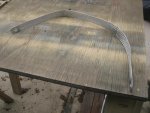
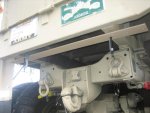
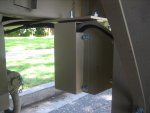
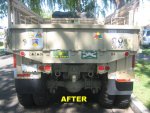
My decision was to mount a piece of flat bar steel to the 14 ½” overhanging rear cargo bed frame rails. I would remove the existing taillight/reflector brackets and remount them to the flat bar steel bracket higher and wider far added visibility. I chose ¼” X 4” flat bar hot rolled steel, purchasing 6 ft. just to make sure I had enough, for the new mounting plate.

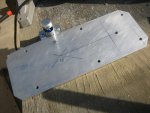
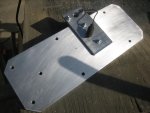
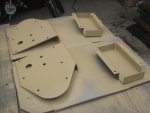
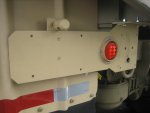
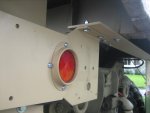
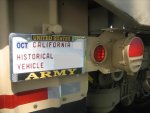
I originally intended to mount the license on the left/rear mudguard. I decided instead to fabricate an aluminum bracket to attach behind the rounded reflector outcropping on the M818 style taillight bracket. I went with ¼”Thick X 6”W x 24”L 6061-T6 bare rectangle extruded aluminum. The 6” width would fit a license plate perfectly.

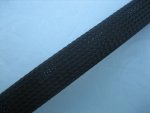
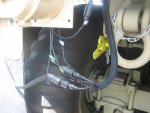
Other materials included 50 ft. of Prestolite 14AWG wire, a two foot grounding strap, 10 ft. of ½” mesh sleeving, a bunch of 3/8” and ¼” nuts, screws, bolts and washers, a couple bags (10 count) of male and female rubber shell connectors, one “Y” connector and a Grote 60151 license plate light.
 

MyothersanM1

19K M1 Armor Crewman
Steel Soldiers Supporter
1,954
401
68
Location
Culver City, CA
License Plate Bracket

License Plate Bracket

I cut and drilled out the license pate bracket using an actual license plate as a template. I allowed for 3 ½-4” over for mounting to the taillight bracket. Holes were drilled at he opposite end for mounting to the taillight bracket. The corners were mitered, ground and wire brushed to eliminate sharp edges.

I cut a slice of the aluminum to the width (2 3/4”) of the license plate light to be the light holder. The light holder was drilled out for light mounting and for license plate mounting. The mounting holes for the light bracket on the plate bracket were counter sunk for flush mounting with ¼” flat head machine screws and nuts. Everything was assembled and checked for ground.

All holes were drilled out for 1/4" machine screws.

All the parts were lightly sanded with fine grit sandpaper, assembled, primed and painted with Gillespie 686 Sand.
 

Attachments

Last edited:

MyothersanM1

19K M1 Armor Crewman
Steel Soldiers Supporter
1,954
401
68
Location
Culver City, CA
Taillight Bracket Mounting Plate

Taillight Bracket Mounting Plate

I took measurements from the bed frame and taillight brackets then transferred them to the flat bar steel. Bed frame and taillight brackets mounting holes were marked and drilled out for 3/8” bolts. The mounting plate was then cut down to its final length, 45 ½”, based on the above measurements. The mounting plate was sanded, primed and painted with Gillespie 686 Sand.
 

Attachments

MyothersanM1

19K M1 Armor Crewman
Steel Soldiers Supporter
1,954
401
68
Location
Culver City, CA
Taillight Removal and New Mounting Prep

Taillight Removal and New Mounting Prep

The existing taillight brackets were removed from the rear crossmember and all electrical connections were disconnected. I disassembled the lights and brackets. I prepped the brackets and wire junction boxes and gave them a fresh coat of 686 Sand. The new taillight mounting plate was C-clamped to the bed frame rails and mounting holes were marked for drilling. I removed the plate and bored out the mounting holes for 3/8” bolts.

I bolted a two-foot grounding strap from the original taillight location on the rear crossmember to the new mounting plate bolts on the bed frame rail. The strap was also zip tied to the rear crossmember. The ground strap is probably redundant, but I just want to make sure I had a solid yet flexible ground.
 

Attachments

Last edited:

MyothersanM1

19K M1 Armor Crewman
Steel Soldiers Supporter
1,954
401
68
Location
Culver City, CA
Remounting Taillights and License Plate Bracket Install

Remounting Taillights and License Plate Bracket Install

The left taillight bracket and license plate bracket were pre-assembled with ¼” machine screws using the reflector mounting holes and an additional hole I drilled for added support. Both left and right brackets were installed to their new location on the mounting plate.
 

Attachments

MyothersanM1

19K M1 Armor Crewman
Steel Soldiers Supporter
1,954
401
68
Location
Culver City, CA
Taillights Reinstalled, Wired and License Plate Attachment

Taillights Reinstalled, Wired and License Plate Attachment

I was originally going to use my existing taillights for this project. I then found some brand new Grote LED taillights with buckets for $25 a piece on eBay. This did not change my design, but was an added plus. The new taillights and their grounding leads were attached to the their brackets.

I had pre-wired new Prestolite 14 gauge wire leads with male shell connectors. The female shell connectors on the existing wire harness had dry-rotted so they were all replaced. The wire leads were all connected, pushed up inside the rear crossmember and covered with ½” braided sleeving. Both sets of leads were attached to the mounting plate using ½” rubber coated wire clamps.

Female shell connectors were attached to the new wires. The left rear taillight service drive marker light lead (#21) was changed to a female shell connector. The maker light lead and the wiring harness lead were connected with a shell connector “Y” adapter. The other side of the “Y” adapter was left open to connect the lead for the license plat light. Service drive and blackout marker/drive were all tasted for proper operation.

A lead was wired from the license plate light using female shell connectors at both ends and covered in ½” sleeving. This lead was connected to the open side of the “Y” adapter. After all leads were connected and tested, all hanging wires and connectors were neatly packed into the repainted wire junction boxes. The boxes were reattached to the taillight brackets using ¼” bolts. Last, but not least, the license plate and my U.S. Army frame were affixed to the license plate bracket. Done.
 

Attachments

MyothersanM1

19K M1 Armor Crewman
Steel Soldiers Supporter
1,954
401
68
Location
Culver City, CA
The project was fairly easy to complete. The hard part was coming up with the mounting design. I had several different mental visions of how I wanted to accomplish this job. Some were going to be a bit more difficult than others.

All in all, I like the way it turned out and the improved visibility will lend itself to better safety on the road.
 

Attachments

Yohan

New member
266
0
0
Location
NY
That looks really good and thanks for posting the mod. Would you care to post a side view of your truck and would you happen to remember how much length was taken off your Deuce bed? TIA
 

AZDeuce

Active member
484
38
28
Location
Tonopah, AZ
Nice job, I did a similar modification on my old M52A2, but I put my tail lights a little further to the outside, and then took some old take off Deuce bumperettes, cut them, and welded them to some flat steel plate that I had drilled to allow the removal/installation of those rear shackles, and then using longer bolts, used the shackle brackets/bolts to hold my bumperettes in place, it made the truck look more G.I.

Plus it's just something else an errant civilian driver has to get through to hurt your truck.
 

pmramsey

Active member
457
182
43
Location
VA
Nice job...I am still working on the details of mine and your work is an inspiration.
 

MyothersanM1

19K M1 Armor Crewman
Steel Soldiers Supporter
1,954
401
68
Location
Culver City, CA
That looks really good and thanks for posting the mod. Would you care to post a side view of your truck and would you happen to remember how much length was taken off your Deuce bed? TIA
Approximately two feet was sectioned out from the rear. The tailgate portion was cut off and the two feet was taken from the bed then the tailgate was re-welded.

Ask and you shall receive...Below is the most recent side shot of my truck, but prior to the taillight job.
 

Attachments

Last edited:

Danger Ranger

New member
2,253
23
0
Location
Roland, IA
Wow, great documentation, and I really do like the look afterwards. I originally thought they looked good before, but the after really cleans up the rear end and makes it all stand out. Thankyou.
 

MyothersanM1

19K M1 Armor Crewman
Steel Soldiers Supporter
1,954
401
68
Location
Culver City, CA
Nice job, I did a similar modification on my old M52A2, but I put my tail lights a little further to the outside, and then took some old take off Deuce bumperettes, cut them, and welded them to some flat steel plate that I had drilled to allow the removal/installation of those rear shackles, and then using longer bolts, used the shackle brackets/bolts to hold my bumperettes in place, it made the truck look more G.I.

Plus it's just something else an errant civilian driver has to get through to hurt your truck.
I'd really like to extend the rear crossmember out or bolt on a second one on behind the existing for that reason.
 

Sevin7

Member
156
9
18
Location
New Paris, OH
From a safety standpoint that is probably a really good idea. I too am dissatisfied with the look of the factory location of the M818 taillights once a bed is installed. Without a better idea I was content to leave them as is because it's only cosmetic. But I had never considered that the taillights may be blocked from view of a somewhat tall vehicle due to the bed overhang (I used the full length bed and removed the spare rack leaving me with about 24" of overhang past the frame which looks to me more than you have). So, this is definately some food for thought.

The modification looks pretty good and very well done. You deserve bonus points for utilizing the original mounting plates (saving $$). I think I would prefer the look of putting them up in/on the back of the bed like some 813's are. That would be quite a bit more difficult and more expensive but it would better identify your corners.

Aren't license plates for civilian vehicles?
 

MyothersanM1

19K M1 Armor Crewman
Steel Soldiers Supporter
1,954
401
68
Location
Culver City, CA
I think I would prefer the look of putting them up in/on the back of the bed like some 813's are. That would be quite a bit more difficult and more expensive but it would better identify your corners.

Aren't license plates for civilian vehicles?


I was going to mount them more outwardly and higher, but still under the tailgate. However, the mounting system was going to be a little more sophisticated. As far as height goes, CA Vehicle Code says between 15" and 72" (Sec. 24600(f)) on vehicle mfg'd after 01-01-69.

The truck is registered as a Historic Vehicle in CA. No special provision for former military vehicles out here (like in TX) as far as registration goes. So, yes, the law requires visible license plates.

 
Top
AdBlock Detected

We get it, advertisements are annoying!

Sure, ad-blocking software does a great job at blocking ads, but it also blocks useful features of our website like our supporting vendors. Their ads help keep Steel Soldiers going. Please consider disabling your ad blockers for the site. Thanks!

I've Disabled AdBlock
No Thanks