gparkes
New member
- 6
- 1
- 3
- Location
- O'Fallon, MO
I guess I got disgusted with spinning those rusty old gate valves every time I parked my truck, so I decided I was going to replace the valves with ball valves so that 1/4 turn on four valves and I would be done.
I have seen several posts asking, is it really necessary to drain your tanks. Let me say, YES, YES it is essential if you don't want big problems with your air system over the life of your truck. It is for this reason that I wanted the improvement.
As simple as it seems, and it is not difficult to complete, the one of the adapters is actually the difficult thing about completing the mod. So here is your part listing for the modification:
Total cost for all four valves: $44.00 (everything rounded up)
.jpg")
Directions:
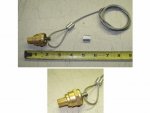
1. Assemble each of the valves and adapters into an assembly. Utilize Teflon tape, as with any air or plumbing connection, to ensure no leaks. As you can see from the photo, you will have a nice, slightly longer, valve than what is on the truck now.
2. Label each of the Air lines from top to bottom. That will make sure you have them in the proper order when putting them back on to the valves. While this might not make much difference now, when you are troubleshooting a problem in the future and can't seem to make sense out of why something is out of order... then it might make sense.
3. Disconnect the #1 air line from the first valve. Make sure the compression connector (part #3) you purchased fits the hose. This will keep your frustrations to a minimum when later you find out it does not. If it does properly seat, remove all four air lines from all four valve assemblies.
4. Remove the two 1/4" bolts holding the valve bracket to the truck.
5. Remove the four valve assemblies from the bracket by removing the four U-Bolts. (As with any good horder, do not discard these as you might need these in case something does not fit right later).
6. Take off the bracket and mount in vice. If you are like me, you won't be able to find an exact U-Bolt, and the Bolt will be slightly thicker in diameter. Drill the holes out to fit the new U-Bolts. (See picture)
.jpg")
Optional: At this point, if you are particularly anal, you could sand, prime and paint the bracket, since it will never be more exposed. You could do the same on the truck, if you desired as well. It would eliminate any future rust problems. (See picture. I really should have cleaned up the green paint from the truck when available.)
.jpg")
7. Flip the bracket on your vice so that the bracket is in the same direction as is mounted on the truck.
8. Assemble the valve assemblies onto the bracket. If you have square Ball Valves, ensure the flat side of the valve makes contact with the bracket. This should take the U-Bolt making contact with the gate valve. Also, to make sure everything aligns just perfectly, make the hex of the female adapter with the point making contact with the bracket.
.jpg")
This worked out perfectly as the width, point to point, of the hex was the same diameter as the Ball Valve. Thereby it created balance on either side of the U-Bolt. From the picture, you can tell this was one of my first assemblies, as I was using one of the old 1/4" FIP (male) to 1/4" Compression Connector (male) (part #3). If I had known this would be the cheapest of all parts, I would have replaced all four. On a side note about part #3, I could not get the old female compression connector off of the hose, and I chose to leave well enough alone.
The next two pictures show the completed valve assemblies mounted on the bracket in the vice.
.jpg")
.jpg")
Optional: Again, if you really wanted to impress the neighbors, you could paint the brass to match the truck while off the truck for that truly professional look.
9. Reattach the completed bracket on the truck.
10. Reattach the air hoses on the appropriate valve.
11. Ensure valves are in the "OFF" position.
12. Turn on truck. Allow air system to fully pressurize. Turn off truck. Check for air leaks.
Final assembly thoughts:
If you wanted that finishing touch you could add one or both of the following.
First stencil, "DRAIN AIR TANKS DAILY" on the bracket facing out.
Second, you could stencil "IN NUMERIC ORDER" or something like that.
Finally, and this one isn't a joke, you could number the valves on the side:
I have read in several places in this forum this is the correct order for draining the tanks. Personally, with this new set up, initially draining the tanks has changed into a four second task instead of 15 second. And no more sore fingers. Considerably more air pressure comes out of the open valves than before.
As I said earlier, draining the air out of the system is essential for the health of the vehicle. I went from have a lot of water in the system, to barely getting any out when I open the valves. And that was before I replaced the valves. Now that the pressure out has increased, I am getting them to spit again, so I think there will be even less moisture in the system than before.
One other part about the completed task: I could not decide if I wanted the valve handles on top or on the side. I don't know if I won't change it around after looking at the pictures again. In either case, the way Ball Valves are designed, the handle will either be to the side or down, when closed, and pointing at you when open. It makes for a real easy check prior to getting in the truck and starting it, not that the loud sound of escaping air didn't give away the problem before. That being said, you should always close the valves when you are done to keep any additional water from getting into the system. Even looking at the finished picture above, you don't have to touch anything to know if they are closed or open when walking away from your truck at the end of the day.
Good luck should you choose to venture off to complete this yourself, and I look forward to hearing what you think.
I have seen several posts asking, is it really necessary to drain your tanks. Let me say, YES, YES it is essential if you don't want big problems with your air system over the life of your truck. It is for this reason that I wanted the improvement.
As simple as it seems, and it is not difficult to complete, the one of the adapters is actually the difficult thing about completing the mod. So here is your part listing for the modification:
[*=1]1/4 Turn Ball Drain Valve with 1/4" NPT(male) connection. (4 each) I was able to procure these on clearance for $3.00 each at Walmart.
[*=1]1/4" FIP Female Pipe Coupling. (4 each). Found these for $5 each at Lowes.
[*=1]1/4" FIP (male) to 1/4" Compression Connector (male) (4 each). I was trying to reuse these from the existing valves, but broke one in halfwhen trying to remove it from the old gate valve. The plumbing section at Lowes and Home Depot, as well as assorted plumbing stores have 3/8" compression fittings, but they are not compatible with the air lines. Finally found the part at Peterbilt parts counter. If I had known how little they cost, I might have started there to begin with and replaced all four. $2 each.
[*=1]3/4" x 1 1/2" U Bolt. I wanted to replace them, since they were rusted and the fine threads were falling off. I also added a lock washer. (4 each) $1 each.
Total cost for all four valves: $44.00 (everything rounded up)
Directions:
1. Assemble each of the valves and adapters into an assembly. Utilize Teflon tape, as with any air or plumbing connection, to ensure no leaks. As you can see from the photo, you will have a nice, slightly longer, valve than what is on the truck now.
2. Label each of the Air lines from top to bottom. That will make sure you have them in the proper order when putting them back on to the valves. While this might not make much difference now, when you are troubleshooting a problem in the future and can't seem to make sense out of why something is out of order... then it might make sense.
3. Disconnect the #1 air line from the first valve. Make sure the compression connector (part #3) you purchased fits the hose. This will keep your frustrations to a minimum when later you find out it does not. If it does properly seat, remove all four air lines from all four valve assemblies.
4. Remove the two 1/4" bolts holding the valve bracket to the truck.
5. Remove the four valve assemblies from the bracket by removing the four U-Bolts. (As with any good horder, do not discard these as you might need these in case something does not fit right later).
6. Take off the bracket and mount in vice. If you are like me, you won't be able to find an exact U-Bolt, and the Bolt will be slightly thicker in diameter. Drill the holes out to fit the new U-Bolts. (See picture)
Optional: At this point, if you are particularly anal, you could sand, prime and paint the bracket, since it will never be more exposed. You could do the same on the truck, if you desired as well. It would eliminate any future rust problems. (See picture. I really should have cleaned up the green paint from the truck when available.)
7. Flip the bracket on your vice so that the bracket is in the same direction as is mounted on the truck.
8. Assemble the valve assemblies onto the bracket. If you have square Ball Valves, ensure the flat side of the valve makes contact with the bracket. This should take the U-Bolt making contact with the gate valve. Also, to make sure everything aligns just perfectly, make the hex of the female adapter with the point making contact with the bracket.
This worked out perfectly as the width, point to point, of the hex was the same diameter as the Ball Valve. Thereby it created balance on either side of the U-Bolt. From the picture, you can tell this was one of my first assemblies, as I was using one of the old 1/4" FIP (male) to 1/4" Compression Connector (male) (part #3). If I had known this would be the cheapest of all parts, I would have replaced all four. On a side note about part #3, I could not get the old female compression connector off of the hose, and I chose to leave well enough alone.
The next two pictures show the completed valve assemblies mounted on the bracket in the vice.
Optional: Again, if you really wanted to impress the neighbors, you could paint the brass to match the truck while off the truck for that truly professional look.
9. Reattach the completed bracket on the truck.
10. Reattach the air hoses on the appropriate valve.
11. Ensure valves are in the "OFF" position.
12. Turn on truck. Allow air system to fully pressurize. Turn off truck. Check for air leaks.
Final assembly thoughts:
If you wanted that finishing touch you could add one or both of the following.
First stencil, "DRAIN AIR TANKS DAILY" on the bracket facing out.
Second, you could stencil "IN NUMERIC ORDER" or something like that.
Finally, and this one isn't a joke, you could number the valves on the side:
3
4
1
2
4
1
2
I have read in several places in this forum this is the correct order for draining the tanks. Personally, with this new set up, initially draining the tanks has changed into a four second task instead of 15 second. And no more sore fingers. Considerably more air pressure comes out of the open valves than before.
As I said earlier, draining the air out of the system is essential for the health of the vehicle. I went from have a lot of water in the system, to barely getting any out when I open the valves. And that was before I replaced the valves. Now that the pressure out has increased, I am getting them to spit again, so I think there will be even less moisture in the system than before.
One other part about the completed task: I could not decide if I wanted the valve handles on top or on the side. I don't know if I won't change it around after looking at the pictures again. In either case, the way Ball Valves are designed, the handle will either be to the side or down, when closed, and pointing at you when open. It makes for a real easy check prior to getting in the truck and starting it, not that the loud sound of escaping air didn't give away the problem before. That being said, you should always close the valves when you are done to keep any additional water from getting into the system. Even looking at the finished picture above, you don't have to touch anything to know if they are closed or open when walking away from your truck at the end of the day.
Good luck should you choose to venture off to complete this yourself, and I look forward to hearing what you think.