I’m not reinventing the wheel here. I know this has been done many times but I never found a thread here that really covered it. I’m sure if you talked to 5 people you would get 5 different ways to do this.
I found a lot of information on how to from the following web pages .
http://gear-report.com/the-deuce-utility-vehicle-d-u-v-project-m35a2-alternator-upgrade.
And
http://wolverinetechnologiesllc.com/AlternatorKitM35M54.html
I have no affiliation with either page . I have heard wolverine has been involved with litigation for what I don’t know but his page was very helpful.
Now for my how to experience .
I recently acquired a M35a2 that came to me with a bad alternator. I could not find a mil unit at a price I was willing to pay. This lead me to search for an alternative . I came across the previous mentioned web pages and began my acquisition parts.
The alternator is a delco style 21si 24 volt 70 amp for Diesel engines . It purchased off Amazon for $109. Here is the link. https://www.amazon.com/gp/product/B...AB3B8&linkId=72d7a5f047445d51982d998088dded42
The pulley came from Amazon as well. Premium pulley for a Delco 21si alternator for 2 belts . https://www.amazon.com/PREMIUM-ALTE...rd_wg=aZEvQ&psc=1&refRID=953MP249GQX2JZTJ01WK
total for both was $133.
The other items needed are
1. Flat steel bar 1.5 inches by 1/8 thick.
2. 3/4 inch pipe
3. 5 1/12. X 1/2 bolt with locking nut and 2 washers.
I bought all of this at the local Ace Hardware. I’m sure it can be found at Lowe’s or Home Depot..
How to install.
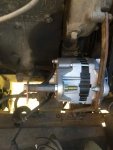
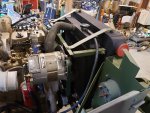
1. The lower hole on the alternator mounts to the stock position.
2. The top adjuster arm mounts to the top mount. Roll the alternator to its proper tension point.
3. Now you will need to make the upper rear mount for the alternator. Cut the flat still bar to around 11 inches .
Mark the lower mounting hole on the flat steel where the bolt hole will need to be drilled. I did this by holding the
Flat steel bar in the lower mount. Dip the tip of the original bolt in paint. Slide it through the lower alternator mount making contact
With the flat steel bar. This is where you will need to drill the hole in the flat steel to make the lower rear mount.
After drilling the mounting hole attach using the orginal bolt.
4. Now slide your 5 1/2 bolt into the top altenator mount and mark the flat steel using the same paint procedure as before.
Cut the extra length off the flat steel.
5. Now using the 3/4 inch pipe cut a spacer about 2.5 inches long . Assemble hand tight with your remaining hardware.
6. Install the belts, adjust tension and tighten everything up.
Wiring it up.
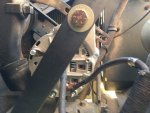
1. Install the ground wire to the ground bolt on the alternator.
2. The hot wire or red wire goes to the hot/red terminal on the Alt,
3. The field wire (the one with the military connector) is no longer needed and can be tied back out of the way.
This was an easy mod that can easily be reversed.
The truck is charging dead in the green on the alt gauge .
Please note the front shaft of the alternator will be close to the fan. It will not touch and the fan does not flex.
I found a lot of information on how to from the following web pages .
http://gear-report.com/the-deuce-utility-vehicle-d-u-v-project-m35a2-alternator-upgrade.
And
http://wolverinetechnologiesllc.com/AlternatorKitM35M54.html
I have no affiliation with either page . I have heard wolverine has been involved with litigation for what I don’t know but his page was very helpful.
Now for my how to experience .
I recently acquired a M35a2 that came to me with a bad alternator. I could not find a mil unit at a price I was willing to pay. This lead me to search for an alternative . I came across the previous mentioned web pages and began my acquisition parts.
The alternator is a delco style 21si 24 volt 70 amp for Diesel engines . It purchased off Amazon for $109. Here is the link. https://www.amazon.com/gp/product/B...AB3B8&linkId=72d7a5f047445d51982d998088dded42
The pulley came from Amazon as well. Premium pulley for a Delco 21si alternator for 2 belts . https://www.amazon.com/PREMIUM-ALTE...rd_wg=aZEvQ&psc=1&refRID=953MP249GQX2JZTJ01WK
total for both was $133.
The other items needed are
1. Flat steel bar 1.5 inches by 1/8 thick.
2. 3/4 inch pipe
3. 5 1/12. X 1/2 bolt with locking nut and 2 washers.
I bought all of this at the local Ace Hardware. I’m sure it can be found at Lowe’s or Home Depot..
How to install.
1. The lower hole on the alternator mounts to the stock position.
2. The top adjuster arm mounts to the top mount. Roll the alternator to its proper tension point.
3. Now you will need to make the upper rear mount for the alternator. Cut the flat still bar to around 11 inches .
Mark the lower mounting hole on the flat steel where the bolt hole will need to be drilled. I did this by holding the
Flat steel bar in the lower mount. Dip the tip of the original bolt in paint. Slide it through the lower alternator mount making contact
With the flat steel bar. This is where you will need to drill the hole in the flat steel to make the lower rear mount.
After drilling the mounting hole attach using the orginal bolt.
4. Now slide your 5 1/2 bolt into the top altenator mount and mark the flat steel using the same paint procedure as before.
Cut the extra length off the flat steel.
5. Now using the 3/4 inch pipe cut a spacer about 2.5 inches long . Assemble hand tight with your remaining hardware.
6. Install the belts, adjust tension and tighten everything up.
Wiring it up.
1. Install the ground wire to the ground bolt on the alternator.
2. The hot wire or red wire goes to the hot/red terminal on the Alt,
3. The field wire (the one with the military connector) is no longer needed and can be tied back out of the way.
This was an easy mod that can easily be reversed.
The truck is charging dead in the green on the alt gauge .
Please note the front shaft of the alternator will be close to the fan. It will not touch and the fan does not flex.
Attachments
-
 75 KB Views: 35
Last edited: