• Steel Soldiers now has a few new forums, read more about it at: New Munitions Forums!

  • Microsoft MSN, Live, Hotmail, Outlook email users may not be receiving emails. We are working to resolve this issue. Please add support@steelsoldiers.com to your trusted contacts.

Seems like this is turning into a build thread.

CARC686

Active member
Steel Soldiers Supporter
132
193
43
Location
Las Cruces, New Mexico
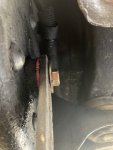
I actually hadn't installed the upper shackle bushings on the front end, so I set about that this morning. Had spent some time looking around online for any example I could find of how it's done, since I don't know what I don't know and that's a good way to find out. No luck, so here's my experience. First, set up some kind of heat deflector above the driver's side upper, because torching it could catch your wiring harness on fire if you don't. Other than that, I just heated the center sleeve, twisted it out, cut off one side of the rubber, and knocked it through from the outside with a screwdriver. There was no outer sleeve, which was a relief, because I had set up my reciprocating saw and discovered it was not going to fit before I got started.

Shackle Upper.jpeg

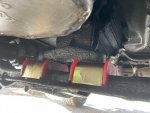
So that one's in place. Stopped there, since my favorite neighbor came out to let me know what he thought of the sound of bushings being tapped with a hammer. Figured since I was rolling around in the dirt anyway, I'd get a pic of the transmission mounts I did a couple days ago.

Transmission Mounts.jpeg

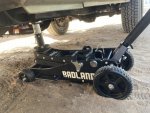
My undercarriage is beautifully seasoned, like an heirloom skillet. I had wanted this thing for awhile and finally decided I was willing to buy once and cry once. I'm happy with it. Good purchase.

Worth It.jpeg

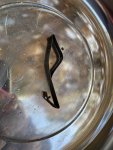
Yeah, I know, plywood or something. Haven't got any. The truck can't push this jack frame through the sand. My house is built on it. It's fine. Anyway, I found some kind of sprung push retainer on the driver's side floorboard yesterday and I don't know what it is. It could have fallen out of the steering column when I was tapping the lower column onto it. That's my only theory. Does anyone recognize this thing? Thanks in advance if you do.

Identify This 01.jpeg
 

CARC686

Active member
Steel Soldiers Supporter
132
193
43
Location
Las Cruces, New Mexico
This morning I went to R&R the last bushing on the front springs. Passenger side shackle top. Started tapping it out and found that it backs into the bank 2 exhaust. Looked up at those three nuts on the collector. Thought about how they've heat cycled a thousand times and rust has been crystalizing in the threads for ten presidential elections. Thought about snapped fasteners in the manifold. Thought about removing the manifold to drill them out and snapping studs off in the cylinder head.

My risk/benefit analysis of the situation came to one conclusion: Nope.

I reckon I could torch the bolt until the rubber turns to mush and slide hammer it all out together. Maybe cut the head off and pull it out from the thread end and just install the new bolt backwards. Makes no difference. I just haven't got a slide hammer or an angle grinder at present. There isn't enough room between the frame and the exhaust to install the inner half of the Energy Suspension bushing at that point. Could always just cut the collar off it, install both halves from the outboard side, and replace the missing poly with a fender washer.

I'll decide how to deal with it today and get after it again tomorrow.
 

CARC686

Active member
Steel Soldiers Supporter
132
193
43
Location
Las Cruces, New Mexico
Decided to skip working on the truck this morning and took it out instead. Had it in 4L a couple times and found that it's perfectly comfortable doing things that I'm not. At a trail washout, there was a spot with broken glass and bumpers lying on the ground. Some people really tore their vehicles up. The CUCV crawled through the whole mess without much effort. I did crest a climb blind at one point, partially because I haven't replaced the rear springs yet, but it was also pretty damn steep. Was a bit harrowing, seeing nothing but sky through the windshield on those twisty trials, but I haven't put the roof on the ground yet. Knock on wood. The only thing out there that really worries me is loose sand. I've got to get a winch and a claw so I can deal with it when I inevitably bury it to the axles. It's just a matter of when. Anyway, got back on the asphalt and cruised a few hundred miles, up to around 7200 feet elevation, and back down to 3900, averaging almost exactly 20 MPG. Blew out my driver's side exhaust manifold donut on one of the mountain climbs, so it was a smelly drive home. Picked up a can of PB Blaster along the way, and the multi-day soaking has commenced. Maybe I'll do the motor mounts in the morning. Maybe not.
 

CARC686

Active member
Steel Soldiers Supporter
132
193
43
Location
Las Cruces, New Mexico
Did the rear springs today. Nuts and bolts are 7/8" and 13/16". U-bolt nuts are 15/16". Reused the original hardware because it was fine. Finally replaced the last shock. I was stalling on it because I didn't want to drop the tank, but we just cut the bolt off this morning. Suspension is all brand new and it feels like it.

40 years of rear end sag:

Before.jpeg

Six leaf Husky replacements:

After.jpeg

Had to double the antenna tie downs over so they wouldn't drag the garage door on the way out. Eventually, the rear bumper is going to weigh in at about 300 pounds. Depending on how much sag that creates, I may do the ORD 2.5" shackle flip. Maybe not. It was noticeably more difficult to load all my junk back into the bed after the job was done. A little rear end sag makes life easier.
 

CARC686

Active member
Steel Soldiers Supporter
132
193
43
Location
Las Cruces, New Mexico
Was really looking forward to how cheap parts would be on a truck that has had overstock sitting on shelves for decades all over the world. Also, in case anybody wondered, the black plastic vacuum doodad on the side of your injector pump is GM #14057219 aka NSN #4820-01-158-6836. Nobody is making them and NOS seems to hover around $200 USD at a minimum if you can even find one.
Turned out I couldn't find any at all except for a guy on eBay sitting on a pile of surplus NOS and asking $300 apiece. At that price, I got into my junk box, pulled one off a seized DB2, and tried it out. Worked great, and I liked the price a lot better.
 

Sharecropper

Well-known member
Steel Soldiers Supporter
1,820
953
113
Location
Paris KY
Was really looking forward to how cheap parts would be on a truck that has had overstock sitting on shelves for decades all over the world. Also, in case anybody wondered, the black plastic vacuum doodad on the side of your injector pump is GM #14057219 aka NSN #4820-01-158-6836. Nobody is making them and NOS seems to hover around $200 USD at a minimum if you can even find one.
I've got one practically brand new if you want it. I'm not going to need it with my new 765R4. Pm me if interested.
 

WWRD99

Well-known member
Steel Soldiers Supporter
946
1,442
93
Location
York Pa
I actually hadn't installed the upper shackle bushings on the front end, so I set about that this morning. Had spent some time looking around online for any example I could find of how it's done, since I don't know what I don't know and that's a good way to find out. No luck, so here's my experience. First, set up some kind of heat deflector above the driver's side upper, because torching it could catch your wiring harness on fire if you don't. Other than that, I just heated the center sleeve, twisted it out, cut off one side of the rubber, and knocked it through from the outside with a screwdriver. There was no outer sleeve, which was a relief, because I had set up my reciprocating saw and discovered it was not going to fit before I got started.

View attachment 924748

So that one's in place. Stopped there, since my favorite neighbor came out to let me know what he thought of the sound of bushings being tapped with a hammer. Figured since I was rolling around in the dirt anyway, I'd get a pic of the transmission mounts I did a couple days ago.

View attachment 924749

My undercarriage is beautifully seasoned, like an heirloom skillet. I had wanted this thing for awhile and finally decided I was willing to buy once and cry once. I'm happy with it. Good purchase.

View attachment 924750

Yeah, I know, plywood or something. Haven't got any. The truck can't push this jack frame through the sand. My house is built on it. It's fine. Anyway, I found some kind of sprung push retainer on the driver's side floorboard yesterday and I don't know what it is. It could have fallen out of the steering column when I was tapping the lower column onto it. That's my only theory. Does anyone recognize this thing? Thanks in advance if you do.

View attachment 924751
That magic spring did come out of your steering column...it's the key in the ignition ground...I usually chuck those since I don't like that buzzing noise.

Sent from my SM-S906U using Tapatalk
 
Top
AdBlock Detected

We get it, advertisements are annoying!

Sure, ad-blocking software does a great job at blocking ads, but it also blocks useful features of our website like our supporting vendors. Their ads help keep Steel Soldiers going. Please consider disabling your ad blockers for the site. Thanks!

I've Disabled AdBlock
No Thanks