- 3,187
- 4,816
- 113
- Location
- Olympia/WA
So originally I was considering putting a winch on a plate to go into a 2" receiver. A buddy here gave me a milemarker winch plate, so I ended up mounting the winch that way instead.
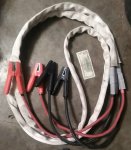
Before that happened though, I was also given a slave cable and a couple of the old slave cable 2 pin ends that had been cut off just past the big rubber portion and the cable scrapped.
I bought some Anderson connectors as well, as my plan had been to power the winch using the slave cable with an Anderson plug.
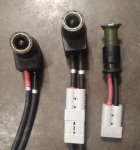
I decided earlier today to go ahead with the Anderson plugs on the slave cable, and the results are below.

Yes, I could have just purchased a Nato to 2 pin slave adapter. Those cost a decent chunk of change though, and since I had 2/0 cable lying around from a project in the past, I decided it would work just as well to disassemble and reuse a 2 pin slave cable end.
This is just how far I have gotten so far. I have plans that in the future I'll be acquiring a 24V inverter, and would like to power it using the slave cable. Those plans involve a trailer set up for camping (not acquired yet) so making it be able to reach the HMMWV is beneficial, even if I can only really use it when the truck is running (or set it up to recharge a battery bank in the trailer through the slave cable)
I dunno really. Lots of possible options, still not sure exactly what I plan to do with it, but thought I'd do it and share anyway.
Tools involved
Hydraulic crimper (for the Anderson plugs; you could solder them on instead if you wanted to)
Solder and propane torch (for disassembling and putting new wires into the 2 pin slave cable end)
Cable cutter (I got by with a small pair, but took a bit of effort. A larger pair would make the job much easier)
Razor knife (for stripping insulation from the cables)
Heat gun (for shrinking the heat shrink)
Parts involved
Slave cable
2 pin slave cable end
Anderson Plugs ( SB350A CONN 2/0 GRAY V0 part number: 6320G1 )
3/4" adhesive lined heat shrink (kind of optional, but I like to seal up the cable ends)
Instructions for those that aren't familiar with working with electrical stuff.
Determine where you want to cut the cable at. I chose to only cut at the last 8-10" or so in order to keep the max length no matter what end I want to use with it. mine is a 20 foot slave cable. If the weight is an issue for you (these things are a little heavy/awkward) or you have the 50 foot cable, you can do it in the center or multiple sections to get the weight lower, and possibly make it easier to store.
once the cable is cut, strip back the appropriate length of insulation from the cable. For this Anderson plug, that was about 1" or slightly over.
Put the exposed end of the cable into the end piece for the Anderson plug. There are 2 of these terminal end pieces loose in the plug.
For a longer cable it doesn't matter what way it is facing, but for a short cable you want to check and recheck to make sure it's facing the correct direction of it will be twisted and a royal pain to work with getting it into the plug.
Crimp the end onto the cable.
Cut a length of heat shrink and slide over the cable end. about 2-2.5" should work here. It should be about equally on the plug end and cable insulation. Use heat gun to apply heat until the heat shrink has shrunk all over the cable and end piece.
Put the correct end into the correct side of the Anderson plug housing. The slave cable ends are marked as "+" and "-", and so is the Anderson plug housing. When it is properly installed, you will hear a loud "click" noise and the cable won't pull back out (if you screw up and put it in the wrong side, use a small screwdriver to push down on the metal spring inside the housing in order to release it)
Repeat process until you have all the cables ends installed.
Hope this helps.
Before that happened though, I was also given a slave cable and a couple of the old slave cable 2 pin ends that had been cut off just past the big rubber portion and the cable scrapped.
I bought some Anderson connectors as well, as my plan had been to power the winch using the slave cable with an Anderson plug.
I decided earlier today to go ahead with the Anderson plugs on the slave cable, and the results are below.

Yes, I could have just purchased a Nato to 2 pin slave adapter. Those cost a decent chunk of change though, and since I had 2/0 cable lying around from a project in the past, I decided it would work just as well to disassemble and reuse a 2 pin slave cable end.
This is just how far I have gotten so far. I have plans that in the future I'll be acquiring a 24V inverter, and would like to power it using the slave cable. Those plans involve a trailer set up for camping (not acquired yet) so making it be able to reach the HMMWV is beneficial, even if I can only really use it when the truck is running (or set it up to recharge a battery bank in the trailer through the slave cable)
I dunno really. Lots of possible options, still not sure exactly what I plan to do with it, but thought I'd do it and share anyway.
Tools involved
Hydraulic crimper (for the Anderson plugs; you could solder them on instead if you wanted to)
Solder and propane torch (for disassembling and putting new wires into the 2 pin slave cable end)
Cable cutter (I got by with a small pair, but took a bit of effort. A larger pair would make the job much easier)
Razor knife (for stripping insulation from the cables)
Heat gun (for shrinking the heat shrink)
Parts involved
Slave cable
2 pin slave cable end
Anderson Plugs ( SB350A CONN 2/0 GRAY V0 part number: 6320G1 )
3/4" adhesive lined heat shrink (kind of optional, but I like to seal up the cable ends)
Instructions for those that aren't familiar with working with electrical stuff.
Determine where you want to cut the cable at. I chose to only cut at the last 8-10" or so in order to keep the max length no matter what end I want to use with it. mine is a 20 foot slave cable. If the weight is an issue for you (these things are a little heavy/awkward) or you have the 50 foot cable, you can do it in the center or multiple sections to get the weight lower, and possibly make it easier to store.
once the cable is cut, strip back the appropriate length of insulation from the cable. For this Anderson plug, that was about 1" or slightly over.
Put the exposed end of the cable into the end piece for the Anderson plug. There are 2 of these terminal end pieces loose in the plug.
For a longer cable it doesn't matter what way it is facing, but for a short cable you want to check and recheck to make sure it's facing the correct direction of it will be twisted and a royal pain to work with getting it into the plug.
Crimp the end onto the cable.
Cut a length of heat shrink and slide over the cable end. about 2-2.5" should work here. It should be about equally on the plug end and cable insulation. Use heat gun to apply heat until the heat shrink has shrunk all over the cable and end piece.
Put the correct end into the correct side of the Anderson plug housing. The slave cable ends are marked as "+" and "-", and so is the Anderson plug housing. When it is properly installed, you will hear a loud "click" noise and the cable won't pull back out (if you screw up and put it in the wrong side, use a small screwdriver to push down on the metal spring inside the housing in order to release it)
Repeat process until you have all the cables ends installed.
Hope this helps.


