• Steel Soldiers now has a few new forums, read more about it at: New Munitions Forums!

  • Microsoft MSN, Live, Hotmail, Outlook email users may not be receiving emails. We are working to resolve this issue. Please add support@steelsoldiers.com to your trusted contacts.

Speedometer cable tip

edpdx

Active member
794
75
28
Location
Oregon
Installing the Speedometer cable in the M1009 is fairly straight forward. I just installed mine- the outer plastic sheath was shabby and had worn t the steel core causing erratic readings. Here are a few of my observations that may save a little head scratching for the next guy:

The parts store will offer several options. You want the 100" cable. The OEM has bracing on the undercarriage end to provide proper angle of attack to the transmission. I got mine at NAPA- it came without the steel brace.

I released the cable by reaching up under the dash and depressing the cable clamp. Pulling it through the grommet and hoping to reuse the grommet was not gonna happen- it was too brittle. I cut it out and promptly looked in the TM for the part number. came up with 679759. Available on the net for about $10.

The TM shows placement of the guide brackets- I believe 8mm and 10mm- shop towel, headlamp and 1/4" ratchet with extension made short work.

Hope it helps.

I installed the bottom end first and then routed the line through the bottom two brackets, ending up with lots of cable to work with until the top end was connected to the speedometer.

TIP: Mark the original cable BEFORE you release it from the uppermost bracket- under the hood. A piece of tape wrapped around the cable at: outside of the grommet, and at the first bracket will help you determine how much cable needs to be fed through the firewall, and also give to the appropriate amount of cable above the first firewall bracket to keep strain to the minimum.

The big mental challenge was to feed the top end of the Sppedo cable through a 3/16" hole in a solid rubber grommet. I would've taken photos, but I surprised myself with the first effort, so here's a drawing: 1614908223163.png
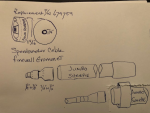
I used spray silicone- the kind to lube sliding door tracks, to cut friction.

Connect a 1/4" to 3/8" to 3/8" to 1/2" adapter to step open the hole. I pushed the adapters through easily until the grommet was around the 1/2" end about 5/8" outside diameter. Had a jumbo Sharpie in my tool bag- I pushed the grommet off of the adapter and onto the end of the marker pen. The diameter of the speedo end of the cable was a bit smaller than the pen and I was able to slide the grommet off of the pen and onto the cable.

I cleared around the grommet opening of the firewall and shoved the entire grommet into the cab. Once inside, I crawled under the dash and pushed the grommet back until the barb of the grommet caught in the hole but could not get it seated. I created a collar of electrical tape about 3 inches from the end of the cable- It was about 1" in diameter. From the engine side I was able to pull on the speedo cable as the collar of tape forced the grommet outward. Worked the grommet barb with a flat screwdriver until it seated. BONUS: the collar helped me to really force the cable into the speedometer. I just left it in place.
 

dougco1

Well-known member
Steel Soldiers Supporter
867
647
93
Location
Cooperstown NY
Installing the Speedometer cable in the M1009 is fairly straight forward. I just installed mine- the outer plastic sheath was shabby and had worn t the steel core causing erratic readings. Here are a few of my observations that may save a little head scratching for the next guy:

The parts store will offer several options. You want the 100" cable. The OEM has bracing on the undercarriage end to provide proper angle of attack to the transmission. I got mine at NAPA- it came without the steel brace.

I released the cable by reaching up under the dash and depressing the cable clamp. Pulling it through the grommet and hoping to reuse the grommet was not gonna happen- it was too brittle. I cut it out and promptly looked in the TM for the part number. came up with 679759. Available on the net for about $10.

The TM shows placement of the guide brackets- I believe 8mm and 10mm- shop towel, headlamp and 1/4" ratchet with extension made short work.

Hope it helps.

I installed the bottom end first and then routed the line through the bottom two brackets, ending up with lots of cable to work with until the top end was connected to the speedometer.

TIP: Mark the original cable BEFORE you release it from the uppermost bracket- under the hood. A piece of tape wrapped around the cable at: outside of the grommet, and at the first bracket will help you determine how much cable needs to be fed through the firewall, and also give to the appropriate amount of cable above the first firewall bracket to keep strain to the minimum.

The big mental challenge was to feed the top end of the Sppedo cable through a 3/16" hole in a solid rubber grommet. I would've taken photos, but I surprised myself with the first effort, so here's a drawing: View attachment 827418

I used spray silicone- the kind to lube sliding door tracks, to cut friction.

Connect a 1/4" to 3/8" to 3/8" to 1/2" adapter to step open the hole. I pushed the adapters through easily until the grommet was around the 1/2" end about 5/8" outside diameter. Had a jumbo Sharpie in my tool bag- I pushed the grommet off of the adapter and onto the end of the marker pen. The diameter of the speedo end of the cable was a bit smaller than the pen and I was able to slide the grommet off of the pen and onto the cable.

I cleared around the grommet opening of the firewall and shoved the entire grommet into the cab. Once inside, I crawled under the dash and pushed the grommet back until the barb of the grommet caught in the hole but could not get it seated. I created a collar of electrical tape about 3 inches from the end of the cable- It was about 1" in diameter. From the engine side I was able to pull on the speedo cable as the collar of tape forced the grommet outward. Worked the grommet barb with a flat screwdriver until it seated. BONUS: the collar helped me to really force the cable into the speedometer. I just left it in place.
I think you missed your calling.

If your "Back Yard Mechanic" gig gets old you can always become a cartoon artist. Nice job
 

Sganderson

Member
45
53
18
Location
South Carolina
What do you guys think if I’ve changed the Speedo cable, changed the Speedo itself , lubed the core with graphite oil , made sure there’s no sharp curves and still get an erratic reading?
Whats the part called that connects the Speedo cable to the transfer case?
I got a 100” cable with plenty of slack, what am I missing here?
 

edpdx

Active member
794
75
28
Location
Oregon
My needle still bobs about 3 mph at times. There is a part in the transmission housing that the cable plugs into that can be replaced. I’m not able to look it up now, but I purchased one to replace and hopefully end my cable wors- that’s before I discovered that my cable was chewed up through the insulation and steel sheath, so I have not replaced it yet. Videos on YouTube explain how to replace them- apparently worn ones can cause erratic needles. Conversely, I don’t see why the counterpart on the other end of the cable (behind the dashboard) couldn’t cause the same movement if worn. I would try the transmission end first before tearing out the dashboard. Keep us posted.
 

Sharecropper

Well-known member
Steel Soldiers Supporter
1,836
987
113
Location
Paris KY
What do you guys think if I’ve changed the Speedo cable, changed the Speedo itself , lubed the core with graphite oil , made sure there’s no sharp curves and still get an erratic reading?
Whats the part called that connects the Speedo cable to the transfer case?
I got a 100” cable with plenty of slack, what am I missing here?
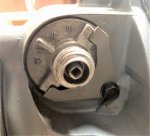
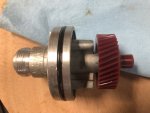
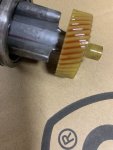
Sarge - Considering that you have replaced everything else, the only thing it could be is the "Speedometer Driven Gear Sleeve" located at the transfer case. See photos below. There is a Drive Gear inside the transfer case, and a Driven Gear in the sleeve.

To confirm and rectify the issue, spray the sleeve and surrounding area on the transfer case with a suitable cleaner and wipe down to clean thoroughly. Then remove the speedometer cable and the sleeve by removing the one bolt that holds the sleeve in place. There is a rubber O-ring which seals the sleeve in its hole, so twist the sleeve and it should simply come out. Once you get it out you will see how it works. The plastic Driven Gear in the sleeve snaps into the aluminum sleeve hosing. Pull the Driven Gear out of the sleeve and clean all parts, then lubricate the gear shaft with grease and reinstall. Grease the O-ring so it will go back in while gently twisting the sleeve. Do not force it. You may need to twist the shaft a little to get the Driven Gear on the inside to mesh with the Drive Gear. When you get the sleeve and Driven Gear out and clean, inspect the teeth on the Driven Gear to make sure that they are not worn or chipped. I suspect your issue is nothing more than a lack of lubrication, however if the teeth are chewed up, you may need to replace the Driven Gear. While you have the sleeve out, shine a light into the hole and you will see the gray OEM Drive Gear which is on the final drive shaft of the transfer case. If for some reason this Drive Gear is stripped (which I doubt), the only way to fix it would be to remove the tail piece housing of the transfer case and replace the Drive Gear. However I doubt this is the case, as in my 50 years of fooling with these things I have never seen a damaged Drive Gear.

Let us know how it turns out. Hope this helps.

IMG_4426 (2).jpg IMG_4429.jpg
 
Last edited:

Sganderson

Member
45
53
18
Location
South Carolina
Sarge - Considering that you have replaced everything else, the only thing it could be is the "Speedometer Driven Gear Sleeve" located at the transfer case. See photos below. There is a Drive Gear inside the transfer case, and a Driven Gear in the sleeve.

To confirm and rectify the issue, spray the sleeve and surrounding area on the transfer case with a suitable cleaner and wipe down to clean thoroughly. Then remove the speedometer cable and the sleeve by removing the one bolt that holds the sleeve in place. There is a rubber O-ring which seals the sleeve in its hole, so twist the sleeve and it should simply come out. Once you get it out you will see how it works. The plastic Driven Gear in the sleeve snaps into the aluminum sleeve hosing. Pull the Driven Gear out of the sleeve and clean all parts, then lubricate the gear shaft with grease and reinstall. Grease the O-ring so it will go back in while gently twisting the sleeve. Do not force it. You may need to twist the shaft a little to get the Driven Gear on the inside to mesh with the Drive Gear. When you get the sleeve and Driven Gear out and clean, inspect the teeth on the Driven Gear to make sure that they are not worn or chipped. I suspect your issue is nothing more than a lack of lubrication, however if the teeth are chewed up, you may need to replace the Driven Gear. While you have the sleeve out, shine a light into the hole and you will see the gray OEM Drive Gear which is on the final drive shaft of the transfer case. If for some reason this Drive Gear is stripped (which I doubt), the only way to fix it would be to remove the tail piece housing of the transfer case and replace the Drive Gear. However I doubt this is the case, as in my 50 years of fooling with these things I have never seen a damaged Drive Gear.

Let us know how it turns out. Hope this helps.

View attachment 835194 View attachment 835195
Thanks very much. Yes it did help .
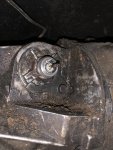
so I took the time tonight to remove the adapter ( I think only the m1009 has it) and the sleeve.
the driven gear looked fine, I greased it. Drive gear was good too.
I went ahead and disassembled the adapter gear box and cleaned and re-greased that as well.
put it all back together and I’m still having problems.
I believe I want to do away with the adapter box and try it.
I wonder what size driven gear I would need to do that?

83BBFBFA-AACA-4A3E-BD6A-FDF6AE6D80A6.jpeg
 

Sganderson

Member
45
53
18
Location
South Carolina
As far as I know it’s still 3.08 axle ratio and I’m running 33’s.
i know why that conversion box is there butis there a way to bypass it and still be accurate?
 

Sharecropper

Well-known member
Steel Soldiers Supporter
1,836
987
113
Location
Paris KY
Here is a website with some great information pertaining to the Drive/Driven gears. https://www.tciauto.com/speedometer-gear-calculator

I believe the adapter was installed on the M1009 so that the same Drive and Driven gears could be used in both the trucks and blazers. The CUCVs came from GM with the 15-tooth gray Drive gear GM part #14037997 and 41-tooth yellow Driven gear GM part #1362195. You can easily change the Driven gear to more or less teeth to get the speedometer to read correctly (within a couple MPH or so). Different size tires will also affect how the speedometer reads. If you remove the adapter and the speedometer is steady but inaccurate, you have discovered the source of the erratic movement. Now all you need to do is change the Driven gear to make the speedometer read correctly. Remember this - fewer teeth on the Driven gear will speed up the speedometer, and more teeth will slow down the reading. The different Driven gears are readily available on Ebay. Each tooth added or subtracted will cause a change in the speedometer of approximately 2 MPH. Therefore, after removing your adapter, if the speedometer is smooth but slow by 10 MPH, you will need a new Driven gear with 5 more teeth than what is installed at the time of the reading. I know it sounds complicated, but if you study it carefully you will figure it out. I still believe that adapter may be your problem. Remove it and see if the needle smooths out.

Hope this helps.
 

Sganderson

Member
45
53
18
Location
South Carolina
Here is a website with some great information pertaining to the Drive/Driven gears. https://www.tciauto.com/speedometer-gear-calculator

I believe the adapter was installed on the M1009 so that the same Drive and Driven gears could be used in both the trucks and blazers. The CUCVs came from GM with the 15-tooth gray Drive gear GM part #14037997 and 41-tooth yellow Driven gear GM part #1362195. You can easily change the Driven gear to more or less teeth to get the speedometer to read correctly (within a couple MPH or so). Different size tires will also affect how the speedometer reads. If you remove the adapter and the speedometer is steady but inaccurate, you have discovered the source of the erratic movement. Now all you need to do is change the Driven gear to make the speedometer read correctly. Remember this - fewer teeth on the Driven gear will speed up the speedometer, and more teeth will slow down the reading. The different Driven gears are readily available on Ebay. Each tooth added or subtracted will cause a change in the speedometer of approximately 2 MPH. Therefore, after removing your adapter, if the speedometer is smooth but slow by 10 MPH, you will need a new Driven gear with 5 more teeth than what is installed at the time of the reading. I know it sounds complicated, but if you study it carefully you will figure it out. I still believe that adapter may be your problem. Remove it and see if the needle smooths out.

Hope this helps.
You’re such a huge help and yes I agree that it’s probably the adapter box. Just one quick question, my driven gear has like a “male” square cable that comes out of it to connect to the adapter. Does this come off? It feels like it’s stuck In there pretty good and I sure hate to break it if I don’t have to.
E1F577EE-4B45-4FF4-A8E4-394F6374E1BA.jpeg
 

Sharecropper

Well-known member
Steel Soldiers Supporter
1,836
987
113
Location
Paris KY
You know, I believe you may have just discovered your problem. All Driven gears have a square hole on the end that protrudes from the sleeve, into which the speedometer cable end fits. It almost seems that you may have a piece of old cable broken off and still in the hole. Pull the sleeve back out and remove the Driven gear from the sleeve. Look at the end opposite the gear. What do you see? If there is a piece of metal sticking out, take pliers and pull it out. You should then see a square hole. The end of your speedometer cable then fits into the square hole and the end nut is tightened onto the sleeve. If this is in fact what you have, that would explain why your speedometer would be erratic. Post some photos so we can see.
 

Sganderson

Member
45
53
18
Location
South Carolina
We
You know, I believe you may have just discovered your problem. All Driven gears have a square hole on the end that protrudes from the sleeve, into which the speedometer cable end fits. It almost seems that you may have a piece of old cable broken off and still in the hole. Pull the sleeve back out and remove the Driven gear from the sleeve. Look at the end opposite the gear. What do you see? If there is a piece of metal sticking out, take pliers and pull it out. You should then see a square hole. The end of your speedometer cable then fits into the square hole and the end nut is tightened onto the sleeve. If this is in fact what you have, that would explain why your speedometer would be erratic. Post some photos so we can see.
Aha!!!!!
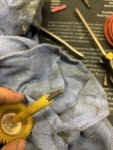
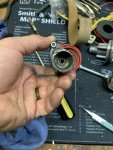
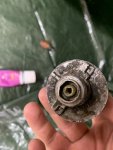
Now I understand, that piece of cable that was stuck in the driven gear must’ve belonged to the adapter. I removed it and Now just got to put it back in and test the Speedometer.


283E08AF-CB34-46D0-AADD-04A6A50E5F15.jpeg2B3558D7-7857-414E-9C89-56DBB067D4DB.jpeg17923173-54FF-4EC5-B4A0-DF80CAB75905.jpeg
 

Sganderson

Member
45
53
18
Location
South Carolina
It smoothed right out . It’s about 14mph off so I’m going to delete the adapter and order a 34 tooth gear and housing.
Especially since I can’t find an adapter anywhere.
Thanks
 

Sharecropper

Well-known member
Steel Soldiers Supporter
1,836
987
113
Location
Paris KY
Well I looked and do not have good news. I have another sleeve and red gear but will need that when I reinstall my 11.00/20's. My advice is to look on Ebay and find a 34-tooth gear and try it. Good luck.
 
Top