Bob,
I did try a couple and found that it seems okay, although a bit looser because of the metal loss. Thanks for the link to the studs...I'll be needing some.
New issue!
On getting to the left front hub this AM I found that 4 of the 12 nuts holding the brake plate would not come off. Managed to get 2 of these off with the studs, but the other two just sit and spin. The protruding threads on the 'stickers' look good, but they move neither in nor out...tried grips and Blaster to no avail. Three alternatives I can think of are:
1-drill the stud ends and use an 'easy-out'; or
2-find someone to come and weld the nuts to the studs, or hex keys or something to the studs to enable removal; or
3-try to hold the stud end w/grips and turn it out...this'll only work on the one that has maybe enough stud showing through the nut.
I am less than enthusiastic about all of the above, so I am open to suggestions. While I'm not dead in the water, I will be when I get the currently dis-assembled stuff cleaned up and readied for re-install. Gotta get the last plate off to get at the seals/retainers. Gotta get this stuff done so I can pick up a boat...another recovery trip.
While I'm here, I'll add some random deuce observations made since picking this beast up in Huntsville.
1-Driving this thing is a hoot, and is more comfortable, except for having to look under the wiper motor, than I expected.
2-For the sake of other first timers, one item that I have not seen noted in threads I've read so far is the need to de-crappify whatever you're working on for the first time. My KyNG truck has varying accumulations of the dusts of ages on it, up to 1/4-inch thick. I took it to a car wash prior to starting the hubs, but I still had to hand scrape stuff off in several places. I ended up taking the hubs themselves to the wash to get stuff I couldn't reach, and to deal with the grease/asbestos gunk on the inner parts.
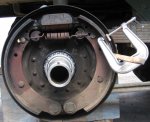
3-Removing brake spring is no big deal if one has appropriate pliers [and finally figures out where to grab the bleeding spring...hint: look at the tm], but it was for me impossible to avoid gouging the brake pad until I clamped a small piece of oak to the shoe [4th photo].
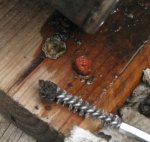
4-Every bolt I've removed [spindle, kingpin bushing] has been gunky, so I've been cleaning the bolt holes. Did the rear hubs so far. It looked like a troupe of monkeys had been living in 'em [3rd photo]. Ended up using a round brush, paper towels, and brake cleaner and spending 20-30 minutes on each hub. Re-installation has included a dab of Blaster for the spindle bolts.
5-Gaskets. Using Permatex ultra copper sensor-safe high temp rtv silicone in place of the paper gaskets on the spindles. Directions call for coating, then immediate installation finger tight, then tighteingn after an hour. I know many are using something like this successfully, but I wondered a bit when I saw how much material oozed out when I slapped the spindles on. I got a chance to evaluate the results when I noticed that I'd installed a right cylinder on a left hub and vice versa...DUH! On re-removing everything I noted that the rtv seal looked someplace between almost invisibly thin and non-existant. So, on re-re-installing I re-cleaned both mating surfaces, re-coated one, and let the stuff set for a half hour or so, then inserted the shaft, lined up the bolts carefully, and slowly hand tightened them sequentially. Torqued 'em after an hour or so. Results look better; we'll see.
6-Speaking of gaskets, I note that the tms do not call for anything between the brake plate and steering knuckle, yet both of my fronts have some sort of black silicone-looking stuff. The seal seems to be fine, but the stuff extruded around the studs into the interior of the brake plate and made things a little messy. Has anyone seen this before, or is anyone doing this now?
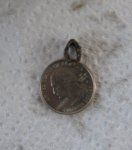
7-Re rear hub cork seals, mine [2nd photo] were all little sections of rubberized cork tubing, not pieces cut from sheet material. The finished size is 3/16"x7/16"x1/8" [width, length, thickness]. They seem to have worked well. Anyone else run across these seals? I'm using the rtv instead of cork, and find that it needs to set up for at least an hour before mounting the bearing, seal, nuts, etc., or it squishes out between the seal and the bearing and the seal and the first nut.
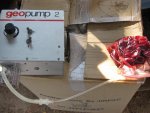
8-After packing the first of eventually 12 bearings by hand, I remembered that someone suggested using a vacuum food sealer. Lacking one, I pulled out a peristaltic pump I used for water sampling in an earlier life. Plumbed it to a small ziplock freezer bag full of grease and a bearing [1st photo]. It seemed to work pretty well, but moderate anxiety caused me to pack a bit by hand prior to installation. Next I tried just putting the grease and bearing into a zl bag and kneading for a while. This seemed to work pretty well, too. but I still gave it a minute-or-two hand job. This is how I'll do the rest, and load up a couple of extras to carry on the road. Might explore using the pump and a larger bag in the future, as it's pretty painless and almost as quick as using a conventional packer.
9-What the heck is the crank on the front of the spring seat for? Looks like mine lacks a retaining pin that'd hold it into whatever it's supposed to actuate. Way down on my fix-it list.
bs
UPDATE
Managed to lock a nut on one of the problem nuts and back 'em both off. The bad one was stripped nearly smooth. Still mucking with the last one.