grw800
New member
- 17
- 3
- 0
- Location
- Terlingua, TX
I replaced the front output shaft seal on a customer's M1009, and thought I would post up what I learned. And learn I did, since I had to do the job twice!
Remove transfer case shield (skid plate).
Disconnect front driveshaft from front output yoke. 4 bolts, 5/8" hex size. A big screwdriver helps to hold the yoke while loosening the bolts. You don't have to completely remove the driveshaft, I just held it up and out of the way with a jack stand.
Drain transfer case. The drain plug hex size is 1 3/16".
Remove the nut that holds the yoke on the output shaft. The hex size is 1 1/8". An impact wrench makes this easy.
Pull the yoke off the shaft. You may have to tap the yoke a bit from the back side to slide it off.
Remove the rubber seal washer.
Pull the seal with a seal puller. I used this one and pried against the output shaft. Engaging 4WD will hold the shaft from spinning and make this easier.

Clean the seal area and check for burrs where the new seal will sit.
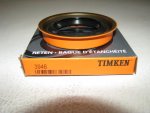
The new seal, Timken 3946

I also installed a Timken KWIK-Sleeve on the seal surface of the yoke because it was pitted. The part number is Timken KWK99187. Sorry, no pics.
Apply grease to the seal lips and the seal surface of the yoke.
IMPORTANT, and the reason I had to do this twice: Coat the outside diameter of the seal with gasket sealer. I used Permatex The Right Stuff. This is a great product and can replace gaskets in many instances. I suppose RTV silicone would also work here.
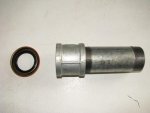
Tap the new seal into place. A 2" iron pipe coupler attached to a 2" X 6" pipe nipple works perfectly as a seal driver.

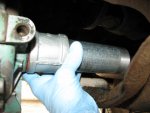
My homemade seal driver in place. It is the right size for the OD of the seal, and clears the output shaft. There is enough room to tap it with a hammer from the front of the crossmember.

Install the yoke. I applied some sealer to the splines of the yoke to prevent any leaks there.
Install the seal washer. I didn't use a new seal washer, but just gave it a liberal coat of The Right Stuff.
Install the nut and torque to 120 ft. lbs.
Reattach the driveshaft.
Fill the transfer case. 5 Quarts of Dexron III.
Install the transfer case shield.
After installing the new seal the first time, I still had a leak. I decided that the fluid must have been leaking around the outside of the seal. The second time around I coated the outside of the seal with The Right Stuff, and now it doesn't leak.
Remove transfer case shield (skid plate).
Disconnect front driveshaft from front output yoke. 4 bolts, 5/8" hex size. A big screwdriver helps to hold the yoke while loosening the bolts. You don't have to completely remove the driveshaft, I just held it up and out of the way with a jack stand.
Drain transfer case. The drain plug hex size is 1 3/16".
Remove the nut that holds the yoke on the output shaft. The hex size is 1 1/8". An impact wrench makes this easy.
Pull the yoke off the shaft. You may have to tap the yoke a bit from the back side to slide it off.
Remove the rubber seal washer.
Pull the seal with a seal puller. I used this one and pried against the output shaft. Engaging 4WD will hold the shaft from spinning and make this easier.

Clean the seal area and check for burrs where the new seal will sit.
The new seal, Timken 3946

I also installed a Timken KWIK-Sleeve on the seal surface of the yoke because it was pitted. The part number is Timken KWK99187. Sorry, no pics.
Apply grease to the seal lips and the seal surface of the yoke.
IMPORTANT, and the reason I had to do this twice: Coat the outside diameter of the seal with gasket sealer. I used Permatex The Right Stuff. This is a great product and can replace gaskets in many instances. I suppose RTV silicone would also work here.
Tap the new seal into place. A 2" iron pipe coupler attached to a 2" X 6" pipe nipple works perfectly as a seal driver.

My homemade seal driver in place. It is the right size for the OD of the seal, and clears the output shaft. There is enough room to tap it with a hammer from the front of the crossmember.

Install the yoke. I applied some sealer to the splines of the yoke to prevent any leaks there.
Install the seal washer. I didn't use a new seal washer, but just gave it a liberal coat of The Right Stuff.
Install the nut and torque to 120 ft. lbs.
Reattach the driveshaft.
Fill the transfer case. 5 Quarts of Dexron III.
Install the transfer case shield.
After installing the new seal the first time, I still had a leak. I decided that the fluid must have been leaking around the outside of the seal. The second time around I coated the outside of the seal with The Right Stuff, and now it doesn't leak.
Last edited:


