• Steel Soldiers now has a few new forums, read more about it at: New Munitions Forums!

  • Microsoft MSN, Live, Hotmail, Outlook email users may not be receiving emails. We are working to resolve this issue. Please add support@steelsoldiers.com to your trusted contacts.

Who are the experts on the Air compressor

GCecchetto

Well-known member
Steel Soldiers Supporter
313
293
63
Location
Woodside CA
Okay, this saga is behind me. The gasket that came in the kit I ordered is really nice and better than than the original paper only gasket in my opinion. Also installed the 175psi secondary relief valve. Removing the original relief valve was a royal pain in the a$$. Whoever installed it buried the threads in the dryer and the wrench flats are outboard of the vent holes which significantly weaken the body of the valve causing it to snap off. Eventually managed to remove it by driving a screw extractor into it and clamping a vice grip on the out side of the barrel. Applying force to both broke it free.

Unloader Gasket.jpg
 

GCecchetto

Well-known member
Steel Soldiers Supporter
313
293
63
Location
Woodside CA
Okay folks, truck is running like a Swiss watch and the issues with the compressor and relief valve on the air dryer are gone, but I need advice from the brain trust here. Surprisingly, the unloader cover is leaking all the way around its perimeter. I really thought the gasket above was going to be the bomb, but no love. I have another gasket that doesn't have the embossed sealant strip like above and am considering trying that with some of the anaerobic gasket sealant. I know many of you know much more about this type of stuff than I do, so looking for advice. I have already tightened the bolts further and really don't feel it's safe to put any more torque on the 1/4' bolts.
 

Ronmar

Well-known member
4,321
8,167
113
Location
Port angeles wa
Are the surfaces flat? I use a flat file to draw file mating surfaces flat(pull file perpendicular to the long axis of the file like a draw knife), to reduce any raised areas… For paper gaskets I have used a spray sealant called copper coat for decades when needed. Hang the gasket on a hook and spray both sides and allow it to tack up then install the gasket..
 

GeneralDisorder

Well-known member
Steel Soldiers Supporter
2,480
6,023
113
Location
Portland, OR
The gaskets are installed dry......

I've done half a dozen of these with the RNT-26 kit from Haldex without issue. Check the surfaces but I would guess it's probably that gasket. I haven't seen that one before with the pre-applied sealant stripe.

Make doubly sure that unloader access plate is FLAT.
 
Last edited:

GCecchetto

Well-known member
Steel Soldiers Supporter
313
293
63
Location
Woodside CA
Are the surfaces flat? I use a flat file to draw file mating surfaces flat(pull file perpendicular to the long axis of the file like a draw knife), to reduce any raised areas… For paper gaskets I have used a spray sealant called copper coat for decades when needed. Hang the gasket on a hook and spray both sides and allow it to tack up then install the gasket..
Thanks. Yes, the surfaces are flat. I used copper coat on the cork gasket I made initially. I will install the other gasket I have and see if that fixes the issue. If not, then I'll try the copper coat.

I ended up buying two kits due to a delay in shipping of the first kit. They were both listed as RNT-26 kits for the EL 1300/1600 compressor and the photos of the included parts showed the small and large unloader pistons. Both kits showed up with only the small pistons, so no o-rings for the larger pistons included. Fortunately, my pistons and springs look like new. When I installed the home made gasket, I replaced the o-rings on the pistons with o-rings from a assortment kit I have, found here. Not sure if the material is appropriate or not. If anyone knows the proper o-ring spec, please share.
 

GeneralDisorder

Well-known member
Steel Soldiers Supporter
2,480
6,023
113
Location
Portland, OR
I would use Viton or Silicone o-rings. HNBR might work too - those are used in refrigeration/AC systems so they can handle some oil and high temps/pressure - AC systems routinely hit 300 psi. The factory one's are Nitrile which is essentially just vulcanized tree sap with some carbon and extra seasonings. Synthetic Fluoroelastomers have come a ways since this compressor blueprint was smoked over by a (likely long dead) engineer with a tobacco pipe.
 

GCecchetto

Well-known member
Steel Soldiers Supporter
313
293
63
Location
Woodside CA
Okay, can someone explain what exactly is being said in the Haldex unloader maintenance instructions that says "Apply M-R spec 2527 lubricant to the unloader seals forming a 9/16 diameter ball around around each seal"? That seems like a huge amount of lubricant if they are literally saying to create a 9/16" ball of lubricant around the unloader piston heads, especially on the top side of the piston. Doesn't seem right. Maybe they mean a 9/16 diameter ring? I can see lubricating the piston shaft and the o-rings, but not with that much lubricant, and that wasn't what appeared to have been done when I originally removed the unloader cover.
 

GeneralDisorder

Well-known member
Steel Soldiers Supporter
2,480
6,023
113
Location
Portland, OR

If you carefully file pins on the side where they are D-shaped they can be contoured to fit in the intake valve cages. Just be careful that the force is being applied uniformly so you don't crack the cages. I've done like 5 or 6 compressors effectively with mine. Works great actually. The factory tool seems to be unobtainable in practice despite there being a part number for it - it doesn't even exist in the federal system despite the rebuild kit being listed for some 1970's fire apparatus.....
 

Skyhawk13205

Well-known member
191
309
63
Location
Alaska
I took the head off my parts truck and rebuilt that then swapped with my operational truck and I just finished replacing all the valves on that as well so I have a spare. I found all the intake valve disks damaged even tho the springs were still intact, the disks have gouge marks from slamming into the valve cages. I think a broken spring just accelerates the wear. I’d imagine running at redline also does not help the issue. I think a head rebuild is definitely a good preventive maintenance item.

IMG_9580.jpeg
 

Reworked LMTV

Expedition Campers Limited, LLC
1,544
1,203
113
Location
TN
You should at least rebuild the compressor cylinder head. Without exception, EVERY SINGLE ONE of these FMTV Haldex compressors I have opened up has broken exhaust valve springs. I came to this realization when the disc in one of my exhaust valves broke in half and slipped down into the cylinder - it punctured a hole in the compressor piston, scored up the cylinder wall, and beat the hell out of the head in that cylinder. I pulled the compressor but it ended up not even being rebuildable when the crankshaft broke trying to get the drive gear retaining nut off. I had to find a core to rebuild and get up and running again. Since that experience in 2021 I have opened up about five or six compressors and every one has had heat damaged exhaust valve springs that were broken into between 3 and 10 pieces and the discs have circles worn deeply into them from bouncing and rattling on the seat.

I carry a rebuilt cylinder head on board my truck as a spare after these experiences. It's only about $100 for the kit to rebuild them (includes the head gasket) and it's 6 bolts to swap it out on the truck. Takes maybe an hour tops. You are absolutely screwed if you have a failure like I had with a hole in a piston since that causes the compressor to push compressed air (under turbo-charger boost pressure) directly into the engine crankcase and it will blow oil out of the engine breather and likely cause other problems with gaskets and seals. Finding one of these compressors out in the field is very difficult - they are not the normal compressor spec'd by CAT. Those are only about 15 CFM. This is a military spec'd compressor that is 18 CFM - the assumption being the emergency mode of the CTIS system, and in general the military wants the air system to get the troops back from the field even with leaking hoses, etc. But you can't (easily) adapt something else in it's place since the power steering hydraulic pump is driven off the back and the support bracket is very specifically located and sized to run that exact pump - and without that brace you will crack the timing case as the entire weight of the compressor and hydraulic pump would be hanging off it by two bolt...... it's not something you want to deal with away from home. Thus my spare cylinder head and also monitoring wet tank inflation time at idle as a metric to ascertain compressor pumping efficiency and head-off any impending valve issues before they end in catastrophe.

The unloader piston o-rings also go hard/square and leak causing the unloader signal from the wet tank to leak wet tank air back through the unloaded intake valves. This is an insidious failure since it's invisible - the unload air signal leaks back into the engine intake.

In addition to ALL that - the new style Haldex PUREst dryer had a running change from a 150 psi relief valve to a 175 psi relief valve. I noticed that the 150 valve on mine would regularly open if I was under boost when the dryer purged. Partially due to it being spec'd too low and partially because my engine is juiced up to 370 HP and thus is running significantly higher boost pressure - and the compressor is fed air from the intake manifold post-intercooler where it's getting 30+ psi above atmospheric which is fed directly to the dryer when it unloads and the path between turbo and dryer is completely open.
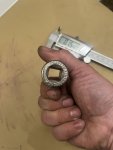
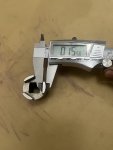
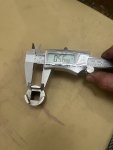
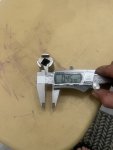
When you refer to Haldex, are you also including the Midland brand compressor for spring failures?
 

Reworked LMTV

Expedition Campers Limited, LLC
1,544
1,203
113
Location
TN
Same thing. Haldex owns Midland. All FMTV's use the same compressor.
I have to admit, I have never rebuilt one of these. I am doing preemptive head rebuild of a Midland this week. I have the compressor out to add the A/C PITA bracket. Any pointers for the valve and spring replacement? I found some videos on this, but most kind of blew through it pretty fast.
 
Top