

jhighsmith
Member
- 23
- 27
- 18
- Location
- tampa, florida
Greetings Brothers and Sisters
I have owned many Humvees and noticed a re occurring problem, either the glow plugs fail to come on at all, OR worst case scenario, they stay on all of the time and burn up.
I have went thru this repeatedly and came up with a fix that I am happy with.
I took my latest variant smart start box ( which happened to be bad ) and opened it up, and then, using a multi meter on continuity, I isolated the glow plug output, which is a #8 green wire - this wire comes from the computer board, thru the cannon plug at the upper fire wall, on the other side of the cannon plug, male side, this wire separates into 8 circuits ; going to each glow plug.
Cut the green wire at the circuit board and place a yellow heavy gauge eyelet 3/8ths on the green wire.
Using another dead start box, remove the 24 volt solenoid that controls the engine on and off, it is the only one in there.
This donor solenoid can be bolted to the corner cover of the box I was putting back in the truck.
Place the green wire on the 3/8th lug, of the donor solenoid
Run another yellow eyelet wire to the main power input at the computer board - now you have an input 24 volt and an output to the glow plug set.
Using a low voltage marine grade horn button, mount this next to the test port or the inboard side facing you as mounted in the truck
1 side of the horn button will go to the main 24 volt input line, the output from this button will go to the trigger side of the donor solenoid
Test fit your pieces so that everything fits in the box when it is bolted back together before mounting the solenoid and horn button.
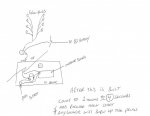
I added a 24 volt LED light in the humvee style next to the horn button, the positive lead goes to the glow plug lug on the solenoid output, the negative goes under the mounting bolt of the solenoid. - Remember LEDs are polarity sensitive
Now when you want to activate your glow plugs ;
1) Turn on your ignition switch
2) Depress glow plug button for (4) seconds ; counting 1 thousand 1, 1 thousand 2 etc.
3) Rotate ignition switch to engage starter
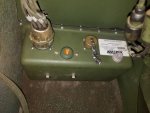
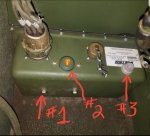
*Note the Picture : #1 is the solenoid mounting bolts
#2 is the warning light that the glow plugs are activated
#3 is the power button - I used a sealed marine grade horn button. Voltage / Amps does not matter, as it is only engaged for (4) seconds.
If anyone is interested in this any further, please PM me, and I can take my box apart and post photos of the exploded view. - I did not do this as I built it, as it was a quick fix to run the truck, however, I mentioned it to some friends and they liked the idea so I thought I would share.
Joe
I have owned many Humvees and noticed a re occurring problem, either the glow plugs fail to come on at all, OR worst case scenario, they stay on all of the time and burn up.
I have went thru this repeatedly and came up with a fix that I am happy with.
I took my latest variant smart start box ( which happened to be bad ) and opened it up, and then, using a multi meter on continuity, I isolated the glow plug output, which is a #8 green wire - this wire comes from the computer board, thru the cannon plug at the upper fire wall, on the other side of the cannon plug, male side, this wire separates into 8 circuits ; going to each glow plug.
Cut the green wire at the circuit board and place a yellow heavy gauge eyelet 3/8ths on the green wire.
Using another dead start box, remove the 24 volt solenoid that controls the engine on and off, it is the only one in there.
This donor solenoid can be bolted to the corner cover of the box I was putting back in the truck.
Place the green wire on the 3/8th lug, of the donor solenoid
Run another yellow eyelet wire to the main power input at the computer board - now you have an input 24 volt and an output to the glow plug set.
Using a low voltage marine grade horn button, mount this next to the test port or the inboard side facing you as mounted in the truck
1 side of the horn button will go to the main 24 volt input line, the output from this button will go to the trigger side of the donor solenoid
Test fit your pieces so that everything fits in the box when it is bolted back together before mounting the solenoid and horn button.
I added a 24 volt LED light in the humvee style next to the horn button, the positive lead goes to the glow plug lug on the solenoid output, the negative goes under the mounting bolt of the solenoid. - Remember LEDs are polarity sensitive
Now when you want to activate your glow plugs ;
1) Turn on your ignition switch
2) Depress glow plug button for (4) seconds ; counting 1 thousand 1, 1 thousand 2 etc.
3) Rotate ignition switch to engage starter
*Note the Picture : #1 is the solenoid mounting bolts
#2 is the warning light that the glow plugs are activated
#3 is the power button - I used a sealed marine grade horn button. Voltage / Amps does not matter, as it is only engaged for (4) seconds.
If anyone is interested in this any further, please PM me, and I can take my box apart and post photos of the exploded view. - I did not do this as I built it, as it was a quick fix to run the truck, however, I mentioned it to some friends and they liked the idea so I thought I would share.
Joe
Attachments
-
 107.1 KB Views: 271
 -
 92.5 KB Views: 305
 -
 50.8 KB Views: 293
Last edited: