• Steel Soldiers now has a few new forums, read more about it at: New Munitions Forums!

  • Microsoft MSN, Live, Hotmail, Outlook email users may not be receiving emails. We are working to resolve this issue. Please add support@steelsoldiers.com to your trusted contacts.

1009 Rear Window Fix Updates?

markx250

New member
30
0
0
Location
Charlottesville, VA
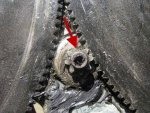
Well, 1 week into new ownership and the manual rear window mechanism went out. The action was notchy and then it just would not move. Took it all apart and even with it on my workbench, the regulator would bind up about every turn of the crank, which made me suspect I had a missing tooth for the small center gear. Went ahead and ground off the rivets for the cover and that sure was it (see pic below of faulty gear with cover removed).

What I found was . . .

  • Felt in side channels was almost totally disintegrated
  • Missing tooth in regulator driver gear
  • Snapped off 1 pawl of the handle clutch (I will take credit for that)
A summary of searches of past threads . . .

  • Flawed design
  • Weak parts (diecast pot metal for clutch and gears)
  • New LMC parts not much better?
  • Electric is an option to consider
Just looking for any more recent updates on fixing this back up right. Did LMC find a new supplier for these ... seems there were issues about a year ago.

As for the felt, someone here had the great idea of getting some carpet or floor mats, cutting into strips and then putting into place with some 3M spray adhesive. Great idea for a low $$$, but effective fix.

I am going to start exploring my local junkyard options tomorrow and am kinda leaning towards the electric option if I can find a donor tailgate.
 

Attachments

MuleMac01

Military vehicle collector
Steel Soldiers Supporter
890
158
43
Location
Las Vegas Nevada
just get a new GM one rockauto.com has em for about $140 then get new window guide Felt ( you can pick this up at crafting store ) this is a must then your problem is over for years unless you are rough with it.
 

markx250

New member
30
0
0
Location
Charlottesville, VA
Agreed wreckerman. It's a shame. Although it may at times be subjected to a high load (window get jammed), it does not really have to experience that many cycles so it should last.

I look at the dang regulator and 1st thing comes to my mind is that it should be a linear actuator (threaded rod, bearing supported at both ends with beefy Acme thread). But you can't really compete with the low cast and lighter weight of those cheapo diecast stuff. Just think back of some of the stuff they put out in the 80s.
 

markx250

New member
30
0
0
Location
Charlottesville, VA
Local yard has an '89 and a '90 suburban, both with power rear glass. I have seen mention of using suburban tailgate guts in the blazers.

Anyone know if the regulator and associated parts will transfer over to the 1009?
 

Warthog

Moderator
Super Moderator
Steel Soldiers Supporter
13,774
232
63
Location
OKC, OK
Local yard has an '89 and a '90 suburban, both with power rear glass. I have seen mention of using suburban tailgate guts in the blazers.

Anyone know if the regulator and associated parts will transfer over to the 1009?

Been done many times.
 

ryan77

Well-known member
2,584
56
48
Location
Cary IL
My m1009 i just got from ft hood is missing the tail gate im doing a power one no more crank bs! Ive replaced felt, gm regulator and it still breaks!
 

markx250

New member
30
0
0
Location
Charlottesville, VA
Visited the yard today, and was able to complete Phase 1, hot-wiring the rear window to go down so I could open the tailgate of the '89 suburban. Everything looks good inside. The '89 setup has the motor driving the pinion gear for one of the arms. Earlier setups of photos I have seen used a blue speedometer-like cable to connect the motor.

Phase 2 is extracting the guts. Weather is going to be nice tomorrow, so I am going to drive the 1009, sans the rear window, to the yard so I can make some visual comparisons. I think I will snap some photos of the work in progress.
 

markx250

New member
30
0
0
Location
Charlottesville, VA
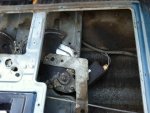
UPDATE - an '89 or '90 Suburban power window setup (pic below) WILL NOT transfer over to '84 1009. With this version, the motor is geared to the right rack (earlier versions use a speedometer cable attached to a remote-mounted motor).

While the bolt holes are a match, the issue is clearance ... the suburban has about 2" more of depth inside the gate which provides room for the motor to fit down in. Looking at the outside of the tailgate, the suburban bows out whereas the Blazer bows in slightly.

Oh well, at least I learned how to hot-wire the power window.
 

Attachments

swiss

Well-known member
Steel Soldiers Supporter
2,731
856
113
Location
Oakwood, Ga
Mark you are going to have to Hand Crank :) This is a mans vehicle, no power needed.

Swiss
 

ryan77

Well-known member
2,584
56
48
Location
Cary IL
Suburban glass and tailgate will not work at all, Bring a cordless tool battery to junk yard to hot wire it!! I just picked up a loaded tailgate rust free yesterday for $100.00 on craigslist and the guy gave me a rust free drivers door for free!!!
 

topgun217

Member
376
0
16
Location
The Northern Border of Ohio
Try a front power window motor instead of the suburban motor. It will fit with some work and imagination. A buddy of mine did his civi blazer and it works fine. If you can find a civi motor from an old blazer at a junk yard it will be cheaper or........there's always _bay!
 

markx250

New member
30
0
0
Location
Charlottesville, VA
I tracked down some Blazer power rear window guts and finally got that installed and working, but not without 2 major challenges.

The first one was clearance between the bottom rail on the window and the rivet heads on the regulator arms. Just enough for it to catch and hang up. I first tried some creative grinding, but the ultimate solution was a 2x4 and some persuasion from a 5lb hammer to drive the mounting plate down a tad.

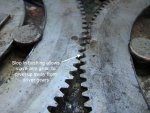
The second one was just enough slop in the slave (DS) regulator arm so that with the window seals in, there was enough force for it to sometimes jump teeth and go out of time. At first I thought I could bend the arm back, so the when bolted to the window, it would pivot some and the teeth would stay down and engaged, but that was not enough.

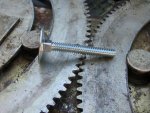
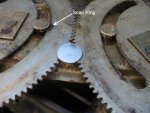
Ultimately, I wanted to make sure the teeth stayed engaged, so I needed a low-profile solution. I ended doing 2 things. I installed a 3/4" snap ring to the rivet to remove slop in that location, which alone was likely enough. But while in Lowe's, I saw the 1/4" elevator bolt in the pic below. I drilled and tapped a hole for that and double-nutted it on the other side. It is adjusted just snug enough to keep the slave gear in plane with the master gear. No chance for it to go back out of time now.

So, I now have a window again, although I am still using a battery-powered drill to operate it for now. Next step is to run the wiring which hopefully will go a little smoother than this part did :D
 

Attachments

nf6x

Feral Engineer
1,630
50
48
Location
Riverside, CA, USA
I hope that you don't mine my hitchhiking on this thread, but I'm having similar tailgate problems that didn't seem to justify a brand new thread.

Today, I tried to fix the endgate window mechanism in my M1009. From LMC, I ordered a new window regulator, both side channels (originals had no felt left and were pretty rusty), new front and rear window seals for the top of the endgate, and both plastic end caps. I cleaned up the window so it wouldn't be dirty where it slides in the slide channels. I applied dry film lube to the two roller channels on the sash, and the bar that unlocks the latch when the window is down. I installed everything, and adjusted the side channels into (hopefully) correct alignment. The second seal was hard to get clipped in place.

Well, the window was hard to crank up even with new, clean parts where they counted. It wouldn't go all the way up into the gasket on the shell, and the crank has already started skipping; I haven't pulled it back apart yet, but it feels like one or more teeth on the small pinion may have already broken. The window is crooked, so I think that the regulator arms have already jumped out of timing.

In my opinion, the design and construction of the endgate window mechanism are utter junk! :rant:

Would a new regulator from a GM dealer be any better than the LMC one that I seem to have wasted my money on, or are they all the same? Does it sound like I did anything obviously wrong? Is there a better approach to make the endgate window work well?
 

markx250

New member
30
0
0
Location
Charlottesville, VA
Agreed. The design is weak. If the window is hard to crank up due to alignment issues or even fresh seals, then it will fail on you sooner than later. If not the regulator, then other weak links such as the pawl or the handle which are all diecast and have sloppy fits.

That is why I went the electric route, since it eliminated everything to do with that crank handle mechanism. That still left the regulator, but once I got that right (see prior posts) it has been problem free.

Whether you go manual or power, the whole window assembly has to work smoothly; they just are not beefy enough to tolerate high actuation forces.

I would start with the regulator. If you have had the coil spring out, make sure it is in right to assist the window going up. Bolt it in and make sure the mounting plate is not warped and causing the gears to bow out. Crank it up and down a few times to make sure it is smooth.

Then bolt the window in, leave the tailgate down, and again crank the window up and down (take care to support the window as it reaches it full up position). Nothing should bind and the window should not make any contact with the regulator itself. Also, when you bolt the regulator arms to the bottom window channel, pay attention to if you have to push each arm down to bolt it on or pull it up. On used regulators, this could cause it to pop out of time is there is bushing slop in the regulator.

Only when you have everything working good with the tailgate down should you proceed to putting the tailgate up for final testing. With the tail gate, test it first without any of the tailgate seals. It should go up fairly easy until is start to contact the shell seals.
 

nf6x

Feral Engineer
1,630
50
48
Location
Riverside, CA, USA
Thanks! I pulled the regulator back out, and confirmed that one of the pinion teeth broke off. Reading the return policy on the back of the LMC invoice, it doesn't appear that I have any recourse since I installed it before the piece of junk failed. :evil:

Pushing the window up manually from inside the truck, I can feel that it takes a lot of force to move it, probably due to the brand new seals. Well, at least it should stay up by friction and keep the weather outside while my truck is parked.

I don't perceive a benefit to replacing the manual crank with an electric system right now, since it seems that the regulator is the weak point anyway. I had already reassembled the crank using the best parts from the three M1009 trucks that I got from GL (all of which had rear window problems), and the crank itself seems OK.

Do you suppose that the seals will settle in and not grab the window so hard if I just leave it parked with the window up for a while? It seems clear that another regulator will just fail immediately due to the tight seals. I'll also take another look at the side channels, but I think they're adjusted OK. If I recall correctly, the window seemed to crank up and down OK with the new regulator (before it broke) and new side channels, before I put in the new seals.

I don't see a clear way to repair the new regulator since one of the pinion teeth broke off... I guess it's junk now?

Grr, this is very frustrating. I had my hopes up that replacing the regulator and side channels would fix my window problems today, and the parts were hardly cheap. :( Did I make a mistake by ordering them from LMC instead of the parts desk at the local Chevy dealer, or would I have gotten the same parts quality?
 

markx250

New member
30
0
0
Location
Charlottesville, VA
Pretty sure they would be the same thing from China? The original pinion looks to me like a die-cast part. If it was hardened steel, it would never shed teeth or go out of time. But then that just means the next part down the line, the pawl, would start to fail.
 
Top
AdBlock Detected

We get it, advertisements are annoying!

Sure, ad-blocking software does a great job at blocking ads, but it also blocks useful features of our website like our supporting vendors. Their ads help keep Steel Soldiers going. Please consider disabling your ad blockers for the site. Thanks!

I've Disabled AdBlock
No Thanks