• Steel Soldiers now has a few new forums, read more about it at: New Munitions Forums!

  • Microsoft MSN, Live, Hotmail, Outlook email users may not be receiving emails. We are working to resolve this issue. Please add support@steelsoldiers.com to your trusted contacts.


Cab Reinforcement Plate Installation M109/ M35s

islandguydon

Well-known member
Steel Soldiers Supporter
3,724
778
113
Location
Michigan
Cab Reinforcement Plate Installation M109/M35s

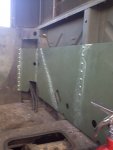
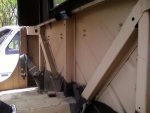
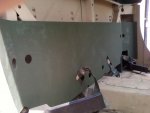
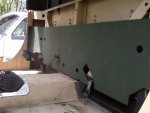
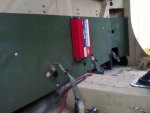
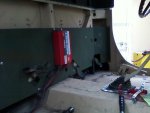
I got an early start on my day and found myself removing the 2 front seats around 9:00am. I picked up this reinforcement plate from MKcoen, in the SS classifieds. The unit came packaged with 96 industrial rivets, 6 nut and bolts sets and a few extras.

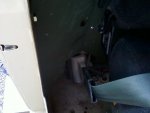
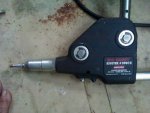
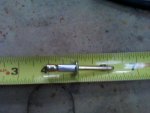
The steel plate is allot heavier than it looks. It was a perfect fit. I drilled the 4 corner spread, 2 each end installed the bolts & locknut's. The install kit came with a bag 96 of the biggest rivets I ever had to work with. I had to go to MikesMobileMarine and borrow the tool, Its called BIG DADDY. I installed only 16 of the 96. That was plenty tough enough. I also welded 8 spots that were accessible. I am confident in the stability.

I believe the plate is to help mount a gun ring which I do not have so the added rivets were unnecessary. I am impressed with the cut outs for the seat belts and the whole plate with a little help just kinda snapped in place.

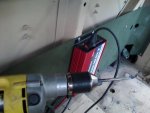
I also added a 1000/2000 spike, inverter. It ran the Dewalt drill no sweat.
 

Attachments

Last edited:

islandguydon

Well-known member
Steel Soldiers Supporter
3,724
778
113
Location
Michigan
Hey Jim, it takes 4-5 minutes per hole. I hit the plate with my fist all over and there was no noise makers. I have to install a drivers seat tomorrow morning and will add a few more.

I have a feeling the way it fits there should be no new squeaks the plate is tight.
 

islandguydon

Well-known member
Steel Soldiers Supporter
3,724
778
113
Location
Michigan
I did it because its was bought from a SS member and adds strength to the cab, also keeps things square. Also you can finally mount things on the rear wall with out drilling to the outside.I am going to fill the 2"gap with Great Stuff expanding foam. That might help quiet the cab some.
 

hndrsonj

Senior Chief/Moderator
Super Moderator
Steel Soldiers Supporter
7,583
358
83
Location
Cheyenne, WY
Hey Jim, it takes 4-5 minutes per hole. I hit the plate with my fist all over and there was no noise makers. I have to install a drivers seat tomorrow morning and will add a few more.

I have a feeling the way it fits there should be no new squeaks the plate is tight.
I woulda thought under a minute a rivet? They are great to mount stuff to.
 

islandguydon

Well-known member
Steel Soldiers Supporter
3,724
778
113
Location
Michigan
Jim,

The bends are double thick, 3/8" + the rear structure steel. I have cobalt bits and a good drill. I was beat at 10,lol There are also 4 point structure end nuts and bolts.

Lights out for me I have Parade Duty Tomorrow. Peace Out..!
 

hndrsonj

Senior Chief/Moderator
Super Moderator
Steel Soldiers Supporter
7,583
358
83
Location
Cheyenne, WY
its a couple minutes per hole because you have to drill each one first. it's no short task.
The way to do them is to clamp them in, draw lines in the middle of the ribs where the rivets go, them remove it, drill all holes in the plate, put it back in, drill all holes through the cab, cleco it in, then set the rivets.
 

islandguydon

Well-known member
Steel Soldiers Supporter
3,724
778
113
Location
Michigan
mkcoen,

Nothing 30 minutes and a couple cans of rapco tan wouldn't cure. I had to paint the new installed seat bases anyway. Again, thanks for the great deal...!:driver:
 

rrrr

Member
752
0
16
Location
Missouri
That steel is tough. Took me 3 days and 9 drill bits to do all the drilling and rivets. I went to Harbor junk and got their big air riveter. Worked great.
 

hndrsonj

Senior Chief/Moderator
Super Moderator
Steel Soldiers Supporter
7,583
358
83
Location
Cheyenne, WY
I removed the seats then set up and drew the center lines of the braces. I then removed the plate marked/center punched/ and drilled the plate. Reset it in the truck. Drilled two at a time 1/4 then did the final drill one at a time with the correct size drill and riveted with the HF 1/4" air riveter ($69). I still have 4 rivets to put in. I bought two new drill bits which are still sharp. I think I have right at 3 hours in it.
 

Attachments

6x6junkie

New member
164
2
0
Location
p.a.
yea took me more time to get the seat out of the way. they are well worth the 40 bucks you cant buy the rivets for that. just get a decent drill bit
 
862
5
18
Location
Reading Pa
What about gripserts? The work like rivets but they hae threads on the inside. So you could bolt the panel in place. Then you could put stuff (fuse blocks, power inverters, etc) in between the exterior wall no the panel, if you ever have to get into the stuff you could just unbolt the panel.
 

hndrsonj

Senior Chief/Moderator
Super Moderator
Steel Soldiers Supporter
7,583
358
83
Location
Cheyenne, WY
What about gripserts? The work like rivets but they hae threads on the inside. So you could bolt the panel in place. Then you could put stuff (fuse blocks, power inverters, etc) in between the exterior wall no the panel, if you ever have to get into the stuff you could just unbolt the panel.
It would be impossible to line up 80+ Rivnuts. Also you can stick your hand behind the panel almost everywhere.
 
Top
AdBlock Detected

We get it, advertisements are annoying!

Sure, ad-blocking software does a great job at blocking ads, but it also blocks useful features of our website like our supporting vendors. Their ads help keep Steel Soldiers going. Please consider disabling your ad blockers for the site. Thanks!

I've Disabled AdBlock
No Thanks