• Steel Soldiers now has a few new forums, read more about it at: New Munitions Forums!

  • Microsoft MSN, Live, Hotmail, Outlook email users may not be receiving emails. We are working to resolve this issue. Please add support@steelsoldiers.com to your trusted contacts.

M-1028 Paint job, 383 green CARC / Rock Slider installation.

islandguydon

Well-known member
3,724
783
113
Location
Michigan
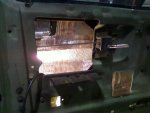
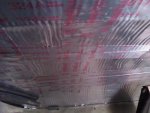
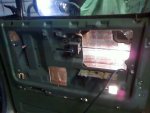
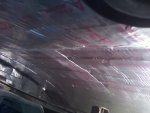
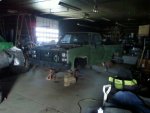
Today; I took the doors apart and applied 3 layers of Peel and stick. I have learned to heat up the product or the steel first for a good stick. I used a salamander to heat up the exterior of the door to get it HOT to the touch.

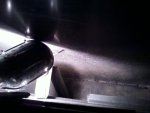
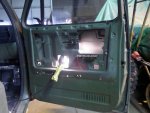
Then I applied the first layer horizontally on the bottom and layered up to the top of the door, taped each seam. Then repeated the process with a 2" overlap to bond the first layer seams. Then the 3rd final layer starting all the way to the bottom working my way up. The final layer was taped at the seams. I then heated the door again and used a roller to smooth out the best I could. There is not much room to work so I am happy with the quality of the outcome.

Now when I tap on the front fender I get a tin sound. You tap on the doors and you get a thunk. WHOA..........! I achieved my goal....fat lady sings
 

Attachments

islandguydon

Well-known member
3,724
783
113
Location
Michigan
Safety First

Be careful working with CARC - the chemicals in it include some ugly stuff that you can become sensitized to. The Army requires a supplied-air respirator to spray this stuff.
I set up Tom the guy painting the truck with a new Israeli gas mask and few new unopened radiological / biological canisters. Also a full painting suit. I do not have access to an air supply hood for him so I am doing the next best thing. Thanks for the safety tip...! Pictures to follow.
 

islandguydon

Well-known member
3,724
783
113
Location
Michigan
1008-1028 cab roof sound and temperature insulation.

I was going to insulate the cab roof with Dyna mat then last night I had an Epiphany.

Since the cab roof is a double shell with a 1-2" air gap between the two I decided to drill 6 strategic points and evenly fill the gap with a product called great stuff expanding foam. The R factor is good and I am sure the sound deadening quality will be OK as well.

My friend Mike said to use the low pressure foam so curing the foam does not expand and blow out the roof. He used the large crack filler between 2 pieces of 22ga welded steel and it blew out a weld when curing. The window and door is a low pressure cure.

I am thinking this is a quality, cheap way to sound deaden and insulate the roof and rails leaving the inner roof origional...!

Proprietary low-pressure formula designed not to bow bend window and door frames
Ideal for filling sealing other areas where low-pressure flexible foam is desirable
Provides real insulation value which complements energy efficiency of the window or door. Greater insulating value than chinked fiberglass or caulk
Soft, pliable foam is forgiving, easier to remove if gap is overfilled. Cured foam can be stuffed back into the gap without trimming
One 12 oz. can foams up to six average sized residential windows (36' x 60", 3/8" wide gap, and 1" deep)
Repels/deflects water
Tack free in 8 minutes; Trims within 1 hour
Flexible foam permits expansion and contraction
Paint able, sandable and stainable
Yellow colored foam
Cures flexible
Conforms to ASTM & AAMA standards
 

Attachments

ryan77

Well-known member
2,584
56
48
Location
Cary IL
I use that foam at work to set shower bases and bath tubs! It will lift a bath tub if its not weighed down!!:shock:
 

islandguydon

Well-known member
3,724
783
113
Location
Michigan
I just drilled 6 strategically placed 1/4" holes to fill the roof gap, rear rails and rear wall gap under the window. I filled the gaps with the window and door great stuff. This is a low pressure foam and will not bulge out the roof like the BIG CRACK filler great stuff will.

I will go back in the morning to check it out. The product is paint-able so the 6 holes will be non discript. I hope it makes a difference on the sound deadening I am shooting for. Pics to follow.

UPDATE: 4/19/2012

It took 6 cans of window and door Great Stuff to fill the gap between the ceiling and roof, also the rear cab rails and back wall 12" under the rear window.

A word of caution, if you do this on your own truck fill from one side to the next with all the holes pre drilled. This way the foam will take the path of least resistance and flow to the vent holes on the opposite side for an even fill. There are no pictures for this mod since it can't be seen but when you tap on the roof anywhere all you get it a THUNK not a tin sound. I even tried to collapse the center of the roof by pushing down and its strong as chit. I covered the small filler holes with clear epoxy mixed with 383 green. You can't tell where the holes are drilled. I am really happy with this mod and recommend it to anyone wanting a quieter truck with out doing the Fat Mat and liner on the ceiling.
 
Last edited:

islandguydon

Well-known member
3,724
783
113
Location
Michigan
I finally got around to painting the Grab Bars I got from Shakem-Deep.

I was impressed with the product from the start. I opened the box and I found every tool to install besides the drill. He even sent the drill bit for the expanding grommets. I painted them with flat black to match the motif of the ride.

I also tested the strength of the expanding grommets. I did 10 pull ups each side then checked them with the socket wrench and they did not move at all. Another fine product from Shakem-Deep.

Thanks Darren..![thumbzup]
 

Attachments

islandguydon

Well-known member
3,724
783
113
Location
Michigan
The fuel line directly coming from the tank is a hard line. It crosses over to the right side then it makes a turn to the front. That turn is a factory rubber hose. Cut the line and add the pump. The pump is made to push fuel so install as close to the tank as you can.Remember it grounds to the frame so make sure you have a good ground. I doubled up jic. Easy 1 hour install including running the power to the front.
 

GreenBull

New member
81
0
0
Location
SE Michigan
I did a search for the Doghead relay upgrade. I went to Napa and paid $14.00 for the part. The box said it was for a lawn mower. Easy install I would think an hour tops.
The 1st pic is from the site, 2 is stock relay, 3 Site pic & new relay, 4 complete job.

Don, when I did mine I turned around the STE-ICE connector on the relay bracket. there is enough slack on the harness and turning it around hides it up under the dash pretty well. You can still get at it easy enough if you need it for some reason. One other thing I'd suggest is using a piece of bike innertube to make a boot to go over the exposed relay lugs of the new 12/24 starter relay. The truck is looking good.
 
Top
AdBlock Detected

We get it, advertisements are annoying!

Sure, ad-blocking software does a great job at blocking ads, but it also blocks useful features of our website like our supporting vendors. Their ads help keep Steel Soldiers going. Please consider disabling your ad blockers for the site. Thanks!

I've Disabled AdBlock
No Thanks