• Steel Soldiers now has a few new forums, read more about it at: New Munitions Forums!

  • Microsoft MSN, Live, Hotmail, Outlook email users may not be receiving emails. We are working to resolve this issue. Please add support@steelsoldiers.com to your trusted contacts.

Airbornebandsman's M109 Conversion

zout

Well-known member
7,744
154
63
Location
Columbus Georgia
Its called experiece. No one is ignorant - just un-trained.

Take it a step at a time and you will wind up with your goal's ending and enjoyment.

Gotta lighten up on yourself there trooper - its a big project and you are tackling it head on with progress - I see no failure in any of that.

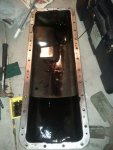
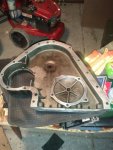
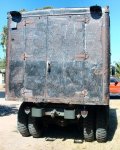
Great pics and enjoying seeing your project come together.
But then again I am nothing but a :popcorn:eating bystander.
 

M35A2-AZ

Well-known member
Steel Soldiers Supporter
3,218
383
83
Location
Tonopah, AZ
I do somethings that I think about later, why did I do that!!!
It's all about learning about these trucks.
It may not be wrong, it just takes a little longer. Well thats what I keep telling myself.
[thumbzup]
 

caliber1

New member
995
8
0
Location
Elcho, Wisconsin
Mik, don't be so hard on yourself. I have discovered that this whole Deuce ownership thing is a learning experience. I can rebuild a small block Ford in my sleep, but this is another animal all together. Rock on man, your truck is looking awesome.
 

mkcoen

Well-known member
Steel Soldiers Supporter
5,637
381
83
Location
Spring Branch, TX
Well me and the wife spent the last two days putting the interior paneling back on the inside of the van (no small feat when it is 110 degrees out).
Cheer up. It was only 105 here today so it'll feel almost like fall when you get here. Good luck and look forward to your arrival.
 

silverstate55

Unemployable
Steel Soldiers Supporter
2,071
868
113
Location
UT
I really dig the strobe mount. Hint hint.. just need 1...
The measurements (in inches) are written on the cardboard template in the photos above...I just cut them from an old metal splashguard I purchased from M16TY.

:mrgreen:
 
814
16
18
Location
Universal City, TX
Ok, got the pan off the truck. Got the gasket surfaces as clean as I could without scraping the metal off. Tonight I will get the old gasket and clean off the surface where the oil pan connects to the engine. Hopefully I can get the pan mounted tonight as well. I plan on using a thin coat of permatex gasket sealant to make sure the gaskets seal properly. (the surfaces do have some imperfections). Wish me luck.
 

Attachments

Warthog

Moderator
Super Moderator
Steel Soldiers Supporter
13,774
228
63
Location
OKC, OK
Hey Mik,

How do you eat an elephant? One bite at a time.

You are doing great work. Just keep plugging away at it. :grd:

Also remember, when you start your trip, I'll be on call to help out. Be it with parts overnighted or driving to lend a hand.
 

hwcurtice

Well-known member
1,558
35
48
Location
Moncks Corner, SC
I am am idiot. I just found the front cover gasket. I thought it was part of the oil pan gaskets. S$%t, now I am behind cause I am an idiot.
As others have said, great work.

And if you're an idiot, what does that make some of the rest of us? Definitely not genius material. From everything I've seen, while watching someone build something out of either nothing, or from someone else's creation, you learn a lot as you go.

The only idiot is the one that doesn't ask for help or ask questions. And you've done both. And you've taken people's advice to heart, along with their support.

Keep on keepin' on!
 

silverstate55

Unemployable
Steel Soldiers Supporter
2,071
868
113
Location
UT
The hard part is done; I HATE removing old gaskets on these trucks! Scraping RTV is easier than removing some of the old Deuce gaskets.

It will go just fine, especially with Tom's recommendation of Permatex to hold the gaskets in place while you reinstall everything. How nice to actually hold the oil in the engine and not have to use a 5-gallon drip bucket every day!! :mrgreen:
 
814
16
18
Location
Universal City, TX
OK, finally got the cover, pan and most of the engine back together. Still have a few things left to do. A piece of advice, don't remount the oil pan by yourself, that is a horrible job by yourself for the first few bolts. Today have to replace the valve cover gaskets, flush the radiator and pray that it doesn't leak oil (as much anyways). Still have to track down that pesky fuel leak though.

Also grinded off and replaced alot of rivets on both sides of the truck that were broken.(another piece of advice, wear more safety gear, pic of my neck).
 

Attachments

silverstate55

Unemployable
Steel Soldiers Supporter
2,071
868
113
Location
UT
Airbornebandsman brought the repaired Band Wagon back over to my place yesterday to get some work finished on her. I finished welding up no less than 14 (yes, FOURTEEN) sheet metal patches I cut from an old splashguard to repair rust holes in the roof....there were cracked & lifted fiberglass patches placed over entire rusted holes on the roof, a couple were so large I could actually see inside the van body. This won't do, so I cut out 14 rust spots and welded in some steel patch panels. They aren't pretty (welding sheet metal is difficult), but they'll work and they look a LOT better than the rusty holes. I did clean out as much rust as I could around each hole before welding in the new patch panel.

The last photo shows the remains of the original pieces I cut out and used as templates for new patch panels.

This had to be done before any priming could commence.
 

Attachments

silverstate55

Unemployable
Steel Soldiers Supporter
2,071
868
113
Location
UT
Stripping the paint off of this monster is something I NEVER want to repeat. There were so many layers of paint, and many many rust spots underneath the paint, that stripping the entire body was the only way to go...otherwise it really would have looked like crap.

Here is the van body stripped down to the original red oxide primer (and bare metal in spots) in preparation for Rusty Metal Primer.
 

Attachments

silverstate55

Unemployable
Steel Soldiers Supporter
2,071
868
113
Location
UT
And this morning in the sweltering heat I primed the body as thoroughly as I could, starting on the roof and working my way down. I only ended up with a couple of runs, I'll sand those out in a day or two so the CARC 383 acrylic Behr paint will go on nice and smooth.

We'll give it at least a good 72 hours in the hot dry cllimate here to hopefully let the enamel primer cure before coating it with the Behr acrylic exterior paint. The original coat behind the cab area seems to be holding up very very well so far. And I think it won't be much of a stretch to ensure 3 weeks of dry weather for the Behr to fully cure as well. So either Thursday or Friday I'll shoot the color coat over the primer, and see if it needs a second coat.

The good news was that it took less than 1/2-gallon of Rustoleum Rusty Metal Primer to fully coat the van body.
 

Attachments

Top
AdBlock Detected

We get it, advertisements are annoying!

Sure, ad-blocking software does a great job at blocking ads, but it also blocks useful features of our website like our supporting vendors. Their ads help keep Steel Soldiers going. Please consider disabling your ad blockers for the site. Thanks!

I've Disabled AdBlock
No Thanks