• Steel Soldiers now has a few new forums, read more about it at: New Munitions Forums!

  • Microsoft MSN, Live, Hotmail, Outlook email users may not be receiving emails. We are working to resolve this issue. Please add support@steelsoldiers.com to your trusted contacts.

Airbornebandsman's M109 Conversion

silverstate55

Unemployable
Steel Soldiers Supporter
2,070
868
113
Location
UT
Slowly but surely...I hope by Friday morning to start priming the area that will be covered by the Deuce cab, then start working on the rear doors.
 

Attachments

silverstate55

Unemployable
Steel Soldiers Supporter
2,070
868
113
Location
UT
So as it turns out, the remaining paint in the above photo took me all of a 12-hour day yesterday to remove, and I still had to put in another 3 hours this morning to get it off of the top cap. I removed the front window and painted it separately; it will get reinstalled tomorrow.

Today Airbornebandsman & his wife came over to help, and did a heck of a lot of work inside removing interior panels for me. I was able to place some small pieces of steel stock behind 7 large holes in the front sheet metal panels, and weld them with my low-current wire-feed welder...then grind them smooth & prepare for paint! I also replaced a bunch of rivets that were missing, as well as fix many small little issues. Airbornebandsman's wife had to go to work, so he took her there and then returned with his daughter (she got to play in our pool while we worked in the heat...how does that work :mrgreen:) so we could do some more work. We used my 10-ton hydraulic body/frame repair ram to straighten out the rear door frame, and then I used my torch to heat up the forklift damage area...I pounded it as flat as I could, then tack-welded more steel stock behind it as reinforcement and started to weld it into place & fill holes with weld beads, when the afternoon sun really started taking its toll on us. We agreed to reinstall the rear door & handle tomorrow morning when it's cooler out, and so we decided to go ahead and spray the front of the van body with the Behr Exterior Acrylic paint he purchased from Home Depot in CARC 383 color (Home Depot color tint codes found here in this thread).

I added about 20% Flow-Trol to slow the drying time, since here with triple-digit temperatures and 0% humidity usually means the paint is dry as soon as it leaves the sprayer...then I added about another 20-25% water to thin the paint for spraying, and at 40psi it sprayed GREAT! We didn't have time to prime the area first, as that would have required a minimum of 3 days (72 hours) for the primer to cure before adding color coats, so we sprayed the area that will be covered by his Deuce cab only. The rest will be primed with Rusty Metal Primer, then sprayed with the Behr acrylic CARC 383.

Tomorrow the van body will be mounted on Airbornebandsman's Deuce, and after some engine work it will be back here for some more body work and eventual complete paint job. I'm happy with our hard work starting to pay off, especially since my 12-hour day on Friday was some of the hardest work I've ever done! My hand muscles are still cramping...that was a motherf***er of a day, I'll tell ya...unreal how tough that paint was to remove. I've had much easier times removing rust and scale, even welding slag; none of that compares to how difficult this CARC paint was on the front of this van. I'm glad that the sides & rear are much easier to remove.
 

Attachments

silverstate55

Unemployable
Steel Soldiers Supporter
2,070
868
113
Location
UT
A big milestone today: the van body was mounted to Airbornebandsman's Deuce, making working on it much much easier. Didn't come without drama, but all in all it worked out very well.

Airbornebandsman was able to line up the use of a surplus forklift, which he piloted. We attached "aircraft grade" chain to "aircraft grade tiedown hooks" to the lifting shackles on the van body, then secured them to the forks on the lift. Mik did a good job of lifting it straight up, so I then drove my truck/trailer out of the way, and we walked the van forward to place it on the Deuce chassis. It went pretty well, except for when Mrs. Airbornebandsman (a former SeaBee) got impatient and pushed us out of the way, climbed up on top of the van, and removed the chains & hooks...she sure showed us!

With a little finesse from the forklift, we were finally able to get the mounts lined up so we could install the new Grade-8 bolts to secure the van body to the Deuce, complete with original wood insulator strips. All's well that ends well, and in spite of the triple-digit temperature in the afternoon, the van body was successfully installed on the back of Mr. & Mrs. Airbornebandsman's Deuce.

After some engine work, it will be back at my compound to continue with the rest of the bodywork.
 

Attachments

silverstate55

Unemployable
Steel Soldiers Supporter
2,070
868
113
Location
UT
Of course, nothing like this happens without some kind of drama. After Airbornebandsman kept touting the "aircraft grade" status of his chains & hooks, I think (as a former USMC tanker) that I subconsciously was skeptical and might have placed one of the chains into a hook upside down (short side down)....as the van body was being placed on the Deuce frame, the body came down suddenly and initially I thought that Mik meant to do that...it was only as he came off the forklift & told me that a chain came off its hook that I realized how close to disaster we came. Not to mention that one of Mik's friends was standing almost underneath it and could have been seriously injured.

The chain didn't break, but the locking latch on the hook came undone and allowed the chain to slip out...luckily the van was sitting about 2 inches above the Deuce frame at the time, so there were no injuries nor damage (WHEW).

So please don't overcomplicate things for us former tankers & groundpounders....please keep it simple! :mrgreen:

But I won't shirk responsibility, I really think I screwed the pooch when I set that hook up incorrrectly...I'm grateful that nobody was hurt. I meant to double-check it to ensure that I didn't put the chain in incorrectly, but I forgot...lesson reinforced! Always double-check, and then go back to check again.

The chain in question is in the upper right of the photos. First you see it, then you don't....
 

Attachments

silverstate55

Unemployable
Steel Soldiers Supporter
2,070
868
113
Location
UT
After the chain slipped off, the Safety Officer kept running around like a chicken with her head cut off...she couldn't stand the thought of her Daddy getting hurt (Airbornebandsman).
 

Attachments

814
16
18
Location
Universal City, TX
Warren, Thanks for all the help and time you have put into this project. And the malfunction was my fault entirely. As it was my detail it was my responsibility to make sure everything was secured properly, and as you hadn't used tiedowns like that before I should have done my job better. I got in a hurry and didn't check and double-check everything like I should have. (And those "aircraft grade" do work pretty good:wink:). Nobody feels worse than I do about it, but no one was hurt and I learned a valuable lesson. Thanks again for all your help, I have not idea were this project would be at this point without you. (other than probably still in Barstow).
 
Last edited:

silverstate55

Unemployable
Steel Soldiers Supporter
2,070
868
113
Location
UT
Mik & I were busy today on the van body. I got most of the interior wiring completed for his rotating warning beacon lights, as well as fabricated up 4 mounting brackets for the beacons. I used another splash guard I purchased a while back from M16TY for these brackets, but first the paint had to be removed with a wire wheel & grinder. After that, I drew a template on cardboard and traced it onto the stripped splashguard. Once the pieces were cut, I drilled mounting holes & a 5/8" hole (to be grommetted) for the wires to pass through. I placed the mounting plates in my vise and bent the side reinforcement wings 90-degrees each for support. Tomorrow I'll get them tack-welded in place and drill the holes for the wires to pass inside the van body (also to be grommetted and sealed with silicone).

We'll be making quick progress this week on the van, as I want to have it ready to be primed by the end of next weekend...I'm even hiring my neighbor to come over this weekend to run the needle-scaler, since he's out of work and tired of hearing the racket that it produces. So I told him that it's not obnoxious at all when you're running it over a work area with hearing protection in, so we agreed on a cash-for-labor price for his help. With him running the needle-scaler and Mik & I using grinders with wire cup wheels, we'll have it completely stripped in no time. We're over the halfway mark as far as I can tell, as the sides are much easier than the front was.

I'll post more pics tomorrow of progress as well as wiring.
 

Attachments

Last edited:
814
16
18
Location
Universal City, TX
Amazing work by Silverstate55. I left for 3 hrs, came back and the brackets were done, they look great. Once again thanks for all the hard work. I am learning alot by watching you work and hope to put it into practice myself over the years.
 

silverstate55

Unemployable
Steel Soldiers Supporter
2,070
868
113
Location
UT
Thanks Mik, I'm sure you will! The hardest part is overcoming hesitation; just jump in and do it! I enjoy our time together, you'll be missed...but you'll be better off in San Antonio and will find plenty of new friends there in no time!

Got the 2 front brackets completely welded in today, and drilled the 2 holes for the front rotating beacon wires, as well as installed the grommets. Will get the other two welded in tomorrow.

Below is a photo of the cardboard template I used for the light mounts. It is 13.5 inches wide overall; each support wing is 2 inches tall by 4-7/8" long. The mount is 9 inches long overall. Hope that explains the numbers drawn on the template. It seems to have worked pretty well!

Also is a photo of the wiring to run 24V power to the lights inside the van; it is 10-gauge wiring, with 2 power leads and one ground lead going from the cab to the van body. I also installed some military plugs between the van body & cab, in case unscrewing the plug from the van body wasn't enough. All connections are soldered and double-heat shrunk, then wrapped in wire loom and heat shrunk at each end. The plug end will be sealed with silicone to protect it from the elements.
 

Attachments

M1031CMT

New member
356
12
0
Location
Ontario
Mounts look great. Was thinking of installing some rotating lights on mine as well a while back but never found any used lights for a reasonable price (and new ones are very expensive), so I just put it on my list of "one day" mods.

If you want to hide the wiring for the lights, you can unscrew the inner paneling in the box. I did that when I installed the millions of clearance lights (which I needed to be legal up here).

Some pics of when I did it. Little hard to see in the pics, but the wiring is hanging out of the panels.
 

Attachments

silverstate55

Unemployable
Steel Soldiers Supporter
2,070
868
113
Location
UT
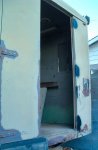
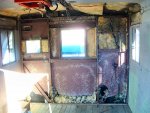
WOW, that looks great! Yep, Mik, his wife, and I tore apart the interior to access the wiring inside...I just didn't think to take photos of it! I'll remedy that tomorrow.

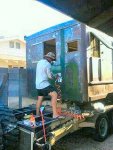
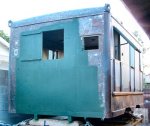
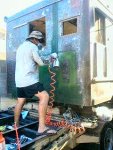
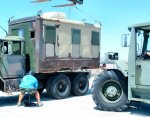
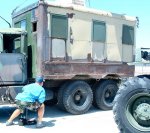
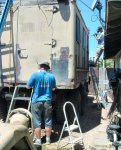
Here are some more photos of our progress lately. My neighbor (who I'm friends with) has been out of work for 8 months now, and his bedroom is right on the other side of where we've been working on this truck. We had a chat last weekend and he told me how if he was working, he wouldn't be home & the endless drone of the needle scaler wouldn't bother him a bit....but now that he's out of work, the endless drone of the needle scaler was really starting to bother him. So, I made him an offer he couldn't refuse: I paid him to come over starting today and run the needle scaler with hearing protection on, until we're finished. Then he won't have to hear it anymore and we'll be done with paint removal by the end of this weekend. Win-win all the way around!!

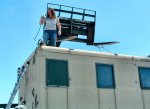
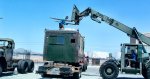
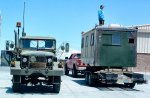
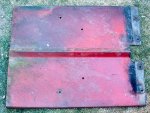
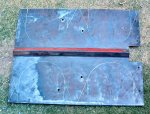
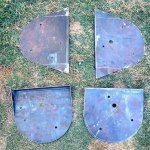
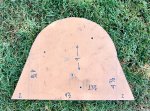
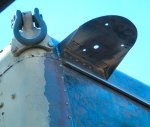
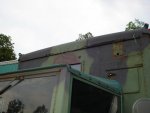
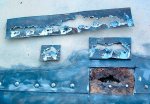
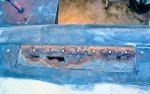
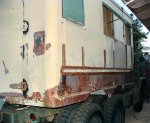
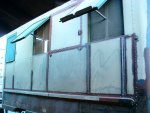
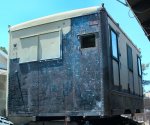
So, my neighbor Mark worked his butt off on the needle scaler today for 8 straight hours, while I finished the wiring for the rotating beacon lights and started to cut out rust spots on the roof. I'll use the old cut out portions of the roof as templates to cut new sheet steel pieces (from yet another one of M16TY's splashguards!), and then weld these directly in to cover the holes. Afterwards I'll seal up any gaps between the sheets with paintable caulk (flexible so it won't crack & peel off) before priming. That should give Airbornebandsman a couple of years of no leaks to decide how he wants to re-do the roof.

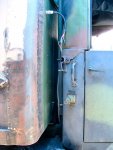
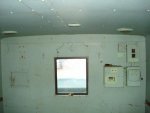
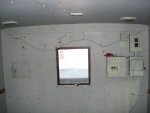
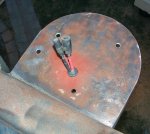
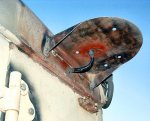
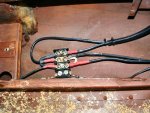
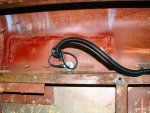
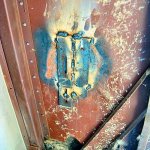
The wiring was done with 10-gauge power wires, all grounds were grounded to the van body on the inside, and all wire connections were soldered thoroughly and double-heat-shrunk for max protection & longevity. I wrapped wires with plastic wire loom, wrapped the loom with electrical tape, then sealed each end of electrical tape with heat shrink to prevent the tape from unraveling. I used rubber grommets on every hole through sheetmetal that the wires passed through, and sealed each of these grommets with silicone for maximum waterproofing. Each wire end is finished with a military plug connector that matches up to the plugs on each rotating beacon light. Tomorrow I'll take some photos of the interior mess and the power distribution block I installed for the power wires. And yes, after I was done wiring I toned out each power wire to check for shorts, which all tested perfect, and ensured each ground had minimal or no resistance across the van body chassis. Conductivity is a GO.

Tomorrow we'll be back at it, with Airbornebandsman over to help with the grinder & wire wheel on paint stripping duty. Full steam ahead, I can see the light at the end of the tunnel!!
 

Attachments

silverstate55

Unemployable
Steel Soldiers Supporter
2,070
868
113
Location
UT
Here are some pics of the inside of the van I just took this morning (sorry for the early-morning sun glare). This gave plenty of room to work with the wiring, adding grommets to the holes for the wires, etc... Also is a close-up of the power distribution block I installed for the power wires; that way, the original power wire isn't gummed up with a ton of taps off of it, everything runs through and off of this terminal block. The bottom of the terminal block was converted to a twin-machine-screw mount, that also doubles as a ground point for the two front lights (I used the original military wiring Mik had for these front two lights; the ground leads were long enough to run right back to this terminal block for grounding).

For the two rear rotating beacon lights, I simply ground off & removed one of the drip rail rivets and installed a carriage bolt to act as the ground point; I did this for each light. I left plenty of slack in the wires to allow for temperature-related expansion & contraction, so that is why so much of the ground wire is wrapped around the ground bolt.

The last photo shows some scrap metal stock I used as backings in order to weld holes & tears in the exterior sheet metal skin. This one shows the rear damage where a forklift tine went through the sheet metal, but there are about a dozen others that are small squares I used to close up unnecessary holes in the sheet metal. This allowed me to use my low-amp wire feed welder to weld closed those holes, grind them smooth, and ready for paint. This one pictured still needs a lot of welding and finishing on the exterior, as it was pretty extensive. But it should be straightened out today or tomorrow in preparation for Rusty Metal Primer.
 

Attachments

Last edited:

silverstate55

Unemployable
Steel Soldiers Supporter
2,070
868
113
Location
UT
Well unfortunately I didn't have time to prime the van body; I only managed to get the final paint bits stripped off very late the last night when it was supposed to be done, so Airbornebandsman could pick it up for mechanical repairs. I didn't get the final paint portions stripped off until around 9pm, and by the time I washed it down and drove it out to hook up with the M105A2 trailer, it was well after 10pm.

Portions of this paint were particularly difficult to remove...add to that the fact that there were numerous other issues I had to deal with as well (rust hole repairs on the roof, missing rivets, and so on), I'm surprised we were able to do all that we have done up to this point. I just feel bad for continually getting bogged down in small details and having to constantly push back our proposed deadlines for Airbornebandsman. When I return from vacation I'll try to repair a few more spots that have rust holes, as well as finish welding up the rust repair panels I installed last weekend, then get that primer sprayed on so it can have at least 2 weeks to cure, before coating with the Behr Exterior Latex CARC 383. That's the plan, anyway...
 
814
16
18
Location
Universal City, TX
I don't know about anybody else, but to me SilverState55 has some superhuman determination. I don't think anyone else could have done nearly as much in such a short amount of time as he has. I can only hope that I have as much drive as I get older, at 29 I can't keep up with him. The night before going on vacation he was still going at it, striping paint. Have fun on vacation, and relax.

Well me and the wife spent the last two days putting the interior paneling back on the inside of the van (no small feat when it is 110 degrees out). and I pulled off the radiator to see what is leaking so bad. here are a couple pics, tomorrow morning I have and Air Force mechanic that worked on them coming over to help track down the leak (or leaks). But there was no oil in the coolant so that takes a leaking headgasket off the table (I hope). More info to come.
 

Attachments

814
16
18
Location
Universal City, TX
Well, got the front cover off. And of course whoever had the truck last loved RTV silicone as it is all over, so when the front cover came off it took part of the oil pan gasket with it. After replacing the seal and getting off the old gasket and sealant, I discoved that the kit I bought didn't have the front cover gasket (it was missing the oil pan gasket as well but that was received a couple week ago). So as of now it is a waiting game and the truck will probably not be up and running until next sunday as I work all week and the housing folks will only look the other way if I work on the truck after 1830. But at least I can get it loaded.

EDIT: I am am idiot. I just found the front cover gasket. I thought it was part of the oil pan gaskets. S$%t, now I am behind cause I am an idiot.
 

Attachments

Last edited:

silverstate55

Unemployable
Steel Soldiers Supporter
2,070
868
113
Location
UT
I am am idiot. I just found the front cover gasket. I thought it was part of the oil pan gaskets. S$%t, now I am behind cause I am an idiot.
Balderdash.

You're just fixing the problem and making right what someone else couldn't, that's all. Take your time and do it right, you have enough headaches already.

Keep up the good work, the interior looks great!

[thumbzup]
 

m-35tom

Well-known member
Supporting Vendor
3,021
221
63
Location
eldersburg maryland
if i recall correctly, the pan gasket is 4 pieces so what came off may have been ok. the only place there should be a small amount of rtv is in the corners of the front gasket where it meets the pan gasket. everywhere else should be a thin film of permatex 3H. people who just use gobs of rtv just aren't mechanics!!

tom
 
Top