• Steel Soldiers now has a few new forums, read more about it at: New Munitions Forums!

  • Microsoft MSN, Live, Hotmail, Outlook email users may not be receiving emails. We are working to resolve this issue. Please add support@steelsoldiers.com to your trusted contacts.

The "Road Oiler" gets overdrive (700R4 Swap)

Recovry4x4

LLM/Member 785
Super Moderator
Steel Soldiers Supporter
34,012
1,808
113
Location
GA Mountains
no, 700's are so easily available I'd not keep it. I've got 10 of them in my shop that are going to the scrapper on my next trip.
Hey John, with that said, what year cores are better to build off of or can any 700 be upgraded? I know I have one with a 1983 case but it has 30 SP input so someone has fooled with it. Other than the "K" case, are there any internal case differences?
 

Speddmon

Blind squirrel rehabiltator
Super Moderator
Steel Soldiers Supporter
4,640
28
38
Location
Cambridge, Ohio
I made some more progress on the Road Oiler today. Not as much as I would have liked though. I started the day off by removing the pan, and the factory wiring for the lock-up solenoid and replacing it with the solenoid and wiring for the Bowtie Overdrives kit. They give you a new 4th gear pressure switch as well, so that needed changed too. Then I put the original shallow pan back on for the installation of the transmission. It was at this point in the day that things went down hill.

Before I slid the transmission under the truck, I noticed the shifter mechanism on the side of the R4 was different than the one on the th400...no biggie, right, I'll just take the one off of the 400 and put it on the R4...WRONG! I removed the one from the 400 just fine. The nut holding the mechanism onto the R4 was rusted to the shift shaft and the nut spun the end right off of the shaft aua. I called out to the shop that rebuilt the transmission to find out how difficult it is to replace that shaft. Luckily, it's a really easy process and you don't need to do anything more than to remove the pan (again) to get the shaft changed. BUT, it was a waste of about 2 hours of my day running out to the shop to get the new (used) shaft and back home to install it. Bob is a super nice guy and just gave me the shaft for free.

So, I'm back home and have the new shaft in and ready to slide the transmission under the truck. I get it under the truck and maneuvered up onto my motorcycle lift. Then I put the torque converter on, pushed the lift into position and raised the lift to bolt everything up. All went really good until I found I couldn't draw the transmission up tight to the block because the converter isn't seated the entire way aua. So, I take it BACK loose and wiggle the converter around until it slides in the last 1/2". Then it's back up in the air and start bolting everything up again. This time it went great, but I had to fight for about 1/2 hour getting the stupid dipstick tube back into position.

So it's finally bolted in place and ready to re-install the cross member. The riser I made at work needed just a little modification. The holes that hold the R4 adapter down are M10x1.5 bolts...not a big deal, I through drilled that part of the riser so the bolts would slip through. The old th400 adapter was bolted in place with 1/2"-13 bolts, I only drilled and tapped my riser for 3/8"-16 bolts. By the way, I love how most things on the truck and transmission are metric, but they still slip a standard bolt in every now and then, just to screw you up. So I broke out the drill press and drilled the bottom two holes bigger and tapped them for the proper 1/2"-13 bolts. Back under the truck to install the riser, and it fit like a glove! The transmission is installed and ready for the transfer case to be put on. I still need to put the TV cable on, and hook up the oil lines, install the deeper pan and do the external wiring for the lock-up.. But that shouldn't be too bad to do.

Tomorrow when I run out, I'm going to drop off the drive-shaft to get balanced. The shop said they needed the joints and slip yolk complete to balance the whole assembly. I was going to put the new u-joints in before I took it over to them, but I ran out of daylight, so I'll give them the joints and they can put them on and then balance the shaft.
 

cliffyp

Member
328
4
18
Location
Brownsville, Texas
Is your TV cable connected to the transmission? Getting the cable connected to the TV linkage while the trans is up in place might not be much fun.

I wrangled with the dipstick tube for a while too to get it into position.

I'm glad you backed off when the torque converter wasn't set in all the way. I've read lots of threads where guys kept tightening the bell housing bolts and ended up damaging flex plates.
 

Speddmon

Blind squirrel rehabiltator
Super Moderator
Steel Soldiers Supporter
4,640
28
38
Location
Cambridge, Ohio
Another progress report.

Today I had to waste about 1/2 of the day running errands. I dropped my daughter off at preschool, and then took a trip over to Zanesville, OH to drop the drive shaft off to be balanced. I gave them the new u-joints to install when they balanced it. The guy doing the work, took one look at the dent and decided to throw it on the balancer before he even did anything with the joints. They have an allowance of .020" out of straightness to still be able to balance them properly. He said if it's .040" even up to .060" he has heated one side to draw it back into line better...mine was .140" out! aua aua . The only thing left to do was to have it re-tubed...SOOOO almost $300 later I have a brandy new (almost) drive shaft to put back into the truck.

When I did got home I decided to finish up some of the little things that needed done since I had 1/2 a day gone already. I installed the deeper oil pan, hooked up the oil lines, cleaned the outside of the transfer case so I can tear it apart first thing in the morning, and hooked up the TV cable.

Is your TV cable connected to the transmission? Getting the cable connected to the TV linkage while the trans is up in place might not be much fun.
Actually, the cable wasn't as bad as you would think...without the transfer case and front drive shaft in the way, I was able to reach up in there with both hands and hook it up pretty easily. I say the front drive shaft wasn't in the way because I forgot to put it on top of the cross member when I put it back on yesterday aua. So, I had to undo 4 nuts and pop the front drive shaft off, lift it up over the cross member and reattach the front yolk. Putting the TV bracket on was a snap. I did have to undo the temp sensor because the bracket wouldn't fit over it, no biggie.

For those of you who have done this mod before...I have a question about the cable adjustment. There is no adjuster on my cable. I ordered the cable specific for an '84 K5 blazer with a 6.2 diesel from Rock-auto. The guy at the transmission shop said that the cable should be tight when I have it at WOT...not banjo string tight, but maybe about 1/16" to 1/8" deflection at WOT. I have about that and maybe just a bit more, but like I said, no way to adjust it. It springs back where it's supposed to when I let go of the IP linkage. Does this sound normal?
 

Speddmon

Blind squirrel rehabiltator
Super Moderator
Steel Soldiers Supporter
4,640
28
38
Location
Cambridge, Ohio
Scratch that comment about the cable adjuster...I just did a little research about the cables and I see how it adjusts now. I'll go back through it all tomorrow. I even have a PDF of GM's adjustment procedure for diesels. I'll make sure I have everything correct before it comes out of the garage.
 

Speddmon

Blind squirrel rehabiltator
Super Moderator
Steel Soldiers Supporter
4,640
28
38
Location
Cambridge, Ohio
It's a good thing I decided to research and look into the TV cable situation for the conversion.

WARNING TO ALL

DO NOT BUY THE TV CABLE FROM ROCKAUTO.COM FOR AN 84 K5 Blazer w/ 6.2L, IT IS THE WRONG CABLE!!!!!!!

I bought the cable from Rockauto and it is the wrong cable! The ACDelco part number of the cable they say fits the truck is 25515598....IT SHOULD BE 25515599. The cable from Rockauto is too long by about 7.5". The proper cable should be 36.1" long OAL, and the one from Roackauto is 43.74" long OAL.

Attached is a PDF with the service bulletin for all GM repair shops with the part numbers and cable "Codes" for the TV cable for the '84 K5 w/6.2L Diesel

The proper cable is a code FK cable, part # 25515599

Rockauto does have a listing for a Dorman cable part #04216, under a '81 Buick Regal with a 3.8 L. The proper ACDelco number is in the description for that cable. But since I need the cable right away, I'll have to call NAPA in the morning when they open and see if they can get one to me right away. Both NAPA and Autozone have a listing for the proper cable but Autozone can't get it for me until the end of the week.

I am also going to make a new thread and stick it to the top of the CUCV Mod forum with this warning. Maybe I can save someone some money. Or maybe a transmission. If I had tried to run the truck with that cable that transmission would not have lasted long.
 

Attachments

Last edited:

Recovry4x4

LLM/Member 785
Super Moderator
Steel Soldiers Supporter
34,012
1,808
113
Location
GA Mountains
The PDF doc speaks of a pump rod. I'm not aware of any pump rods on my IPs. Good research on the TV Cables
 

cliffyp

Member
328
4
18
Location
Brownsville, Texas
I would also recommend doing a pressure test of the trans. As throttle is applied you should get immediate pressure rise. Here is the page from the ATSG Service Manual for the 700r4.
ImageUploadedByTapatalk1355278535.639727.jpg
 

Speddmon

Blind squirrel rehabiltator
Super Moderator
Steel Soldiers Supporter
4,640
28
38
Location
Cambridge, Ohio
I'm beginning to wonder if I'm every going to get this project done!!!!!!!!!!

I started out this morning by calling my local NAPA Auto Parts Store, talked to Rusty and ordered the TV cable. He said they have one in Columbus, I can have it for you by about 1:30 or so...Excellent, get it here!

After I got back from dropping off my daughter at preschool, I decided to open up the transfer case and change the input shaft....what a PAIN IN THE A$$!!!

I must correct that, the job would not have been nearly as bad if I had a little warning or had known better than to do what the TM said. Let me explain...

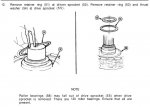
The TM has you start by taking off a bunch of unnecessary stuff like the 4 wheel drive switch and the entire output bell. I skipped those parts for obvious reasons. But when it get's to the inside, since I've never had one of these apart before, I decided to play along and do what they suggest. WRONG. This is where the TM gets you into trouble. The TM says to remove the retaining rings from both the drive sprocket and driven sprocket so both can be lifted out to remove the chain..DO NOT DO THIS!!!! There is a nice little note under the illustrations that says "Roller bearings ( 58 ) may fall out of drive sprocket (55) when drive sprocket is removed. There are 120 roller bearings. Ensure that all are present".Note.jpg

This note needs to be changed from "bearings may fall out" to "bearings WILL fall out, and you will need to totally disassemble the rest of the case on the input side to get the bearings that fall down through the planetary and under the plate below the input shaft!" I find out after the fact that removing the retaining ring and drive sprocket is unnecessary because you can simply lift out the entire output shaft as an assembly, along with the driven sprocket to remove the chain. Needless to say, I had to use some hillbilly engineering to reassemble the bearings into the drive sprocket. But, I finally got the case put back together and mounted on the truck. I also installed my brandy new rear drive shaft!

While I was waiting for my wife to get back from picking up our daughter, going to the store and NAPA for me so I could get my new TV cable; I decided to start installing the oil cooler for the transmission. While it is a nice cooler kit, they don't provide enough hose in the kit for larger trucks like ours. I guess they do if you want the cooler to be off to the side of the radiator rather than in the center...I like mine in the center. So, as I'm finishing the cooler up as far as I can with the limited amount of hose they give you. My wife comes home with my new TV cable. Great, I can throw that bad boy on and be done with the drive line stuff...WRONG. It is the correct cable, but while I was clipping the end onto the TV bracket rod at the IP, the plastic end of the cable broke. aua. SO, back on the phone with NAPA. The are going to have another one for me first thing in the morning.

Also, while I was waiting on my wife, I removed the OEM fuel filter and installed the base for the one I am going to use. I'll need to swing by the hardware store tomorrow morning and get some barb fittings to hook up the fuel lines, then that one will be done.

Can someone tell me why there are 3 wire connectors on the OEM fuel filter? I know one is for the water in fuel light, but what are the other two for? Also, I plugged off the vacuum line going to the turbo 400 transmission, but what is the other vacuum line for. Coming off of the pump, there are 2 lines, one goes to the transmission, and the other goes to the back of the engine to what I have no idea (I know where it goes, but I haven't a clue what the part is it's hooked to)

I'll try to snap a pic of the TV cable differences later tonight before I take the broken one back to NAPA and send the wrong one back to Rockauto.com.
 
Last edited:

doghead

4 Star General /Moderator
Staff member
Super Moderator
Steel Soldiers Supporter
26,246
1,179
113
Location
NY
Can someone tell me why there are 3 wire connectors on the OEM fuel filter?
-water in fuel light

-heater

-ICE/STE sensor


Today, I also broke a brand new Chinese plastic item. aua
 
Last edited:

Speddmon

Blind squirrel rehabiltator
Super Moderator
Steel Soldiers Supporter
4,640
28
38
Location
Cambridge, Ohio
The vacuum pump being in the back where a distributor normally would go makes sense. Once it comes to the front of the engine into that little "block" by the IP, What it the purpose of the block and do I need it any longer?
 

cliffyp

Member
328
4
18
Location
Brownsville, Texas
Bearing WILL FALL OUT! Yes, that was a fun surprise. I used a pen magnet and was able to collect the ones that fell deep into the case. It was also fun to count 120 roller bearings to make sure all were present and accounted for.
 
Top
AdBlock Detected

We get it, advertisements are annoying!

Sure, ad-blocking software does a great job at blocking ads, but it also blocks useful features of our website like our supporting vendors. Their ads help keep Steel Soldiers going. Please consider disabling your ad blockers for the site. Thanks!

I've Disabled AdBlock
No Thanks