• Steel Soldiers now has a few new forums, read more about it at: New Munitions Forums!

  • Microsoft MSN, Live, Hotmail, Outlook email users may not be receiving emails. We are working to resolve this issue. Please add support@steelsoldiers.com to your trusted contacts.

Brakes Deuce what is wrong with this picture

frank8003

In Memorial
In Memorial
6,426
4,984
113
Location
Ft. Lauderdale, Florida
So I am adjusting, cleaning, checking, repacking bearings and such.
I get to the right front and find minor adjustment screw turns makes zero difference on rear shoe. Open it up to find rear shoe stuck, will not move. I learn a lot on SS with the pictures.
So what is wrong with this picture.

lf 3.jpg

LF 1.jpg
 

Rmtaunton

Well-known member
1,510
31
48
Location
Smyrna, ga
X2
The forward adjuster (towards the cab)

With rachet or wrench on top of axle pointing up needs to be pulled towards the front ( towards the cab) to tighten

The rear adjuster (towards the Pintle )

With the wrench on top of the axle pointing up needs to be pulled towards the rear (towards the pintle to tighten) to tighten

you should start with the bottom adjustment lower left , gap it to twenty then move to upper left gap to 10 , then move to lower right then upper right etc.
 

SP5

Member
75
2
8
Location
scappoose, oregon
Also, you may want to check in the -20, concerning the return spring placement. I believe that both ends of the return spring are to be hooked into the elongated slot that the anchor pins ride-in.
In your #1 picture, the left-hand of the spring is in a hole above the slot, this makes the spring crooked, and have less return force. It's also riding on the WC.
 

bonedoc

New member
502
1
0
Location
Bangor, PA
Also, you may want to check in the -20, concerning the return spring placement. I believe that both ends of the return spring are to be hooked into the elongated slot that the anchor pins ride-in.
In your #1 picture, the left-hand of the spring is in a hole above the slot, this makes the spring crooked, and have less return force. It's also riding on the WC.
X2 on this when I first looked at it but I don't have enough knowledge or experience to comment on that.
 

clinto

Moderator, wonderful human being & practicing Deuc
Staff member
Administrator
Super Moderator
Steel Soldiers Supporter
Supporting Vendor
12,596
1,129
113
Location
Athens, Ga.
So I am adjusting, cleaning, checking, repacking bearings and such.
I get to the right front and find minor adjustment screw turns makes zero difference on rear shoe. Open it up to find rear shoe stuck, will not move. I learn a lot on SS with the pictures.
So what is wrong with this picture.

View attachment 487506

View attachment 487507
The only thing that's truly wrong is the spring placement. The adjusters were either turned the wrong way or you turned them farther than they needed to go and they "started over".

If I were you, I'd put at least one new shoe, maybe both. I would move the return spring to the correct location. I would also check to make sure the shoes can easily pivot. Verify the retainers aren't messed up or too tight-the shoes need to easily pivot on the lower and upper mounts.

You are turning them the wrong way. The way you have them there they are adjusted all the way down, and if they are pushing the shoes out, they won't stay.
I suspect you're correct but I guess it's possible he was going the correct direction and once he went past the highest spot, the adjuster "fell off" the shoe.

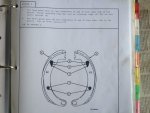
Also, you may want to check in the -20, concerning the return spring placement. I believe that both ends of the return spring are to be hooked into the elongated slot that the anchor pins ride-in.
In your #1 picture, the left-hand of the spring is in a hole above the slot, this makes the spring crooked, and have less return force. It's also riding on the WC.
You are correct. See image below:
IMAG0028.jpg

And the shoe on the right look very thin
It's definitely thin. I don't remember what the minimum thickness is, but they're .333" thick when they're new.
 

frank8003

In Memorial
In Memorial
6,426
4,984
113
Location
Ft. Lauderdale, Florida
brake show widgets

OK OK So I liked that David Blaine too

All the screws got turned the right way, just had to work a bit to get the drum off due to faulty brake part installation the last time it was done...
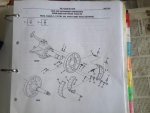
So I follow the TM 9-2320-209-20-3-2 and brake show parts placement still escapes me.


w 1.jpg
So I see whomever it was last time that put the spring on wrong, what a turkey to get it off, then maybe they lost some parts somewhere as this rear shoe was bound up good.


So I can not see what goes where and delve into it finding TM 9-2320-361-24P for a better picture.
w 2.jpg

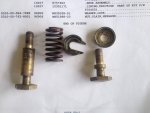
So I have brake shoe fastener parts in the photo and between the two TM's I still can't see what is obvious to everyone else.

w 4.jpg

This stuff is hand assembled so what is the special retaining tool as in TM 92320 209 3-2 page 13-55?
Please help tell me where the little parts go with the two special pins. Top pin gets the spring but am unclear which way part 17, the dished stamped steel washer in the 24P depicted goes together.

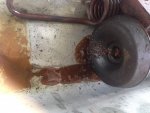
and the wheel cylinder is trashed
w 3.jpg
 
Top
AdBlock Detected

We get it, advertisements are annoying!

Sure, ad-blocking software does a great job at blocking ads, but it also blocks useful features of our website like our supporting vendors. Their ads help keep Steel Soldiers going. Please consider disabling your ad blockers for the site. Thanks!

I've Disabled AdBlock
No Thanks