• Steel Soldiers now has a few new forums, read more about it at: New Munitions Forums!

  • Microsoft MSN, Live, Hotmail, Outlook email users may not be receiving emails. We are working to resolve this issue. Please add support@steelsoldiers.com to your trusted contacts.

m35a2 bad rear wheel seal

acesneights1

Member
1,449
21
20
Location
CT
I have spent the last two hours going through Tm's, google search, site search and maybe I'm retarded but I can't find the info or which TM.
I have looked in Tm9-2320-361-20 chap 20,TM9-2320-209-20-1,TM9-2320-209-34-2-1 chap 10,11,12 and still can't find the actual seal replacement procedure. Just brake. Can someone please point me to the exact TM,chapter,page number ?
 

Woodsplinter

Member
723
6
18
Location
Phoenix/AZ
I don't know either, but I just did all 4 of mine. It's similar to the front bearings.

1- Remove 8 bolts holding axle shaft flange in place, then remove axle. There is a gasket (or rtv) that may require a little persuasion to pull apart. (TM 9-2320-361-24-1, WP 147)
2- Bend up tab on retaining lock washer thing, then remove outer spindle nut, lock washer, inner nut and outer seal. Very much like front hub. (TM 9-2320-361-24-1, WP 187)
3- Pull hub assy. forward slightly to pop outer bearing out so you can grab it. Take it out, then pull entire hub off.
4- Now you can get to rear bearing. You may need to pry gently with a small screwdriver on each side to get it to pop out of the rear seal. My rear seals were in good shape and I did not replace them. I did replace the outer seals.
5- I cleaned my bearings in mineral spirits, then brake cleaner. They were in great shape so I just repacked them.
6- Clean and inspect the brake pads while your in there. Clean out the hub and reinstall in reverse order.
7- The front hub TM says to tighten the inner nut to 50 ft/lbs, then back off 1/6 to 1/4 turn. I backed off 1/2 turn. I'm sure others will have other ways to do this.
8- Replace lock ring, then outer nut. Torque to 100-150 ft/lbs, then bend tab over outer nut.
9- Replace axle shaft by sliding in towards pumpkin until it stops. Back up just a hair, then push down on the outer end to lift opposite end and slide forward into place. It takes a little wiggling around to get it seated.
10- Replace axle shaft flange bolts and torque to 81-104 ft/lbs. Don't remember where I found that detail.

VERY IMPORTANT: On top of the spindle is a keyway milled through the threads. There is supposed to be a small piece of cork there- if not it will allow gear oil into the bearings and wash the grease away. After replacing everything up to the lock ring, I replaced mine with a piece of cork from the hardware store and RTV. (Clean the keyway good first). Then I installed outer nut.

Hope that helps! I'm sure others will have tips about how they do theirs but this should get you through it.
 

yolner

Active member
393
68
28
Location
Rockville, MD
I don't know either, but I just did all 4 of mine. It's similar to the front bearings.

1- Remove 8 bolts holding axle shaft flange in place, then remove axle. There is a gasket (or rtv) that may require a little persuasion to pull apart. (TM 9-2320-361-24-1, WP 147)
2- Bend up tab on retaining lock washer thing, then remove outer spindle nut, lock washer, inner nut and outer seal. Very much like front hub. (TM 9-2320-361-24-1, WP 187)
3- Pull hub assy. forward slightly to pop outer bearing out so you can grab it. Take it out, then pull entire hub off.
4- Now you can get to rear bearing. You may need to pry gently with a small screwdriver on each side to get it to pop out of the rear seal. My rear seals were in good shape and I did not replace them. I did replace the outer seals.
5- I cleaned my bearings in mineral spirits, then brake cleaner. They were in great shape so I just repacked them.
6- Clean and inspect the brake pads while your in there. Clean out the hub and reinstall in reverse order.
7- The front hub TM says to tighten the inner nut to 50 ft/lbs, then back off 1/6 to 1/4 turn. I backed off 1/2 turn. I'm sure others will have other ways to do this.
8- Replace lock ring, then outer nut. Torque to 100-150 ft/lbs, then bend tab over outer nut.
9- Replace axle shaft by sliding in towards pumpkin until it stops. Back up just a hair, then push down on the outer end to lift opposite end and slide forward into place. It takes a little wiggling around to get it seated.
10- Replace axle shaft flange bolts and torque to 81-104 ft/lbs. Don't remember where I found that detail.

VERY IMPORTANT: On top of the spindle is a keyway milled through the threads. There is supposed to be a small piece of cork there- if not it will allow gear oil into the bearings and wash the grease away. After replacing everything up to the lock ring, I replaced mine with a piece of cork from the hardware store and RTV. (Clean the keyway good first). Then I installed outer nut.

Hope that helps! I'm sure others will have tips about how they do theirs but this should get you through it.
That's how I did it except I used Right Stuff sealant instead of cork in the keyway. No need to stick to 1970s tech when we have something modern that works better IMO.
 

Valence

Well-known member
Steel Soldiers Supporter
2,136
618
113
Location
Davis County, UT
I don't know either, but I just did all 4 of mine. It's similar to the front bearings.

1- Remove 8 bolts holding axle shaft flange in place, then remove axle. There is a gasket (or rtv) that may require a little persuasion to pull apart. (TM 9-2320-361-24-1, WP 147)
2- Bend up tab on retaining lock washer thing, then remove outer spindle nut, lock washer, inner nut and outer seal. Very much like front hub. (TM 9-2320-361-24-1, WP 187)
3- Pull hub assy. forward slightly to pop outer bearing out so you can grab it. Take it out, then pull entire hub off.
4- Now you can get to rear bearing. You may need to pry gently with a small screwdriver on each side to get it to pop out of the rear seal. My rear seals were in good shape and I did not replace them. I did replace the outer seals.
5- I cleaned my bearings in mineral spirits, then brake cleaner. They were in great shape so I just repacked them.
6- Clean and inspect the brake pads while your in there. Clean out the hub and reinstall in reverse order.
7- The front hub TM says to tighten the inner nut to 50 ft/lbs, then back off 1/6 to 1/4 turn. I backed off 1/2 turn. I'm sure others will have other ways to do this.
8- Replace lock ring, then outer nut. Torque to 100-150 ft/lbs, then bend tab over outer nut.
9- Replace axle shaft by sliding in towards pumpkin until it stops. Back up just a hair, then push down on the outer end to lift opposite end and slide forward into place. It takes a little wiggling around to get it seated.
10- Replace axle shaft flange bolts and torque to 81-104 ft/lbs. Don't remember where I found that detail.

VERY IMPORTANT: On top of the spindle is a keyway milled through the threads. There is supposed to be a small piece of cork there- if not it will allow gear oil into the bearings and wash the grease away. After replacing everything up to the lock ring, I replaced mine with a piece of cork from the hardware store and RTV. (Clean the keyway good first). Then I installed outer nut.

Hope that helps! I'm sure others will have tips about how they do theirs but this should get you through it.
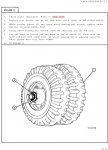
The TM I was reading does not specify a torque for the inner wheel bearing nut, only tighten until the wheel binds while the wheel is rotating, and that 1/2 turn loosening of the wheel bearing nut is 4 times farther than the TM says.


TM 9-2320-209-20-3-2
PDF Page 361 of 554, document page 14-61

Says the following for your step #7:

...
2. Replace rear wheels, but do not jack down truck. Refer to TM 9-2320-209-10.
3. While turning wheels and using wheel bearing nut wrench, tighten adjusting nut until wheels bind.
4. Using wheel bearing nut wrench, back off adjusting nut 1/8 turn.
5. Put one hand on bottom and one hand on top of wheels. Push with one hand and pull with the other hand. If wheel bearing is adjusted correctly, wheel should have very little wobble.

tm-9-2323-209-20-3-2_page_14-61.jpg


I'm not saying which is right, as I am far too inexperienced to make that claim, I am only pointing out a difference that may be noticeable.
 
Last edited:

Woodsplinter

Member
723
6
18
Location
Phoenix/AZ
The TM I was reading does not specify a torque for the inner wheel bearing nut, only tighten until the wheel binds while the wheel is rotating, and that 1/2 turn loosening of the wheel bearing nut is 4 times farther than the TM says.


TM 9-2320-209-20-3-2
PDF Page 361 of 554, document page 14-61

Says the following for your step #7:

...
2. Replace rear wheels, but do not jack down truck. Refer to TM 9-2320-209-10.
3. While turning wheels and using wheel bearing nut wrench, tighten adjusting nut until wheels bind.
4. Using wheel bearing nut wrench, back off adjusting nut 1/8 turn.
5. Put one hand on bottom and one hand on top of wheels. Push with one hand and pull with the other hand. If wheel bearing is adjusted correctly, wheel should have very little wobble.

View attachment 548142


I'm not saying which is right, as I am far too inexperienced to make that claim, I am only pointing out a difference that may be noticeable.
Interesting- I don't know which is "right" either. I just used the same technique for tightening the front wheels because everybody I've worked with out here does so.

Regarding step 5 above, I would think the wheels, when pushed & pulled, would have NO wobble.

Hopefully somebody more experienced will set the record straight.
 

welldigger

Active member
2,602
15
38
Location
Benton LA
You want to feel a slight tick when you rock the wheels after torquing the nuts. This leaves room for expansion when the bearings heat up.

Torque the inner nut until the wheel binds when you try and spin it. Then back it off about a 1/4 to 1/2 turn. It should spin free with noticeable slack when you rock the wheel. Then when you torque the outer nut it should take up some of the slack. It may take a try or 2 to get right but with both nuts torqued down the wheel should spin reletively free with just a bit of slack when you wobble the wheel.

There is no exact torque spec.
 

rustystud

Well-known member
9,169
2,725
113
Location
Woodinville, Washington
Will you be able to feel it with the hub being hot/too warm after a short test drive? Probably too late at that point?

Yep, too late. This has been the way mechanics have adjusted wheel bearings since the beginning of modern vehicles . I was taught this technic in the 1970's by the old farts who where taught from the guys who worked on model A's . The only vehicles that I have found that need a special sequence is the German ones, especially "MAN" . In the 1930's to the 1950's some vehicles used roller bearings on the front wheels, so they needed a little different adjusting procedure.
 

welldigger

Active member
2,602
15
38
Location
Benton LA
Bearings have never burned up from being a little loose, but they do burn up if too tight.
Not quite true. If you had them too loose then they will wear a groove in the races and tapered bearing rollers. They will prematurely wear out. Then if you remove them and then retorque them and they aren't riding in the same groove they will burn up in a couple of miles.

Granted this would be if you left them with way, way, too much slop. Ask me how I know.....
 

Clay James

Member
524
4
18
Location
Reno/NV
The problem I found with adjusting the rears for a slight clearance like the front or any other tapered bearing is the seal. If it's adjusted so there is any movement then the seal is loose and you will be pulling them all apart again. I learned that the hard way. I follow the way the TM says of torquing to 50 ft. lbs. and backing off, but I do a little less than 1/8th turn. No more seal leaks.
 

Valence

Well-known member
Steel Soldiers Supporter
2,136
618
113
Location
Davis County, UT
The problem I found with adjusting the rears for a slight clearance like the front or any other tapered bearing is the seal. If it's adjusted so there is any movement then the seal is loose and you will be pulling them all apart again. I learned that the hard way. I follow the way the TM says of torquing to 50 ft. lbs. and backing off, but I do a little less than 1/8th turn. No more seal leaks.
Thank you Clay James.
I assume you've put many miles on your truck this way and no over heating bearing issues?
 

Woodsplinter

Member
723
6
18
Location
Phoenix/AZ
If the outer seal is loose, can gear oil get into the bearing even if the keyway is properly sealed? Or is the outer seal just to keep grease in the bearing?
 

Clay James

Member
524
4
18
Location
Reno/NV
Thank you Clay James.
I assume you've put many miles on your truck this way and no over heating bearing issues?
They get fairly warm but no problems yet. I suspect the seal creates some heat since the fronts barely get warm at all with everything torqued the same.

If the outer seal is loose, can gear oil get into the bearing even if the keyway is properly sealed? Or is the outer seal just to keep grease in the bearing?
Yes, it seals against the bearing race and that's what keeps the gear oil out and the grease in.
 

sandcobra164

Well-known member
2,999
288
83
Location
Leesburg, GA
I also use the 50 ft. lbs. method with the tires spinning and back off a half turn, torque the outer to 150 ft. lbs. and have had no problems. Hub temps on a hot GA Day from the last GA Rally which is 190 miles one way for me were between 120 and 130 in 90 degree ambient temps running steady at 50-55 mph. Oil pan was running 195, Trans was at 170, Transfer Case was at 160 after that run and the truck ran fine and still does. Not an exact science as I took these temps from an infrared thermometer but I did aim at multiple spots on each item and they pretty much agreed with each other.
 
Top