74M35A2
Well-known member
- 4,142
- 340
- 83
- Location
- Livonia, MI
That is along the lines of what I am targeting. Out of sight, out of mind, and won't snag on trees or cars I am running over. ")
Steel Soldiers now has a few new forums, read more about it at: New Munitions Forums!


I went and read your thread (it's fantastic, great ideas!). Your bed mount is very similar to what I was trying to describe above, only yours is mounted across the bed. I had originally thought of mounting one lengthwise down one bedside. I don't know if there's enough room for clearance between where the tow bar would hang, and where the tires could reach under full articulation. The mount you used would be very handy.I used those military guys brackets under the bed. I like it and it is real secure.
Pics and details on my thread "major Zippidy"
http://www.steelsoldiers.com/showthread.php?105530-quot-Major-Zippidy-quot-M923-build


Using the tow bar "backwards" between the 2 vehicles did y'all have any tracking issues ?When we were deployed, we either kept them mounted all the time to a tow vehicle, or kept them strapped behind the brush guard on a Humvee. For us, rapid deployment was priority over ground clearance or noise. We'd get pintle hitches bolted to the front bumpers of all the vehicles, and leave the tow bar mounted to the rear shackle points of the tow vehicle and stowed upright. If a truck got damaged, hit, flat tire, or was otherwise undriveable, the tow vehicle would back up, the tow bar would be dropped down, hitched to the front-mounted pintle hitch, and off we'd go. Very fast, very secure.
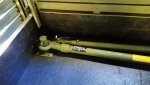
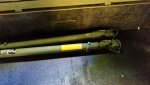
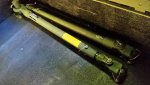
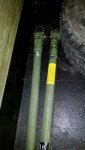
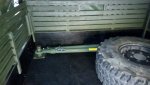
Well here's the finished product.
The ends of the legs slide onto the hollow lugs and are secured by stainless bolts, stainless nuts and stainless lock nuts for jam nuts. The lugs were made from 1/2"ID × 1"OD reducers that were welded in place on the stand-off bracket I made. The full height bracket has a full height backing plate since this end was located in the middle of a side panel.
The pintle ended up next to a support and will have a smaller backing plate. I'll install that when I find the spacers I want, that'll replace the temporary ones I'm using now.
To remove the towbar, both retainer bolts are removed with a special wrench I made to access the nuts. This was a security measure because, short of cutting the heads off the bolts, somebody isn't going to be coming up with a wrench and a ratchet to take my towbar. The nuts in the C-channel are impossible to reach with standard tools. The hinge pin by the lunette is the removed so that end can be picked up and that leg can slide off the lug. Then the extension pin for the bottom leg is removed. This allows the lunette to rotate and be removed from the pintle hitch. That leg can then slide off the lug. Even if the retainer bolts fell out, the bar can't be removed or fall off without removing a pin from each leg due to the very tight tolerances on everything. This was done for double redundancy. Installation is the reverse of removal. Both legs are mounted at a slight angle so water can't accumulate in the tubes.
Once mounted, I painted everything to match the camo pattern, and the finishing touch was new decals.
View attachment 620584
View attachment 620585
View attachment 620586
View attachment 620587
View attachment 620588