• Steel Soldiers now has a few new forums, read more about it at: New Munitions Forums!

  • Microsoft MSN, Live, Hotmail, Outlook email users may not be receiving emails. We are working to resolve this issue. Please add support@steelsoldiers.com to your trusted contacts.

looking for access cover

NormB

Well-known member
1,220
72
48
Location
Cloverly,MD
Ditto. I KNOW I can make one, cutout, flaps, tabs, pop rivets, 10-24 riv nuts, no problem. But where, EXACTLY to cut the tunnel?

Does ANYONE have the instructions for this from the kit for NSN 2510-01-454-7077?

I have, literally, spent over an hour looking for these and the closest I've come to it is some notes on g503's site with some pictures, and the dimensions/orientation isn't helpful (66" from what?), and, not wanting to crawl under, inside, under, inside, measure twice, cut once, I'd really like knowing EXACTLY where the sender unit panel sits so I can just cut about a square foot panel out over it.

Thanks in advance.

Norm
 

Action

Well-known member
3,576
1,557
113
Location
East Tennessee
I would drop the tank before I cut into the floor above it. With it down, you can easily see where the sender is on top of the tank.
 

NormB

Well-known member
1,220
72
48
Location
Cloverly,MD
I would drop the tank before I cut into the floor above it. With it down, you can easily see where the sender is on top of the tank.
That's what I'm trying to avoid, but it's looking more like I'll need to go that route.
 

BLK HMMWV

Well-known member
1,576
497
83
Location
Pasadena California
Well just remember if you don't drop the tank you are cutting were the wires feeding the sender the vent line and the fuel line come into the tank. about maybe 1/2" below the floor.
Not sure what you plan on cutting it with but you must have some mad skills.
 

NormB

Well-known member
1,220
72
48
Location
Cloverly,MD
I'm a physician/surgeon.

Amateur gunsmith (several dozen FN-FAL's, AR15s - milled receivers, M1911s under my belt), I figure on using a router with a 1/8 square-end cutter. I only need to cut through about 80% of the bed, the rest I can open up with a lever-action can opener (old kind, recall chip and dale in the warehouse?).

I have been known to do things the hard way before, it's making more sense as I go along to go ahead and drop the thing, replacing hoses, connectors as I go along. One less thing to worry about down the road.

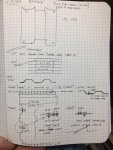
Here: if you follow along with my sketches, you can see where the plates supporting the cutout would be in the bottoms/valleys of the corrugated surface. Since none of it is weight-bearing with the boards placed atop the tunnel, it's all as functional as it needs to be. I'll order gaskets/nuts/seals and drop the thing when it warms up in a month or two, do it right.

Thanks for your suggestions/help.

IMG_3077.jpg
 

BLK HMMWV

Well-known member
1,576
497
83
Location
Pasadena California
I did mine when I separated the body from the frame. I insulated the whole underside of the tunnel as well. It basically is in between the two body support beams. The holes line up with 4 rivet heads at least mine did.
I used a vibrating multi tool with a metal cutting blade. For a surgeon it will be like using a scalpel .
If you do drop the tank. You may want to upgrade the sender/ pickup to the new style if you don't already have one. the old one used a cork as a float.
At least check the sock on the pickup .
Have fun.
 

NormB

Well-known member
1,220
72
48
Location
Cloverly,MD
I did mine when I separated the body from the frame. I insulated the whole underside of the tunnel as well. It basically is in between the two body support beams. The holes line up with 4 rivet heads at least mine did.
I used a vibrating multi tool with a metal cutting blade. For a surgeon it will be like using a scalpel .
If you do drop the tank. You may want to upgrade the sender/ pickup to the new style if you don't already have one. the old one used a cork as a float.
At least check the sock on the pickup .
Have fun.
I've been looking for an excuse to buy another one of those tools for years now. Many times I've had to improvise, or hold part of a hacksaw blade in a vise-grip or something to make cuts in odd locations.

I'm pretty much committed to dropping the tank. I've got enough containers to drain the tank (that's how I know it leaks, 'cause I took it out and filled it up) but a lot of projects until spring when I can do this comfortably. Actually cleared out enough garage space to pull the truck IN, just isn't enough space to close the door behind it.

Thanks, all.
 

Action

Well-known member
3,576
1,557
113
Location
East Tennessee
you can make the hole as big as you want, side to side. the reinforcements under the bed limit how far front to rear you can go. The factory hole is at both of those reinforcements. Look for the lines of rivets across the bed and you will see where they are.
 

NormB

Well-known member
1,220
72
48
Location
Cloverly,MD
I might have a scrap piece, what are the dimensions/measurements of the panel again?
Much appreciated. Dimensions are one of the things I'm wondering about myself.

The PS mag cartoon for the kit says one can change the top gasket AND sender from the port, and from pictures I've seen over on g503, it's only ab out 7x9". I'm hoping to make one at least 12x12, with supports, and will likely be using the original cut-out piece to do this.

Thanks again.

NB
 

dilvoy

Active member
733
25
28
Location
San Francisco, Ca.
There is no way to change the main gasket for the top plate. It is way too large to come out through the hole and there is no room to get at all the nuts anyway. You can change the sender and it's gasket though. As stated before, the front to back length of the opening is limited by the cross members of the body tub. You can cut into them, but it doesn't really get you much, because you can access the sender easily though the original sized access hole. I have cut the opening with a pneumatic disk cutter with good results. The tank and it's sender are very close to the body so you need to keep the disk from going to deep while you are cutting.
 

NormB

Well-known member
1,220
72
48
Location
Cloverly,MD
View attachment tank access cover 586-08.pdfThanks. Just going by what was said in the photo. And, apparently, I'm misreading the "sender unit gasket" verbiage as main plate, cover or whatever the nomenclature is for the big square gasket. This is like a Berlitz language school intensive. Not having a truck on hand with a dropped tank, there's no way for me to know how tight things are in there. But I think I got it figured out now.
 
Last edited:

orgnal

Member
285
4
18
Location
Denver, CO
Did you get around to doing this? I seem to have a slow fuel leak most likely from the fuel tank gasket. I see a drop beading off after driving. It does not quite pool under the vehicle when stationary. If you did go through replacing the fuel tank gasket, I would like to get some pointers / tips. Thanks.
 

TOBASH

Father, Surgeon, Cantankerous Grouch
Steel Soldiers Supporter
Supporting Vendor
3,582
3,488
113
Location
Brooklyn, NY
Might I make a suggestion. Tape some Saran wrap or wax paper to the floor where you plan to cut. Make your fiberglass filler plate on top of this barrier. Make it larger than the intended hole. Make it thick. Then let the fiberglass cure and removal it and then removed the Saran wrap or wax paper.

Then mark and cut your hole and save the piece. Use the cut metal piece as a template, and cut the fiberglass 1 inch larger all around. Drill multiple mounting holes around the perimeter of the fiberglass piece. Use an old rubber inner tube as a gasket or use more wax paper to line the truck edges in the floor and apply silicon to the underside of the fiberglass and let it set 1/8 inch thick. Then drill matching holes in the floor and use very short metal self tapping screws to hold your new plate down. Finally, remove all screws and remove wax paper from the back of the silicone gasket. Reinstall and you are done.

The above is what I am planning to do this Summer.

T
 
Last edited:

NormB

Well-known member
1,220
72
48
Location
Cloverly,MD
Did you get around to doing this? I seem to have a slow fuel leak most likely from the fuel tank gasket. I see a drop beading off after driving. It does not quite pool under the vehicle when stationary. If you did go through replacing the fuel tank gasket, I would like to get some pointers / tips. Thanks.
Not yet. Bought all the parts I'll need (gaskets, hoses, grommets, extra clamps, pads, etc), just haven't started the project yet, waiting for better weather, drained 5 gallons of fuel with a siphon, finally figured out how I'm going to jack up the rear to get a 5 gallon bucket underneath before I release the drain plug, get someone to help push another bucket underneath. I have about 15 gallons of fuel to drain and without a lift it's hard to work around.

Once I drop the thing, I'll drill some holes from underneath to outline the access panel, build it up the way I've sketched out, put in some insulation/sound proofing, reassemble.

I'll be sure and post pictures here somewhere.
 

Stonewall

Member
191
2
18
Location
Peoria, IL
If you do a search, I am pretty sure that retired war horse had a post that detailed how he puts the access door in the bed. I may be wrong, but pretty sure I read one about a year ago.
 
Top
AdBlock Detected

We get it, advertisements are annoying!

Sure, ad-blocking software does a great job at blocking ads, but it also blocks useful features of our website like our supporting vendors. Their ads help keep Steel Soldiers going. Please consider disabling your ad blockers for the site. Thanks!

I've Disabled AdBlock
No Thanks