• Steel Soldiers now has a few new forums, read more about it at: New Munitions Forums!

  • Microsoft MSN, Live, Hotmail, Outlook email users may not be receiving emails. We are working to resolve this issue. Please add support@steelsoldiers.com to your trusted contacts.

M1078 LMTV planetary hub setup

steve6x6x6

Well-known member
Steel Soldiers Supporter
1,425
37
48
Location
Winter Haven, florida
Not sure how the oil in the outside part of the hub i getting past 2 high pressure air seals into the inner part and get by of a premium hub seal. Oil can go down the spindle bore and get by the one seal on the stub axle hub.
 

steve6x6x6

Well-known member
Steel Soldiers Supporter
1,425
37
48
Location
Winter Haven, florida
Axle vent blocked or partially blocked allowing pressure to build in the axle and push out oil past the seal??
The 2 seals for the CTIS are rated at 175 PSI. The inside would have the vent but that is inner side, that oil would run out of the bottom of the steering kunckle.
 
Last edited:

DiverDarrell

Member
Steel Soldiers Supporter
629
24
18
Location
Port orchard, WA
I guess it will be a bit before I get to this now and will start a new thread on it, including high speed gear install (since I'll have one hub apart good time to do it.) also ordered the seal drivers and a full hub kit. So I can machine the old hub cover and set the gear lash as Steve does it. Hopefully it's not the spindle as I haven't found one of those for sale yet. I just have to keep telling myself it's just money, I'll make more. Thanks everyone for the ideas, they will all be investigated.
 

steve6x6x6

Well-known member
Steel Soldiers Supporter
1,425
37
48
Location
Winter Haven, florida
All of my meritor axle builds for off road use I have removed the CTIS seals to lube both wheel bearings with the gear oil. The seal will keep the oil in the hub, but the opening in the spindle for the air supply must be plugged at the spindle flange, or oil will come out.
 

Floridianson

Well-known member
Steel Soldiers Supporter
7,409
2,503
113
Location
Interlachen Fl.
I knocked off my flange cap nuts with a old monkey wrench and a dead blow hammer so I could remove the axles. They came loose very easy. Now I just have to find out what axle is having trouble. I will put the monkey wrench in the truck tool box.
Steve I grabbed this seal installer off Obay for 30 bucks with thoughts I might need it one day.
What four inch seal does it install? Hub seal to spindle was my guess. I was thinking about doing a compleat R&R on all axles. Might be easer if I call you and see what you have for sale and just do a change out. Tanks for the thread!!!!!!!!!
 

Attachments

Last edited:

expeditionnw

Member
174
1
18
Location
Alaska
Thanks for creating this thread Steve, its very helpful!

If ever there was a sticky worthy thread, id think this was it. seems every one of these trucks ive seen has a noisy hub.
 

Waltjg

Member
46
3
8
Location
Central OR
I have so of these Meritor RF-12 ( M1078A1 and 2 on up) kits. These have 100% all of the planetary parts with end cap. This can really help some one that opens their hub up to find chewed up parts.
Hi Steve,

Thank you for this thread. I am getting some noise, and a lot of excess heat from front right hub on one of my trucks. I am thinking it best to tear apart in pursuit of the bearings, but inspecting everything along the way. Are you still offering these kits? If not, where can I get a couple?

Thanks in advance!
 

TNriverjet

Active member
Steel Soldiers Supporter
1,172
24
38
Location
Clifton, TN
Hi Steve, Thank you for this thread. I am getting some noise, and a lot of excess heat from front right hub on one of my trucks. I am thinking it best to tear apart in pursuit of the bearings, but inspecting everything along the way. Are you still offering these kits? If not, where can I get a couple?Thanks in advance!
FYI, improper shim thickness (too thick) can also cause excessive heat. Ask me how I know... I quickly made necessary changes after a 3-5 mile test run!
Also, If your bearing nut starts to back off, it could easily "crowd" the clearances on the spider gears and cause heat. I've heard several say that the nut was finger tight (loose, as the case may be) once they pulled the gears out of the hub. It may not hurt just to tear it down and make sure that nut is properly tightened on your wheel bearing.
 
321
14
18
Location
Montana
What parts or gaskets, o-rings do I need if any to take the hub apart and check the wheel bearing? I would also expect I would need a pretty big socket to tighten it right?
Thanks so much

Seth

FYI, improper shim thickness (too thick) can also cause excessive heat. Ask me how I know... I quickly made necessary changes after a 3-5 mile test run!
Also, If your bearing nut starts to back off, it could easily "crowd" the clearances on the spider gears and cause heat. I've heard several say that the nut was finger tight (loose, as the case may be) once they pulled the gears out of the hub. It may not hurt just to tear it down and make sure that nut is properly tightened on your wheel bearing.
 

DiverDarrell

Member
Steel Soldiers Supporter
629
24
18
Location
Port orchard, WA
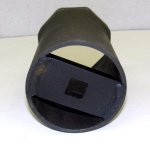
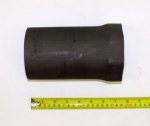
A 3 7/8" very deep well socket, RTV, and a way to measure to set the gear lash on the reduction gears. To just check the bearings you may be able to get away with not changing seals. The torque on the hub nut is surprisingly light.
 

agazza2

Active member
483
31
28
Location
Ahwatukee, AZ
Front Axle hub rebuild parts - 1995 M-1078

Here are the parts I bought for the front axle rebuild. I will post photos of the part numbers for the NAPA bearings later. But the NAPA bearings cost around $160 and the kit on the large auction site was around $65. The socket from Fleet pride was $20, but I will need to cut it, extend and weld it back together. I will post the pictures of the Tinken bearings part numbers next.
 

Attachments

Last edited:

agazza2

Active member
483
31
28
Location
Ahwatukee, AZ
M1078 Front axle hub bearings.

Here are the part numbers for the Timken bearings that I received in the kit I bought. I still have not found a cover to modify like Steve, so I may try just using (4) U-joint clamp brackets (modified) to hold the cross T section for the spider gears in place to make the measurements. Or make 4 aluminum blocks with the half round section cut out, and bolt holes to bolt to the hub to make the measurements.
 

Attachments

Last edited:

agazza2

Active member
483
31
28
Location
Ahwatukee, AZ
How are you going to do that:

- piece in a short length of matched-diameter pipe between the two ends?
I was thinking just put it in my chop saw, and cut in half and put the new sleeve between the two pieces and tack weld it back in place. But can also do it the way expeditionnw suggested.
 

scottmandu

Active member
822
36
28
Location
Texas
So I'm going to be that guy and state these aren't planetary gears... They are bevel gears. Planetary gear sets are something entirely different.
 
Top
AdBlock Detected

We get it, advertisements are annoying!

Sure, ad-blocking software does a great job at blocking ads, but it also blocks useful features of our website like our supporting vendors. Their ads help keep Steel Soldiers going. Please consider disabling your ad blockers for the site. Thanks!

I've Disabled AdBlock
No Thanks