• Steel Soldiers now has a few new forums, read more about it at: New Munitions Forums!

  • Microsoft MSN, Live, Hotmail, Outlook email users may not be receiving emails. We are working to resolve this issue. Please add support@steelsoldiers.com to your trusted contacts.

Rear Level Wind Servicing Tips

zebedee

conceptualizer at large
Steel Soldiers Supporter
1,634
741
113
Location
Central NY
Washers - orientation

Just to clarify orientation of the thrust washer and spacer washer in relation to the bearing of the sheave pulley wheel and frame.

rear level wind spacer.png
 

SLOrazorsedge

Member
415
5
18
Location
San Luis Obispo, Ca
I'll grap some pics today. It keeps the rear of my wrecker an oily dripping mess. Why would the roller be filled as opposed to just lubing the end support bearing caps? If filled, I would imagine it easily would take 6-8 tubes of grease.
 

zebedee

conceptualizer at large
Steel Soldiers Supporter
1,634
741
113
Location
Central NY
I'll grap some pics today. It keeps the rear of my wrecker an oily dripping mess. Why would the roller be filled as opposed to just lubing the end support bearing caps? If filled, I would imagine it easily would take 6-8 tubes of grease.
Perhaps this conversation should be moved to the other thread...

Several points... The rollers need to be a certain radius due to the size of the cable. If solid, except for a spindle, they would weigh a ton!
Once full of grease, it only takes a couple of pumps to lube the bearings - grease is cheap for the military.
To machine and add pressure seals to retain grease is overkill I guess...


I added tubes inside the rollers to reduce the grease volume.
 

zebedee

conceptualizer at large
Steel Soldiers Supporter
1,634
741
113
Location
Central NY
and to finish!

Part Three - Sheave Pulley.

Firstly - ensure that the outside of the sheave shaft and the inner surface of the sheave frame are completely paint/rust free. Even burnished with power wire wheel. This will assist in the reassembly.

I made a captive drift out of a large bolt with it's shank built up with tape to fit snugly into the center of the sheave shaft so that I could drive it into the sheave frame squarely.
20170228_115002.jpg

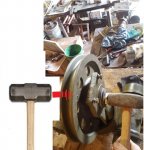
Holding the head of a large sledge hammer to the opposite side of the sheave frame, it provided sufficient resistance to the hammer blows from the right side of the pic to drive the shaft home. NB. Ensure the dowel in the sheave shaft is lined up with the corresponding key way in the top of the sheave frame before starting to drive it home... After it has almost gone through the first side of the frame, use a small diameter bar to lift and hold the pulley wheel in alignment with the shaft. Then drive it through the pulley bearing and then the second side of the frame.
20170228_115023.jpg

Drive the sheave shaft to the circlip on one end then fit the second circilp to the opposite end.
Final grease nipple installed then pump grease and check for easy rotation of pulley wheel.
20170228_114903.jpg

I found this little gizmo very handy - Lock n Lube. Replaces standard grease gun end with a quick type clamp so that you don't have to use one hand (with a flexible hose) to keep the nozzle on the nipple.
20170228_114918.jpgI think it was nearly $30 from a local tractor dealer. Made in "seth efrika" - never had anything made from there before, but it works like a charm.

The End.
 

zebedee

conceptualizer at large
Steel Soldiers Supporter
1,634
741
113
Location
Central NY
That's the rebuild completed - one further note or tip for initial disassembly or final reassembly on the vehicle..

Remove the sheave pulley guard #3 whilst winch cable is under load/tension, then release tensioner/load and pull slack above the sheave pulley - this will allow the cable loop to be pulled to one side for removal of the level wind trolley and sheave pulley complete.

Install in reverse, finally tensioning the cable on to the sheave pulley so that the guard can be refitted. There is too much memory/spring in a 3/4" cable to be able to 'loose' the slack (required to remove the level wind) to allow the guard to be refitted.
 

zebedee

conceptualizer at large
Steel Soldiers Supporter
1,634
741
113
Location
Central NY
First run of level wind post service. NB. This is the second time I have used this winch since I acquired the truck - the first time I found out that it came with a sheared shear pin! Was retrieving a runaway tractor and ended up using the boom!
So, after changing out the shear pin, I decided to tear down the level wind. Fast forward to yesterday, discovered that one layer down, there were some bad wraps.....

https://youtu.be/B7S-CIB2x-U

Stuck the M916A1 in reverse and let it trundle down the drive hooked to the wrecker, pulling out enough cable so that I could rewind to tidy the wraps.

https://youtu.be/dnS4AZPAR30

Remembering this time to tether the steering wheel.... Pulled the LET back up the driveway - now in Neutral, then when close enough, engage tensioner, loose the Freightliner and stow appropriately.

Cable will have to be pulled all the way out a few times to bed-in the rollers on the level wind, lube the cable and lay up properly, but that will have to wait 'till Soldier B returns from college for the summer.

'spose I can now install the sheave wheel cover since the cable is tight. .... Hmmmmm - where did I put it?

and yes - check out the corrosion on the clutch lever due to ponding of water in the underside of the knob - long since gone. Replacement somewhere in the spares container.
 
Last edited:
Top
AdBlock Detected

We get it, advertisements are annoying!

Sure, ad-blocking software does a great job at blocking ads, but it also blocks useful features of our website like our supporting vendors. Their ads help keep Steel Soldiers going. Please consider disabling your ad blockers for the site. Thanks!

I've Disabled AdBlock
No Thanks