• Steel Soldiers now has a few new forums, read more about it at: New Munitions Forums!

  • Microsoft MSN, Live, Hotmail, Outlook email users may not be receiving emails. We are working to resolve this issue. Please add support@steelsoldiers.com to your trusted contacts.

Miler Marker Hydraulic Winch Identification

78703TX

New member
21
2
3
Location
Austin, TX
Howdy

First post so bear with me. I've been searching this site since August when I got my HMMWV and have found some great info so far. Since purchasing I have upgraded mine to a 4 man, restored and installed/adjusted a set of X-doors, installed an airlift bumper and rhino tire carrier, installed a 12v converter to run stereo/dash lights, and installed a 50" light bar. Definitely could not have done any of it without the knowledge shared on this forum.

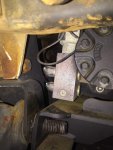
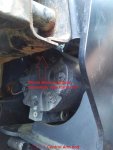
Unfortunately today I have found myself unable to find an answer so figured I would post and see if anyone can help me out. I bought a Mile Marker hydraulic winch last week on fleabay hoping it was a straightforward install. After tracking down the Mile Marker manuals on this site I started to notice there were differences in what I had vs. what the manual shows. I believe my winch is actually a rear winch mounted on a front mount bracket. On mine the solenoid, plugs and motor are on the PASSENGER side of the vehicle, and connected to the banjo fittings are 2 hydraulic hoses that feed into a valve which has a mounting bracket attached to it. I have attached a photo for reference. This valve isn't shown anywhere in the manual and it shows the solenoid, plugs and motor on the DRIVER side.

What I'm wondering is if this is in fact a rear winch, in order for me to plumb it do I need to remove both hoses at the banjo fittings and find/have hoses made to run direct from there to the hydrobooster/ps gear? Or does the valve need to stay in line for any reason? I'm assuming since the winch connections are on the PASSENGER rather than DRIVERS side that I'll need to have custom hoses made to account for the extra length?

Also, I'm in search of an original yellow Mile Marker controller and plug if anyone can point me towards a set.

Thanks in advance yall
IMG_20180319_1824233.jpg
 

juanprado

Well-known member
Steel Soldiers Supporter
5,614
2,922
113
Location
Metairie/La (N'awlins)
Interesting, as the rear ones I have seen do not have solenoids at the winch but there is a block for them by the windshield washer bottle/Cadillac valve.

I have not seen that valve either? Also looks like there is 2 ports at the solenoid block?

Mile marker tech support is very friendly and were helpful to me. Please post your results.

I bought the plug wiring harness from them direct. I already had controller but I would think they would also sell it direct. It makes it easier for them to use the mile marker numbers off the install manual and not the military part number or nsn. Be prepared to answer the question repeatedly that this is not for export and personal use for a surplus ebay purchase.

There are many post on here also about using the black warn controller which uses the same plug but needs 2 wires reversed for the mm.
 

86humv

Well-known member
Steel Soldiers Supporter
1,700
501
113
Location
Texas
Looks like the regulator on M1114 trucks for cooling lines that run to the rear Diff.
I have silver ones.
 

78703TX

New member
21
2
3
Location
Austin, TX
Alright so I think I have it figured out. The extra inline valve, according to the Mile Marker rep, is a booster to increase the pressure on the extra long lines for the rear mount winches (the hoses are 12+ feet long in order to make the run from rear end to hydroboost/ps pump). He said to remove this when front mounting the winch and to run the hoses direct from the solenoid ports to the hydroboost/ps pump. The port marked P connects to the power steering gear box and the port marked T runs back to the power steering reservoir. The other 2 "ports" to the left of the hose ports are adjusting screws for flow and backup.

In order to make the kit work as a front winch I ended up having to cut out a crescent shape in the passenger side bracket in order for it to fit against the winch bracket and around the winch motor.

The following parts were required which I easily got from Mile Marker (Mile Marker Part #s included):

-Controller Plug - 983-74-1002
-Controller - 983-74-1001
-60" Hydraulic Hose - 88-50060
-78" Hydraulic Hose - 88-50078
-Valve Kit - 35-5020-17

Take note that these extended hydraulic hoses were required to account for the solenoid mounting on the PASSENGER side rather than DRIVER side. The standard front mount winch hoses are not long enough to reach over.

Hope this helps someone in the future.

Thanks for yall's replies.
 

Retiredwarhorses

Well-known member
Steel Soldiers Supporter
4,400
4,182
113
Location
Brentwood, Calif
You will also have to unspool the cable and rewrap it so the cable feeds out through the fairlead correctly.
ive installed several rear MM’ on the front.
 

78703TX

New member
21
2
3
Location
Austin, TX
Thanks for the advice.

I'm just now noticing this- as I mounted the brackets to the frame last night, just after pounding the **** out of the control arm bolts, I noticed it looks like the winch itself will not fit in the space as it currently sits on the winch mounting plate. It looks like the cylinder on the winch motor will stick out past the frame mounting brackets and run into the passenger side frame rail. Anyone who has swapped a rear mount winch onto the front- how did you resolve this? I'd hate to have to cut any of my frame rail...
 

juanprado

Well-known member
Steel Soldiers Supporter
5,614
2,922
113
Location
Metairie/La (N'awlins)
Thanks for the advice.

I'm just now noticing this- as I mounted the brackets to the frame last night, just after pounding the **** out of the control arm bolts, I noticed it looks like the winch itself will not fit in the space as it currently sits on the winch mounting plate. It looks like the cylinder on the winch motor will stick out past the frame mounting brackets and run into the passenger side frame rail. Anyone who has swapped a rear mount winch onto the front- how did you resolve this? I'd hate to have to cut any of my frame rail...
The easy way to remove the lower control arm bolt is to jack it up and relieve the weight. Then use the new longer bolt to chase out the shorter bolt. On the driver's side, I had to remove the caliper out of the way to have clearance.
 

Retiredwarhorses

Well-known member
Steel Soldiers Supporter
4,400
4,182
113
Location
Brentwood, Calif
Thanks for the advice.

I'm just now noticing this- as I mounted the brackets to the frame last night, just after pounding the **** out of the control arm bolts, I noticed it looks like the winch itself will not fit in the space as it currently sits on the winch mounting plate. It looks like the cylinder on the winch motor will stick out past the frame mounting brackets and run into the passenger side frame rail. Anyone who has swapped a rear mount winch onto the front- how did you resolve this? I'd hate to have to cut any of my frame rail...

Ive installed them...they fit, tight...do you have the correct frame brackets?
there are 2 versions, the MM bracket has the bottom gusset removed
 

78703TX

New member
21
2
3
Location
Austin, TX
The easy way to remove the lower control arm bolt is to jack it up and relieve the weight. Then use the new longer bolt to chase out the shorter bolt. On the driver's side, I had to remove the caliper out of the way to have clearance.
Much appreciated! That helped a lot. I had actually read one of your previous posts mentioning that when I google searched it
 

78703TX

New member
21
2
3
Location
Austin, TX
Ive installed them...they fit, tight...do you have the correct frame brackets?
there are 2 versions, the MM bracket has the bottom gusset removed
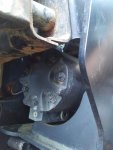
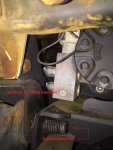
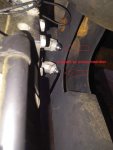
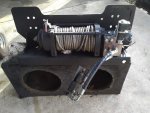
Not 100% sure which frame brackets I have but it's not the frame brackets keeping it from fitting on there. The winch motor cylinder sticks out so far that it butts into the frame rail before I can slip the driver side mounting hole onto the control arm bolt. On top of that, the solenoid hose fittings hit the cross member well before the winch bracket sits flush with it. I figured it might take some weird type of 90% angle flat fitting but I've never seen anything like that so I wouldn't know where to start looking. Pics attached to show what I'm dealing with.

Any idea what I can try next?
IMG_20180424_1930400.jpgIMG_20180424_1925215.jpg
 

78703TX

New member
21
2
3
Location
Austin, TX
Not 100% sure which frame brackets I have but it's not the frame brackets keeping it from fitting on there. The winch motor cylinder sticks out so far that it butts into the frame rail before I can slip the driver side mounting hole onto the control arm bolt. On top of that, the solenoid hose fittings hit the cross member well before the winch bracket sits flush with it. I figured it might take some weird type of 90% angle flat fitting but I've never seen anything like that so I wouldn't know where to start looking. Pics attached to show what I'm dealing with.

Any idea what I can try next?
Updated photos for clarification:IMG_20180424_1930400.jpgIMG_20180424_1925091.jpgIMG_20180424_1925215.jpg

Anyone who has successfully swapped a rear winch onto the front..how did you resolve this??
 

Retiredwarhorses

Well-known member
Steel Soldiers Supporter
4,400
4,182
113
Location
Brentwood, Calif
Looks as though you added the solenoid pack to the winch?
thats not how I mounted mine....I used a rear winch manifold and put it where it comes from the facorty, I just shortened the hydraulic lines that were provided in the kit.
 

78703TX

New member
21
2
3
Location
Austin, TX
Thanks guys I appreciate the replies. I've just gotten done speaking with the Mile Marker rep and after sending him detailed pictures of what I have here is the verdict:

The winch I received is for a M1113 ARMORED vehicle. The winch motor and valve as received will not EVER fit between the frame rails on a M998. In order for me make it work I have to flip the winch so the motor is on the Drivers side, purchase a very expensive replacement 12V valve and set of banjo fittings, hack the coil/wiring from the new 12V valve and replace with the coil/wiring off my 24V unit, and then smack the motor up against the frame rail until it fits.

Also, I need to make a correction to my previous post as the info I had gotten from Mile Marker prior to sending pictures was not accurate. The additional inline valve seen in my first photo, the one shown attached to the hydraulic lines, is not actually a BOOSTER but is in fact a PRESSURE RELIEF due to the fact that M1113s had improved power steering pumps that push 1,600 PSI when the winch can only handle around 1,450 PSI.

If anyone has a lead on a used valve please let me know. Laughing at myself for thinking this would be a straightforward upgrade
 
Last edited:

Retiredwarhorses

Well-known member
Steel Soldiers Supporter
4,400
4,182
113
Location
Brentwood, Calif
Thanks guys I appreciate the replies. I've just gotten done speaking with the Mile Marker rep and after sending him detailed pictures of what I have here is the verdict:

The winch I received (from a fleabay auction..DONT DO IT! The jackass is still advertising them as M998 winches) is for a M1113 ARMORED vehicle. The winch motor and valve as received will not EVER fit between the frame rails on a M998. In order for me make it work I have to flip the winch so the motor is on the Drivers side, purchase a very expensive replacement 12V valve and set of banjo fittings, hack the coil/wiring from the new 12V valve and replace with the coil/wiring off my 24V unit, and then smack the motor up against the frame rail until it fits.

Also, I need to make a correction to my previous post as the info I had gotten from Mile Marker prior to sending pictures was not accurate. The additional inline valve seen in my first photo, the one shown attached to the hydraulic lines, is not actually a BOOSTER but is in fact a PRESSURE RELIEF due to the fact that M1113s had improved power steering pumps that push 1,600 PSI when the winch can only handle around 1,450 PSI.

If anyone has a lead on a used valve please let me know. Laughing at myself for thinking this would be a straightforward upgrade

As I pointed out, that solenoid pack looked wrong, the rear MM winch only has hydraulic fittings, the solenoid pack and all control functions are completely separate.
 

78703TX

New member
21
2
3
Location
Austin, TX
Well, I got the seller to send me a replacement that he said was a standard M998 front mount winch and a M1114 Rear Mount winch showed up. Ha

So now after ordering all of the right parts to install the standard winch I'm looking at this thing wondering how the heck I run the hydraulic lines. Can anyone point me towards the correct valve for this thing? Assuming I need the same one that mounts under the hood as a rear mounted winch. Do I need 2 sets of extra short lines to run it from the winch to the valve then to the pump and booster?

I've been emailing with the mile marker rep but he's waiting a week between responses and its driving me crazy trying to get this stupid thing finished.

Thanks guys
 

navyman

New member
5
0
1
Location
indiana
Any updates on your front winch? I too have been upgrading my M998. I have installed the heavy duty rear airlift bumper w/winch and currently working on my front winch. First question is how did you route the rear hoses on the frame?
I am having trouble uploading my photos atm.
Second does anyone have the mount bolt measurements and or overal measurements of the front hydro winch?
 
Top
AdBlock Detected

We get it, advertisements are annoying!

Sure, ad-blocking software does a great job at blocking ads, but it also blocks useful features of our website like our supporting vendors. Their ads help keep Steel Soldiers going. Please consider disabling your ad blockers for the site. Thanks!

I've Disabled AdBlock
No Thanks