• Steel Soldiers now has a few new forums, read more about it at: New Munitions Forums!

  • Microsoft MSN, Live, Hotmail, Outlook email users may not be receiving emails. We are working to resolve this issue. Please add support@steelsoldiers.com to your trusted contacts.

Name this part, maybe, please

SteelCaesar

New member
28
1
1
Location
Florida
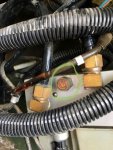
So I have been trying to track down all my CTIS leaks because the system keeps dumping all the air after the ECU tries to do its pressure check ( hwy blinks, pressure check attempt, then the dreaded five flashing lights). I found this small brass plug looking thing leaking air from that small gap on it. I tried checking the TMs but couldn’t find it on a parts diagram. Now it’s probably listed and someone will point it out that I over looked it but can anyone name the part circled? It’s on the CTIS manifold. Adjustments.JPG


Sent from my iPhone using Tapatalk
 

Ronmar

Well-known member
3,846
7,476
113
Location
Port angeles wa
That is a 7-8 PSI relief valve. The PCU uses it as a pressure regulator to drop the air in the system low enough that the dump valves on the frame open to release tire air to the atmosphere. The deflate solenoid opens the manifold to that relief which vents the manifold pressure down to 7-8 ish PSI. If air is coming out of that during a pressure check, you either have shorted wiring that is activating the deflate solenoid, or the dump solenoid valve on the PCU is leaking past...
 

SteelCaesar

New member
28
1
1
Location
Florida
ok can the solenoids be rebuilt or is it a replacement type of thing?

Also to change/add to the topic is there a way to plumb shop air into the system to supply air without having the truck run? I did add a quick connect fitting to the wet tank to be able to set the pressure on the regulator valve there. Can I just back feed air into that to supply air to the system?


Sent from my iPhone using Tapatalk
 
Last edited:

SteelCaesar

New member
28
1
1
Location
Florida
well to answer my own questions yes I can back feed it. And after taking apart the manifold I found seven O rings that needed to be replaced and I found a mud dabber, who is now homeless, had sealed up my vent tube for me....This fixed my air dumping out of the quick release valves but I still get the five lights after pressure check. I manually filled all tires to 60 psi before turning it on. And the tires hold air so I don’t think a wheel seal is leaking. Any advice?


Sent from my iPhone using Tapatalk
 

ramdough

Well-known member
1,554
1,729
113
Location
Austin, Texas
Do you know someone with a known working controller you can try?


Maybe the controller is dead.

I am no expert..... but I would try that if I could.


Sent from my iPhone using Tapatalk
 

Ronmar

Well-known member
3,846
7,476
113
Location
Port angeles wa
You probably still have a leak somewhere. The controller closes the control solenoid and gives a shot of air from the supply solenoid on the PCU to open the dump and wheel valves to the PCU. Then it looks for a stable pressure reading on the pressure sensor on the PCU. If that reading is not stable, it faults and starts flashing lights and opens the control solenoid to depressurize the system. Unfortunately this process is fairly brief so finding leaks with the controller running the show will be tedious.


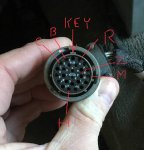
A better way to search for CTIS leaks is to disconnect the cannon plug from the controller and jumper the control solenoid pin to the 28V pin in the connector. Then briefly jumper the supply solenoid pin to 28V to give a shot of air to open the dump and wheel valves back to the manifold. Once pressurized and the control solenoid energized to hold that pressure in the system, you have all the time you want to go over all the plumbing with bubble mix. Having the system fed with a compressor will really help as you can hear things better. Having my PCU under manual control made finding my system leaks pretty easy. The CTIS controller will err on the side of caution, so it doesn't take much of a leak to fault the system. I have pics of the connector with the necessary pins marked to do this, that I can put up later if you want them...
 

SteelCaesar

New member
28
1
1
Location
Florida
So I don’t know anyone with a working controller but I am in pensacola, Fl, if there’s anyone around here willing to help.

I did find two more air leaks. One was a elbow fitting off the wet tank. Snugged that up and no more leak there. The second was this valve behind the first air tank nearest the cab. When i went to take what I thought was a bushing off this spring flew out with these other parts. I hope I found all the guts. Now to look through the TMs and find what this is.


If you can post or PM that diagram on how you pressurized your system that would be great. for now I have shop air plumbed into the wet tank at 120psi. and have checked the system with just the power switch on and the run flat button pushed.


Sent from my iPhone using Tapatalk
 

Ronmar

Well-known member
3,846
7,476
113
Location
Port angeles wa
H is 24V, R goes to the control solenoid, so you need to insert a jumper from R to H to close the control solenoid

B is the supply solenoid. Once the control solenoid jumper is in place/solenoid closed, you will need to jumper H to B briefly and give a 1-2 second shot of supply air to pressurize the CTIS system and open the dump and wheel valves...
 

Attachments

Andyrv6av8r

Well-known member
Steel Soldiers Supporter
1,200
457
83
Location
Spartanburg,SC
I have a spare controller if you need to try it. I can mail it to you if needed. You can also pressurize the system manually with a regulator and couple of ball valves.
 

SteelCaesar

New member
28
1
1
Location
Florida
I have a spare controller if you need to try it. I can mail it to you if needed. You can also pressurize the system manually with a regulator and couple of ball valves.
Thanks I will let you know. But for now I just got the new inversion valve from napa at the end of my shift today. Maybe tomorrow I will get some time to install it and try again.


Sent from my iPhone using Tapatalk
 

SteelCaesar

New member
28
1
1
Location
Florida
H is 24V, R goes to the control solenoid, so you need to insert a jumper from R to H to close the control solenoid

B is the supply solenoid. Once the control solenoid jumper is in place/solenoid closed, you will need to jumper H to B briefly and give a 1-2 second shot of supply air to pressurize the CTIS system and open the dump and wheel valves...
this has been super helpful and regretted at the same time because I am finding more leaks...ugh. So I replaced that inversion valve and found a leak in the front emergency glad hand. pulled the one way valve behind it and that was full of water and rust. the glad hand rubber seal had been missing for awhile and that air line filled with water. replaced that valve and found that there still was a leak. Traced the other line and found the top two way valve on the drivers side pulled that apart found some crud there. The rubber flap looked almost new and the brass was corrosion free. I reassembled it but is there a way to test it before reinstalling it? I used a human air compressor to try and blow air passed and it held one way but If I blew in from the side where that pressure sensor looking thing was it blows right pass the flap. Is that normal?


Sent from my iPhone using Tapatalk
 
Top
AdBlock Detected

We get it, advertisements are annoying!

Sure, ad-blocking software does a great job at blocking ads, but it also blocks useful features of our website like our supporting vendors. Their ads help keep Steel Soldiers going. Please consider disabling your ad blockers for the site. Thanks!

I've Disabled AdBlock
No Thanks