• Steel Soldiers now has a few new forums, read more about it at: New Munitions Forums!

  • Microsoft MSN, Live, Hotmail, Outlook email users may not be receiving emails. We are working to resolve this issue. Please add support@steelsoldiers.com to your trusted contacts.


3 Jake heads under a stock M809 hood!!!

US6x4

Well-known member
Steel Soldiers Supporter
1,165
2,027
113
Location
Wenatchee, WA
Today I had my first trial fit with a front jake head installed under a stock hood and it was a success! Woohoo! ...Okay, i had to trim the middle hood support channel, but other than that no cutting, spacing, clearancing, denting or hood scoop done to the hood. I've been poking away on my quest for jake brakes on my M813A1 and this latest focus on getting that third head to fit is all based on the premise that you don't need a pent roof valve cover for rocker adjuster clearance because all the rockers are now buried in the jake head. Besides atvcat33, everyone (at least from my research) adding 3 jake heads to an NHC-250 on this site has had to do a fair amount of surgery to get the hood to clear. Here is how I got it to work.

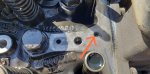
I stuck a tape measure down on the block and closed the hood on it and it stopped traveling at this point.
20191128_160205.jpg 20191128_160124.jpg

The bottom of the jake head would be flush with the bottom of the 3/16" thick radiator support bracket so on my truck I have 3 5/16" clearance and my 25B jake heads measured 2 5/16" tall so that leaves 1" left for valve cover and gaskets. I ordered an extra valve cover to play with my idea while keeping my truck running and this is what the cross section looks like.
20191119_140357.jpg

Now can enough material be removed during a tummy tuck to get this under 1" tall?
20191123_145827.jpg 20191123_145938.jpg
20191123_150036.jpg

The tangent point where the top radius becomes the vertical side is 3/8" below the top surface and not wanting to cut into the radius I marked lines 3/8" below the top and 1/4" above the flat flange area. The little outer perimeter rail is mostly 1/4" I.D. tall so if a saw blade or cutoff wheel were to rub against it while cutting the cut would be 1/4" above the flange.
20191123_155751.jpg
20191123_155823.jpg

At the highest point of the valve cover peak almost 7/8" can be removed from the side wall.
20191123_154119.jpg

Initially my idea was to bolt the valve cover to a large wood post on its side and slice this triangular sliver out with a band saw but the amount a band saw blade wonders during a cut made me shy away from that idea. Next up is the quick and trusty cutoff wheel! I used some 3/8" flat bar to make a cutting guide for the top cut and I used 1/4" keystock to lay in the flat flange area as a guide for the lower cut.
20191218_130405.jpg

Maxed out of number of pics...
 
Last edited:

US6x4

Well-known member
Steel Soldiers Supporter
1,165
2,027
113
Location
Wenatchee, WA
20191218_130540.jpg
20191218_130804.jpg
20191218_131413.jpg
20191219_090632.jpg
20191219_090915.jpg
20191219_112931.jpg
20191219_091708.jpg
20191219_112955.jpg

I did not completely sever the top lid on the short side of the valve cover - I left the straight parts connected but I did cut through the indentation areas of the short side with a dremel tool cutoff wheel since the metal would have to go somewhere when bending the top down flat. Now it's time to weld the seam shut!
 
Last edited:

US6x4

Well-known member
Steel Soldiers Supporter
1,165
2,027
113
Location
Wenatchee, WA
I can't take credit for the welding as I had a coworker who does that for a living stitch the valve cover back together again. His TIG welds turned out pretty nice but my cutoff wheel action left almost 3/16" gaps to fill and that was a challenge.

20200116_090738.jpg
20200116_090747.jpg
20200118_100911.jpg

And now with the welds ground down and then with the valve cover bead blasted once again.
20200119_203413.jpg
20200119_203402.jpg
20200119_203431.jpg
20200126_075841.jpg20200126_075914.jpg

Now it's ready for some Cummins charcoal gray paint!
 

US6x4

Well-known member
Steel Soldiers Supporter
1,165
2,027
113
Location
Wenatchee, WA
With the new low-profile valve cover now finished with its surgery I mounted it onto a jake head to see if it would clear the internal parts that sit proud of the upper gasket surface. My plan was to dimple the valve cover in places that needed more clearance if there was a crash. The socket head cap screws were the highest point on the jake heads as you can see by the ruler below so I grabbed the kid's playdough, placed a ball of it on the cap screw and smashed the playdough with the valve cover (no gasket used).

20200227_165849.jpg
20200227_170540.jpg
20200227_170826.jpg
20200227_171208.jpg

Alright, so the valve cover just barely clears the jake head so let's see if it will fit under the hood...
20200329_134508.jpg

On the first attempt the hood wouldn't completely shut and the underhood support left two scratches on the valve cover so I trimmed off the offending flange for some clearance and then was able to shut the hood completely.
20200329_162558.jpg20200329_144841.jpg


A ball of playdough was once again used to gauge the amount of clearance between the hood and low-profile valve cover.
20200329_145331.jpg20200329_145334.jpg20200329_145520.jpg

So even with a loose valve cover I managed to clear by 3/8"+. My final valve cover height is 5/8" so it adds up to that 1" number from before. The masking tape in the above picture is where the hood support was contacting. I have many more steps to perform before the jakes are installed and running but that is old hat around here so now that I got the exciting part out there I will slowly add updates to this thread as my install progresses. The governor of my state says we are on shutdown till the end of April now so there should be some time to work on it...
 
Last edited:

Lonnie

Member
200
18
18
Location
Pittsburgh, PA
Awesome work. I was planning the same thing, but never got around to test fitting everything.

Other projects took precedence & the truck got ignored again.
Thanks for sharing the measurements, you saved me a few hours of experimentation.
 

US6x4

Well-known member
Steel Soldiers Supporter
1,165
2,027
113
Location
Wenatchee, WA
Awesome work. I was planning the same thing, but never got around to test fitting everything.

Other projects took precedence & the truck got ignored again.
Thanks for sharing the measurements, you saved me a few hours of experimentation.
Thanks, lonnie! Hopefully there is little enough variation in these trucks that yours might also have a similar clearance.
 

zebedee

conceptualizer at large
Steel Soldiers Supporter
1,604
653
113
Location
Central NY
!st in line if you want to make more of the mod'd front valve covers!!!!! Please!

Very clear and pro presentation of your project. Thanks for this thread.
 

US6x4

Well-known member
Steel Soldiers Supporter
1,165
2,027
113
Location
Wenatchee, WA
!st in line if you want to make more of the mod'd front valve covers!!!!! Please!

Very clear and pro presentation of your project. Thanks for this thread.
Well, since I modified a spare valve cover I still have my original that I will have to do something with. I'll think about that and see if my welder is up to it.

If I did another one I would experiment with cutting out the triangle sliver but leaving the short side without any relief cuts or maybe smaller relief cuts. I suspect that the top would still squeeze down and it would only take finger pressure to tell if the relief cuts are necessary.
 

US6x4

Well-known member
Steel Soldiers Supporter
1,165
2,027
113
Location
Wenatchee, WA
I looked high and low for 425A jake brakes purely for the benefit of running a divided entry turbo with pulse manifold and the closest I found was one set of heads only (no installation hardware or crossheads) for $1000. That's a better price than new but still pretty steep.
I checked in with several junk yards and auto dismantlers every few months over the course of a year with the same story: no 425A but plenty of 25B.

I finally gave up on the 425A and got ahold of Stour 2 LLC in Toledo, Ohio who sold me a mostly complete "kit" for $350 + $75 shipping which is the best deal I found in a year of searching.

http://www.stour2.com/listing/takeoff-jake-brakes/
20200225_155758.jpg

The kit was only missing (3) each of item #3.
Screenshot_20200227-210459_Drive.jpg
 

US6x4

Well-known member
Steel Soldiers Supporter
1,165
2,027
113
Location
Wenatchee, WA
The first order of business was taking an inventory, then washing/ degreasing everything, and wire wheeling any rusty threads.
Second step was getting the front head milled to clear the radiator support bracket.
The machinist at work took off .188" in the CNC mill to get the bracket just a hair below flush.20200326_172940.jpg
20200326_172911.jpg
20200326_173003.jpg
20200326_173022.jpg
20200329_115446.jpg
 

msgjd

Well-known member
Steel Soldiers Supporter
856
2,686
93
Location
upstate ny
Good job ! I have a bad 350 sitting here with jake heads, hoping to someday drop the jakes into an M817 which sees a lot of steep downgrades loaded. Although I have a custom-modified jake/turbo hood from a parted-out M818 we scrapped long ago, I want to retain original hoodline and was not going to do the front head. (4 cyls jaked is better than none) But I've been concerned about uneven pressure on a 250 crank, especially for the amount of time spent on downgrades. Your detailed experiences are gonna make my jake conversion possible in full ! thank you
 

US6x4

Well-known member
Steel Soldiers Supporter
1,165
2,027
113
Location
Wenatchee, WA
All washed, painted, lightly oiled inside, and continuity checked in the wire connections. Just waiting to get installed :)

20200401_120314.jpg
20200401_101842.jpg

*for whatever reason my engine has a charcoal gray block, OD heads, gray rocker boxes and valve covers, gray intake, OD thermostat housing & water pump. Can't guess what got replaced or repainted in the past but I'm painting my parts gray to match the majority of the engine.
 

msgjd

Well-known member
Steel Soldiers Supporter
856
2,686
93
Location
upstate ny
[QUOTE="US6x4, post: 2278111, for whatever reason my engine has a charcoal gray block, OD heads, gray rocker boxes and valve covers, gray intake, OD thermostat housing & water pump. [/QUOTE]

One engine here has a tan oilpan, 2 gray heads, 1 carc green head, 3 tan valve covers, OD intake, and a gray waterpump, all on a tan block ! It came that way (still in the truck) from DRMO o_O
 
Last edited:

US6x4

Well-known member
Steel Soldiers Supporter
1,165
2,027
113
Location
Wenatchee, WA
[QUOTE="US6x4, post: 2278111, for whatever reason my engine has a charcoal gray block, OD heads, gray rocker boxes and valve covers, gray intake, OD thermostat housing & water pump.
One engine here has a tan oilpan, 2 gray heads, 1 carc green head, 3 tan valve covers, OD intake, and a gray waterpump, all on a tan block ! It came that way from DRMO o_O
[/QUOTE]

Sounds like a dip in a hot tank was not part of a depot rebuild/reset
 

US6x4

Well-known member
Steel Soldiers Supporter
1,165
2,027
113
Location
Wenatchee, WA
@Lonnie was able to put his 25B jakes on without disturbing his rocker boxes but I was not that lucky. My crossheads crashed with the rocker box so they had to be removed. I got the rocker boxes and top of the heads cleaned up while waiting for the gaskets to arrive. Of course I installed the jacobs crossheads also.
20200404_151340.jpg
20200406_152854.jpg
20200406_130420.jpg
20200409_201433.jpg

While the fresh paint cures I swapped out the set screws for hollow ones and the injector adjusters for the Jacobs type. The hollow set screws for supplying oil to the jakes have a .150" hole through them and it appears that one could drill out the Cummins set screw to match (may take a letter or number drill to get close) .
20200409_091120.jpg
20200409_091454.jpg
 

US6x4

Well-known member
Steel Soldiers Supporter
1,165
2,027
113
Location
Wenatchee, WA
Mucho progress this morning! The rocker boxes are back on, overhead has been run, jake heads installed and adjusted. I stopped just short of firing it up so I'll bleed the jakes and see if I performed the overhead correctly on another day.

20200411_114240.jpg
20200411_140639.jpg
20200411_140630.jpg


Side note: while the rocker boxes were off I checked for the port that needs closed off when a turbo is added and they were already plugged. One less thing to do during turbo install!
 

Attachments

msgjd

Well-known member
Steel Soldiers Supporter
856
2,686
93
Location
upstate ny
[QUOTE Sounds like a dip in a hot tank was not part of a depot rebuild/reset
[/QUOTE]

it wasn't a rebuild, I mean it came in a truck that way from the DRMO . The truck was painted a mix of different colors as well .. green, brown, black, sand ;)
 

US6x4

Well-known member
Steel Soldiers Supporter
1,165
2,027
113
Location
Wenatchee, WA
Good update! I fired up the engine and it runs normal just like it did before and no leaks anywhere so my overhead and rocker box work were a success!

I bled out the solenoids on the jake heads and the rear solenoid will continue to activate the jake mechanism for about 4 seconds after I release the manual button. The other 2 were not sluggish like this. Any thoughts on a cause or is it due to the engine only running at idle?

I'll post a video if I can figure that out...
 
Top
AdBlock Detected

We get it, advertisements are annoying!

Sure, ad-blocking software does a great job at blocking ads, but it also blocks useful features of our website like our supporting vendors. Their ads help keep Steel Soldiers going. Please consider disabling your ad blockers for the site. Thanks!

I've Disabled AdBlock
No Thanks