Now that's an interesting method. If the hammer or chisel doesn't work, I'll try that.I just put a fabric tow strap on mine and pulled it with a pickup. Was gravy, went perfect. Smooth, controlled, and done.
-
Steel Soldiers now has a few new forums, read more about it at: New Munitions Forums!
All 5-tons: Heavy Duty Torque Rod Ends
- Thread starter MyothersanM1
- Start date

More options
Who Replied?74M35A2
Well-known member
- 4,142
- 341
- 83
- Location
- Livonia, MI
I’m just lazy. I prefer it over hammering and such, but each their own.Now that's an interesting method. If the hammer or chisel doesn't work, I'll try that.
I don't think I even have a strap long enough to try it at the moment. Now you've got me curious, so I'll have to go out and measure.I’m just lazy. I prefer it over hammering and such, but each their own.
74M35A2
Well-known member
- 4,142
- 341
- 83
- Location
- Livonia, MI
Cable, chain, anything. Mine was a 30’ tow / recovery strap left over from Jeep 4 wheeling. But I would think you could even use a ratchet strap without the winder part, as long as it was the 2” wide variety or more.I don't think I even have a strap long enough to try it at the moment. Now you've got me curious, so I'll have to go out and measure.
vvwilkins
Active member
- 106
- 117
- 43
- Location
- Riverside CA
I bought 12 from Erik's Military and Industrial Supply. Got the cotter pins off, Now struggling to get the old ends separated from the truck... arg... Athough, the Proto Tools offset 2 1/4" strike wrench is the bomb!If you replace your torque rod bushings, get the ones with the safety bar. They only cost a few dollars more than the bushings without the safety bar. You'll need a 2-1/4" wrench too.
View attachment 792511
View attachment 792512
Brutacus
Active member
- 242
- 208
- 43
- Location
- Marion, AR.
I bought 12 from Erik's Military and Industrial Supply. Got the cotter pins off, Now struggling to get the old ends separated from the truck... arg... Athough, the Proto Tools offset 2 1/4" strike wrench is the bomb!
I'm only doing my uppers at this time. I got the cotter pins out, broke loose one of the nuts (rear inside). Still working on the front inside nut, as it is frozen in place but, the bushing is loose so when I try to break it loose it just flexes alot. I'm thinking of just taking a good chisel bit with an air hammer and splitting the nut off the bushing. The outside nuts located behind the spring pack are still being worked on. I'm trying to modify a 2-1/4" socket to fit in there so I can fit a bar to the back of it for some leverage.
Brutacus
Active member
- 242
- 208
- 43
- Location
- Marion, AR.
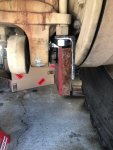
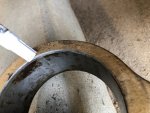
If you have any nuts that are stuck, an air hammer and chisel bit can take the place of a nut splitter. Doing this helped brake two of the stubborn ones loose. They are a little rusty after the rain, but you can see where I attacked them. The one on the right was particularly stubborn. You can see the damaged threads on the inside. I only stopped with air hammer when I watched the nuts move a little. After that, I used a wrench to take them off. Both of these nuts came from the front upper torque rod.
Here is the finished results. You can see where my air hammer caught the frame on the right side above the nut.


Looking underneath at the lower bushings, I see the next ones that need replacing. Since I bought two complete torque rods, I have two left over. I plan on just buying the bushings and pressing in new ones. I can't do them all at once.
Here is the finished results. You can see where my air hammer caught the frame on the right side above the nut.
Looking underneath at the lower bushings, I see the next ones that need replacing. Since I bought two complete torque rods, I have two left over. I plan on just buying the bushings and pressing in new ones. I can't do them all at once.
Brutacus
Active member
- 242
- 208
- 43
- Location
- Marion, AR.
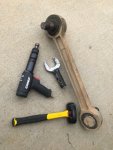
I forgot to mention, modifying a wrench to fit in behind the springs was an important step. Taking an old 2" wrench, a 2-1/4" socket, some cutting disc, some ugly welds, and a flap disc did the trick. The wrench is ugly, but it worked. The rear nut took a cheater to add some leverage to breaker it loose. The front nut required the use of an air hammer to knock it loose. Even then the front nut was tough, and fought me every turn of the way.


Russ Knight
Well-known member
- 1,117
- 1,060
- 113
- Location
- Perry, FL
I'm getting ready to do this, and I dread it.
vvwilkins
Active member
- 106
- 117
- 43
- Location
- Riverside CA
Well Done Brutacus!!! You've made way more progress than I have. I'm still struggling (and I mean Struggling) to get the tapered rod ends to separate from the mounts. What method did you use to free the rod ends behind the spring pack? Funny thing is I was able to remove all 12 cotter pins without too much hassle. I've been soaking the rod ends with Kroil today - finally got a single lower rear to pop free using a combo of compression against a 3/8" angle plate and a homemade pickle fork from a 2 1/8" wrench end. Any suggestions are greatly appreciated....maybe my 4lb sledge hammer is just not up to the task...If you have any nuts that are stuck, an air hammer and chisel bit can take the place of a nut splitter. Doing this helped brake two of the stubborn ones loose. They are a little rusty after the rain, but you can see where I attacked them. The one on the right was particularly stubborn. You can see the damaged threads on the inside. I only stopped with air hammer when I watched the nuts move a little. After that, I used a wrench to take them off. Both of these nuts came from the front upper torque rod.View attachment 795456
Here is the finished results. You can see where my air hammer caught the frame on the right side above the nut.
View attachment 795457
View attachment 795458
View attachment 795459
View attachment 795460
Looking underneath at the lower bushings, I see the next ones that need replacing. Since I bought two complete torque rods, I have two left over. I plan on just buying the bushings and pressing in new ones. I can't do them all at once.
Attachments
-
 89.1 KB Views: 55
 -
 76.7 KB Views: 56
 -
 69.6 KB Views: 51
Last edited:
Brutacus
Active member
- 242
- 208
- 43
- Location
- Marion, AR.
Well Done Brutacus!!! You've made way more progress than I have. I'm still struggling (and I mean Struggling) to get the tapered rod ends to separate from the mounts. What method did you use to free the rod ends behind the spring pack? Funny thing is I was able to remove all 12 cotter pins without too much hassle. I've been soaking the rod ends with Kroil today - finally got a single lower rear to pop free using a combo of compression against a 3/8" angle plate and a homemade pickle fork from a 2 1/8" wrench end. Any suggestions are greatly appreciated....maybe my 4lb sledge hammer is just not up to the task...
.
Just to be clear, I've only replaced the 2 upper dogbones to date. I haven't touched the lowers yet. I used the compression plate method on two of the bushings. The other two bushings, the ones behind the springs, I used a heavy duty air hammer with a heavy bit and long rod to knock the bushings out. I had to put the castle nuts back on the bushing ends to help keep the long rod on the bushing. It was an odd angle, and it took some time on each bushing, but they broke free. In hindsight, I should have used some PB blaster, or Kroil on the tapered part of the bushing a few days before knocking them loose. I think that might have helped. If you get your hands on an air hammer, make sure it has a minimum stroke of 4 inches and uses a heavy bit. My air hammer is an Ingersol-Rand 6A Lock ring riveter. I did use a smaller air hammer and chisel bit to break loose some of the nuts loose. I used that combo like a nut splitter on two of the stubborn nuts.


My 2-1/4" wrench, and my 6lbs. sledge hammer (Short handle) aren't pictured, but I used them too.


I only used my air hammer as a last resort. If I had an extra set of hands, I would have used the long rod and my 10 lbs. sledge to knock the bushings out (bushings behind the springs). An extra set of hands is always welcomed
Last edited:
- 2,756
- 2,414
- 113
- Location
- Sunman Indiana
Try a couple of good solid whacks here, with the taper under tension.Well Done Brutacus!!! You've made way more progress than I have. I'm still struggling (and I mean Struggling) to get the tapered rod ends to separate from the mounts. What method did you use to free the rod ends behind the spring pack? Funny thing is I was able to remove all 12 cotter pins without too much hassle. I've been soaking the rod ends with Kroil today - finally got a single lower rear to pop free using a combo of compression against a 3/8" angle plate and a homemade pickle fork from a 2 1/8" wrench end. Any suggestions are greatly appreciated....maybe my 4lb sledge hammer is just not up to the task...

74M35A2
Well-known member
- 4,142
- 341
- 83
- Location
- Livonia, MI
Correct on strike location. TedCat hit mine so hard I thought the bracket was going to break. No tension on it, dropped right out. 1-2 hits per. I used a wood splitting wedge and piece of 1 by wood to pre-tension my others, I did not hit them as hard as he did.
Brutacus
Active member
- 242
- 208
- 43
- Location
- Marion, AR.
I'll keep that in mind when I'm replacing my lowers. I'm just now noticing The angle iron bolted to the bottom of the u-bolt. I like that too.
vvwilkins
Active member
- 106
- 117
- 43
- Location
- Riverside CA
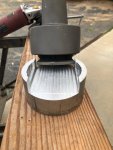
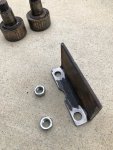
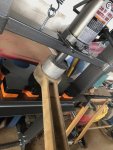
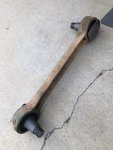
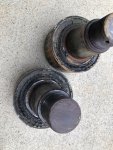
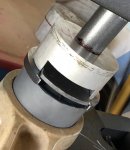
@Brutacus: That's one Serious Air Hammer you have there Sir! @Jbulach & @74M35A2 thank you for clarifying the strike zone. So today I decided that Finesse is highly over-rated and embraced brute force plus a new 4" travel Air Hammer from HF....Success!!! Just backed off the forward torque rod nut enough to keep the air hammer centered on the head of the rod end - pull the trigger and hang in there till magic happens. The rear end I had successfully loosened by combination of the compression plate and the pickle fork with the business end of a 4lb sledge and determination. Attached are pictures from today's efforts, including pressing in the new safety rod ends. Thank you again to all in this thread for sharing your techniques and experiences. Also, I've included a close-up picture of the Chamfer which is machined on the Install side of the torque rod arm. If you ever forget the orientation, look for chamfer to get re-oriented. I needed to re-dress the chamfer due to the excess CARC paint which was on the arm.
Attachments
-
 115 KB Views: 35
 -
 145.4 KB Views: 35
 -
 110.3 KB Views: 38
 -
 86.5 KB Views: 35
 -
 136.2 KB Views: 34
 -
 139.3 KB Views: 31
 -
 66.6 KB Views: 29
74M35A2
Well-known member
- 4,142
- 341
- 83
- Location
- Livonia, MI
Congrats.
Ugh. Trying to do this job while the pandemic is on, will be a giant PITA.
I can order the dog bones online. I found an affordable striking wrench online, no problems there. I'll probably need to go to a store to find that angle iron and nuts to make the compression plate to pop the torque rod end out of the mounting. Not happy about that part.
For those of you who made retaining discs for your bushings- What is the diameter and thickness of the disc? Did you buy them or make them?
- 2,756
- 2,414
- 113
- Location
- Sunman Indiana
I wouldn’t bother with the angle iron. A couple of cold chisels tapped firmly into place to act as a pickle fork should be all it takes, of course followed by a couple of good solid whacks on the exterior of the dog bone mounting brackets. Your not trying to brute force, pry them out, just shocking them loose.
Glenngineer
Active member
- 100
- 108
- 28
- Location
- Vancouver ,British Columbia, Canada
I used 2 1/2 inch flat washers from Fastenal ,they are 1/4 inch thick 5 inches outside diameterUgh. Trying to do this job while the pandemic is on, will be a giant PITA.
I can order the dog bones online. I found an affordable striking wrench online, no problems there. I'll probably need to go to a store to find that angle iron and nuts to make the compression plate to pop the torque rod end out of the mounting. Not happy about that part.
For those of you who made retaining discs for your bushings- What is the diameter and thickness of the disc? Did you buy them or make them?

 .At$5.00 each they are a lot cheaper than having someone cut them out . Lots of air/water and short welds if you go that route , easy to burn the bushings. used small slices of pipe to give more room for the dogbone to move.
74M35A2
Well-known member
- 4,142
- 341
- 83
- Location
- Livonia, MI
I think mine are 6” OD, 1/2” center hole, 1/4” thick flat plate steel, found somebody on eBay to water jet them out for super cheap, like 25 cents per.
You don’t need the angle iron. I used 1 by wood pieces and a wood splitting wedge. Fell right apart.
I did not want to apply heat to the rubber bushing of welding pieces on. I did bolt on because what if I need to press it apart again from that direction?
You don’t need the angle iron. I used 1 by wood pieces and a wood splitting wedge. Fell right apart.
I did not want to apply heat to the rubber bushing of welding pieces on. I did bolt on because what if I need to press it apart again from that direction?
- 114,408members
- 167,301threads
- 2,355,077posts
- 1,480online users