• Steel Soldiers now has a few new forums, read more about it at: New Munitions Forums!

  • Microsoft MSN, Live, Hotmail, Outlook email users may not be receiving emails. We are working to resolve this issue. Please add support@steelsoldiers.com to your trusted contacts.

Fan Solenoid replacement

Thumper580

Active member
269
210
43
Location
Virginia
Going to replace the Cadillac valve on my M998. Looks pretty straightforward. I assume I'll lose power steering fluid. After it's in I'll add fluid and turn the wheels back and forth to get a correct level. Does this process fill the Cadillac valve so it operates ok? Thanks.
 

Milcommoguy

Well-known member
Supporting Vendor
1,710
2,265
113
Location
Rosamond, CA
Shouldn't loose just spoon full.

Valve is above the reservoir and the rest of the circuits. Have a rag at the ready. Pull the hoses and plug with a bolt. Swap the fittings, use Teflon tape, get them going in the right direction and done.

As fluid flows thru valve a sonic sound maybe produced.
If the hissing sound is bothersome, wrap the valve with some old tire rubber cut to fit around valve to isolate the valve from the foot well mount.

I don't think working the steering wheel is necessary to purge the system. Give it a try and do your check drive.

IMO might be over thinking it, CAMO.
 

Dpas1973

Member
138
13
18
Location
New Jersey
Shouldn't loose just spoon full.

Valve is above the reservoir and the rest of the circuits. Have a rag at the ready. Pull the hoses and plug with a bolt. Swap the fittings, use Teflon tape, get them going in the right direction and done.

As fluid flows thru valve a sonic sound maybe produced.
If the hissing sound is bothersome, wrap the valve with some old tire rubber cut to fit around valve to isolate the valve from the foot well mount.

I don't think working the steering wheel is necessary to purge the system. Give it a try and do your check drive.

IMO might be over thinking it, CAMO.
I’m in the same boat I changed the TSTAT new hoses new coolant and a new fan drive switch and I can’t get the temperature gauge to read over 190 I’m not sure what my next step should be?


Sent from my iPhone using Tapatalk
 

Thumper580

Active member
269
210
43
Location
Virginia
I’m in the same boat I changed the TSTAT new hoses new coolant and a new fan drive switch and I can’t get the temperature gauge to read over 190 I’m not sure what my next step should be?


Sent from my iPhone using Tapatalk
That's where I am now.... New Cadillac valve, TDM and temperature switch..... fan stays engaged.... Obviously the fan clutch is stuck....
 

Dpas1973

Member
138
13
18
Location
New Jersey
That's where I am now.... New Cadillac valve, TDM and temperature switch..... fan stays engaged.... Obviously the fan clutch is stuck....
I did not change the time delay or Cadillac valve I got 84ohms across the caddy valve and was told that’s good? What would my next step be


Sent from my iPhone using Tapatalk
 

Thumper580

Active member
269
210
43
Location
Virginia
I did not change the time delay or Cadillac valve I got 84ohms across the caddy valve and was told that’s good? What would my next step be


Sent from my iPhone using Tapatalk
One post I read included repeated shots of PB Blaster and tapping on the metal clutch hub.... It finally unstuck itself....
 

Thumper580

Active member
269
210
43
Location
Virginia
So would a bad time delay cause it not to disengage?


Sent from my iPhone using Tapatalk
Yeah, the TDM can also be bad..... I have a "bad" habit of replacing moderately priced parts hoping it fixes the problem.... In the end it will probably be a stuck clutch on the fan hub.... That will be my last resort.
 

Milcommoguy

Well-known member
Supporting Vendor
1,710
2,265
113
Location
Rosamond, CA
I read many fan issues lately ,actually all the time. Lots of surplus sales, so Guys... I would like to ask, Did you just get this truck? (I see the low post counter)

The cooling system is simple auto shop 101 like any V-8 engine. So now who's big idea was it with the wacky HumV fan control system and temperature reading as to, what's going on. The link here chapter 1 is a GOOD starting point > As a matter of fact, consider it the manual in the" glove box" you didn't get. Box & manual.

https://gear-report.com/wp-content/uploads/2017/03/HMMWV A1 Troubleshooting.pdf

Changing parts is good, understanding is better and cheaper. (not 2 B scolding words) And new makes old Humv & owner happy. :-D

Following thru with the manual. BE aware of chasing ones tail with the temperature gauge. Remember they could be old / inaccurate too... just like the speedo with 42 miles on it. LOL

New rig to you ??? Lot of testing before heading out on a road trip. Many short road tests to come. Checking the fan clutch action is near the top.

4 ME... it's a little - simple work, but the air hose test above can clears up any clutch action issues and you can SEE what it's all about for future reference. It will either MOVE or you get to fix it NOW to clear this major problem before sinking money and time.

If stuck and feeling LUCKY U can fix this up with some tapping CAREFULLY on the hub ring, blasting 150 PIS air on, air of. Air on and tapping to break it loose... NOT break the fan or going crazy on the hub. "Mechanic in a spray can" helps too. Blow gun air in the gap to clear out the junk. Do it again, sip some beer.

Stuck on - locked up is a clear result of way cooler engine temps. Fans, flow thermostats, electrical temp switches. Don't confuse fan control with gauge system. There's no connections.

Runing cool in the Mojave Desert, CAMO 🍦
 
Last edited:

Dpas1973

Member
138
13
18
Location
New Jersey
I read many fan issues lately ,actually all the time. Lots of surplus sales, so Guys... I would like to ask, Did you just get this truck? (I see the low post counter)

The cooling system is simple auto shop 101 like any V-8 engine. So now who's big idea was it with the wacky HumV fan control system and temperature reading as to, what's going on. The link here chapter 1 is a GOOD starting point > As a matter of fact, consider it the manual in the" glove box" you didn't get. Box & manual.

https://gear-report.com/wp-content/uploads/2017/03/HMMWV A1 Troubleshooting.pdf

Changing parts is good, understanding is better and cheaper. (not 2 B scolding words) And new makes old Humv & owner happy. :-D

Following thru with the manual. BE aware of chasing ones tail with the temperature gauge. Remember they could be old / inaccurate too... just like the speedo with 42 miles on it. LOL

New rig to you ??? Lot of testing before heading out on a road trip. Many short road tests to come. Checking the fan clutch action is near the top.

4 ME... it's a little - simple work, but the air hose test above can clears up any clutch action issues and you can SEE what it's all about for future reference. It will either MOVE or you get to fix it NOW to clear this major problem before sinking money and time.

If stuck and feeling LUCKY U can fix this up with some tapping CAREFULLY on the hub ring, blasting 150 PIS air on, air of. Air on and tapping to break it loose... NOT break the fan or going crazy on the hub. "Mechanic in a spray can" helps too. Blow gun air in the gap to clear out the junk. Do it again, sip some beer.

Stuck on - locked up is a clear result of way cooler engine temps. Fans, flow thermostats, electrical temp switches. Don't confuse fan control with gauge system. There's no connections.

Runing cool in the Mojave Desert, CAMO
I replaced my fan drive switch and time delay and fan still runs at all times. Only thing left is Cadillac valve or fan clutch. I’m at wits end lol


Sent from my iPhone using Tapatalk
 

Thumper580

Active member
269
210
43
Location
Virginia
I replaced my fan drive switch and time delay and fan still runs at all times. Only thing left is Cadillac valve or fan clutch. I’m at wits end lol


Sent from my iPhone using Tapatalk
Put in the Cadillac valve, Time Delay Module and Thermo Switch.... Still runs all the time... Going to use Break Free and a hammer to "tap" on the metal fan collar...maybe it will free up.
 

Milcommoguy

Well-known member
Supporting Vendor
1,710
2,265
113
Location
Rosamond, CA
Don't forget to apply the 150 PSI air at the hose going to the fan shroud. I use a coupling to the hose to air supply. Give it a blast of air...tap away at the hub ring,

Loosen belts to rotate blade. Find a new spot and tap away. Spray some mechanic in a can with the tip of nozzle pipe bent to go it the right direction and tap again.

Air on, air off. Go easy up to a point. Fussy fan SHOULD get the point. You're know when it move out about 1/8 to 3/16 inch with air applied. Tapping shouldn't be leaving dents or bending parts. Use a hard wood stick to get in there.

All kinds of goings on in the operation of the fan cooling system. Fan can't be stuck to trouble shoot.

IMO guy's... Ya might be going backwards before knowing that the fan clutch is working in the first place (air test) will clear up the VOODOO.

Got it moving with air? Then follow it back thru the electrics and valve. If lucky that may have been the fix to begin with.

No need to pull out hair or the wallet just to throw money around or loose one wits.

Stick with it to UNstick it, CAMO
 
Last edited:

Dpas1973

Member
138
13
18
Location
New Jersey
Don't forget to apply the 150 PSI air at the hose going to the fan shroud. I use a coupling to the hose to air supply. Give it a blast of air...tap away at the hub ring,

Loosen belts to rotate blade. Find a new spot and tap away. Spray some mechanic in a can with the tip of nozzle pipe bent to go it the right direction and tap again.

Air on, air off. Go easy up to a point. Fussy fan SHOULD get the point. You're know when it move out about 1/8 to 3/16 inch with air applied. Tapping shouldn't be leaving dents or bending parts. Use a hard wood stick to get in there.

All kinds of goings on in the operation of the fan cooling system. Fan can't be stuck to trouble shoot.

IMO guy's... Ya might be going backwards before knowing that the fan clutch is working in the first place (air test) will clear up the VOODOO.

Got it moving with air? Then follow it back thru the electrics and valve. If lucky that may have been the fix to begin with.

No need to pull out hair or the wallet just to throw money around or loose one wits.

Stick with it to UNstick it, CAMO
So do I have to take the fan shroud off to tap it or is there another way? I can’t move it by hand unless I force it and it will love then.


Sent from my iPhone using Tapatalk
 

Milcommoguy

Well-known member
Supporting Vendor
1,710
2,265
113
Location
Rosamond, CA
Leave shroud in place. Might want to take take a study at the TM and then the truck. This is not that hard.

Air pressure, a hammer, a stick. I could have done it in the time of writing this.

Stick you nose it there and go at it, CAMO
 
Last edited:

Retiredwarhorses

Well-known member
Steel Soldiers Supporter
4,400
4,182
113
Location
Brentwood, Calif
Yeah, the TDM can also be bad..... I have a "bad" habit of replacing moderately priced parts hoping it fixes the problem.... In the end it will probably be a stuck clutch on the fan hub.... That will be my last resort.
have you tried air up the clutch with compressed air? Simulates PS fluid pressure.
 

Dpas1973

Member
138
13
18
Location
New Jersey
have you tried air up the clutch with compressed air? Simulates PS fluid pressure.
Going to to that when I get home from work it’s hard by the time I get home it’s 4 and gets dark at 615 and I don’t have a garage. I ordered the 2 parts because I was told it’s going to be one of them 2 guess that was a waste of $$. I really appreciate all the help you guys have given me. It’s not easy working on it with 2 hours of daylight on the street. On another note what can I get for this since it’s not made anymore and I can’t find any online to compare.


Sent from my iPhone using Tapatalk
 

Dpas1973

Member
138
13
18
Location
New Jersey
have you tried air up the clutch with compressed air? Simulates PS fluid pressure.
Ok so I blew 100-130psi right at the shroud connection and no movement I beat the back of fan between the blade and base with wood and a hammer and nothing. Too bad you can’t get to the front to hit it back and fourth. I have 85 ohms at the Cadillac valve on either side the only part I didn’t replace. Any suggestions? Am I hitting the clutch the right way? I sprayed liquid wrench on the back between the fan and belts and nothing. I can’t spin the blade the normal direction with or without pressure if that helps. I can force and spin it backwards around the belt.


Sent from my iPhone using Tapatalk
 

Milcommoguy

Well-known member
Supporting Vendor
1,710
2,265
113
Location
Rosamond, CA
Don't be wacking the front. Can also get to it from the bottom. Rotate and work from different directions. the tap a bit harder. Needs a good shock.

It's all in the stick. Soft wood and your just making splinters. Hard wood gets to the business. (did I just say that) Blunt metal bar gets or big fan drift punch should wake it up, but not so hard to reshape it into a pretzel.

Shoot us a picture to where your working it.

There was this same issue a few weeks back with pictures. Maybe could find it with the "search forum" above. Did you check the TM for the break down?

There is not much of a lip to work with. Not the plastic fan (no no no) the little 3/16 part metal just next to the fan and pulley. IF working will be movement with air applied. Easy on turning fan blades under belt friction. Could snap, crackle and pop.

From the TM BOOK.......
C. FAN CLUTCH SOLENOID RESISTANCE TEST (Figure 1-2) Test for clutch control valve solenoid resistance. Using a multimeter, check resistance between Figure 1-2. Fan Clutch Solenoid Resistance Test Hookup. connector terminals (1). Check resistance both ways. Resistance should be 58 ohms to 78 ohms both ways. If not, replace drive solenoid and hydraulic control valve assembly and check for operation while engine is running.

More or less 85 ohms IMO close enough. BUT still needs it to move... air on and off.

If I get caught doing your home work... meet me after this post, CAMO
 
Last edited:

Dpas1973

Member
138
13
18
Location
New Jersey
Don't be wacking the front. Can also get to it from the bottom. Rotate and work from different directions. the tap a bit harder. Needs a good shock.

It's all in the stick. Soft wood and your just making splinters. Hard wood gets to the business. (did I just say that) Blunt metal bar gets or big fan drift punch should wake it up, but not so hard to reshape it into a pretzel.

Shoot us a picture to where your working it.

There was this same issue a few weeks back with pictures. Maybe could find it with the "search forum" above. Did you check the TM for the break down?

There is not much of a lip to work with. Not the plastic fan (no no no) the little 3/16 part metal just next to the fan and pulley. IF working will be movement with air applied. Easy on turning fan blades under belt friction. Could snap, crackle and pop.

From the TM BOOK.......
C. FAN CLUTCH SOLENOID RESISTANCE TEST (Figure 1-2) Test for clutch control valve solenoid resistance. Using a multimeter, check resistance between Figure 1-2. Fan Clutch Solenoid Resistance Test Hookup. connector terminals (1). Check resistance both ways. Resistance should be 58 ohms to 78 ohms both ways. If not, replace drive solenoid and hydraulic control valve assembly and check for operation while engine is running.

More or less 85 ohms IMO close enough. BUT still needs it to move... air on and off.

If I get caught doing your home work... meet me after this post, CAMO
I was walking the lip under the fan blade where there is a little groove. I can’t find any pics or videos of anyone else doing it?


Sent from my iPhone using Tapatalk
 

Milcommoguy

Well-known member
Supporting Vendor
1,710
2,265
113
Location
Rosamond, CA
OK... last call to the fan guys. Then I am blowing this thread off. LOL

Don't know what one has. All rusted up, bent busted, went swimming in the ocean... whatever. This "tap and a wack" may work to free up the clutch AND you maybe just be that unlucky dude.

To put it all together, look over my last posts to this COMMON STUCK fan fail points. Here are some pictures for those that like pictures. YRMV

Years ago with nothing to do... painted my fan hub red. YEP red. Not only does it look cool and run cooler, but easier to tell and see when working correctly.

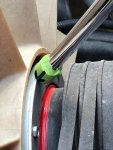
This photo engine is off... fan is engaged as a reference. Logic is not conventional... Hydro pressure off, fan lock-up. This is where the air hose comes in.
I point to the hub ring to take the hits. See arrow. Use a long 3/8 extension if you don't mind banging on your tools that way. I don't !

Go at it at right angles to hub. Not so much as pointer angle shown. Air applied. Gota have air 150 PSI, rotate around. get at it from another direction.
thumbnail.jpg


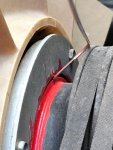
This may help. Squirt your favorite "Mr. Mechanic" in a can in the air, on your helper... trying for the opening where the bent welding rod is pointed. Take a break and let it do the work. Maybe do this first. Yea first. Don't worry it will dry out. Safety first.
thumbnail.jpg


This photo is engine running. Fan is engaged. Air is a moving thru radiator stack. In my Red Line set up, I and Bear know that it is working.

To test system, any component disconnected will produce FAN LOCK UP. The valve solenoid, the valve mechanical action, the TDM, crossover temp switch (or an internal wiring break ) or real low PS pump pressure (along with everything else failing)

BUT a failed / stuck clutch, there's no choice but to start there with air hose at the ready. MY logic IMO. Again YRMV.

The last word in the design is FAN clutch FAIL. If system can't cycle... Likely cooler than normal operating temps all around. Stuck means stuck. Rimes with F and F problem. Doesn't hurt anything, (overall performance) just not working as design and more money at the pump and freeze you buns off in coming months.
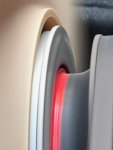
thumbnail.jpg


OK... beat that horse to death. NOW see the thin red line. Using hub ring as a gun sight. Clutch/ fan assembly under hydro pressure move towards engine, hiding red line. Fan is free wheeling (more or less) engine HP picks up a bit, temperature stabilizes towards the lower temps. Give it a minute or two, (lots of hysteresis) engine temp on the rise, thermostatic switch in crossover OPENS and BANG on comes the fan, hot air is blow thru the cab.
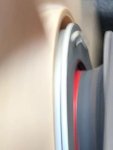
thumbnail.jpg

This is not a sure thing in all cases. With no history, maintenance records, abuse and any and all thing that can go wrong Humv, is just another chapter for the hobby. Worked for me and others. Saved a buck and smell like WD-40.

Not a fan any more, CAMO

Free advice is free. Storytime, send likes. No bears or unicorns were hurt in my fan fix.
 
Last edited:
Top
AdBlock Detected

We get it, advertisements are annoying!

Sure, ad-blocking software does a great job at blocking ads, but it also blocks useful features of our website like our supporting vendors. Their ads help keep Steel Soldiers going. Please consider disabling your ad blockers for the site. Thanks!

I've Disabled AdBlock
No Thanks