My sludge tank is pretty bad like that too. I already did a thorough flush, enough that rust in the coolant drain sump no longer appears, but I think I have to do a reinspect. I want to replace the tank itself but it is bolted to the exhaust manifold bolts and do not want to mess with that. I might just set up another tank elsewhere.To circle back on this blow out i had awhile back, I found the hose on the water manifold to be fully plugged with solid rusty sludge for the 5" of hose closest to the surge tank. I'm thinking this has something to do with the pressure finding a messy way to relieve itself.
View attachment 834123
This was the sediment I pulled out of the sludge tank with a magnet...pretty bad...
View attachment 834124
-
Steel Soldiers now has a few new forums, read more about it at: New Munitions Forums!
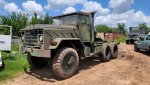
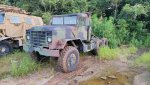
What have you done to your 5 ton this week?
- Thread starter dezert ratt
- Start date

More options
Who Replied?I have a small leak in one of my rear hubs and the front ones have packing grease oosing out the shrouds. Looks like I have my work cut out for me. I assume that gear oil on the M923 comes from the differential... so I will have to fill back up the dif fluid in the meantime.With my brother's help I finally decided to tackle the front inner axle seal that I knew was letting gear oil into the hub, wheel bearings, and knuckle boot. I'd been putting this repair off knowing how involved it could be and I made a contraption for removing the seal holder without the use of a slide hammer or a long bar from the other side.
This time I mounted the spout and can holder to my HubHelper to keep the gear oil mess to a minimum.
View attachment 835629
View attachment 835630
View attachment 835631
After reading about others using a gear puller with the jaws removed to pull the seal holder out, i made this gizmo to do the same thing using a tapped bar, a 12" long 3/4" leg screw, 1/4" c-channel, and a TIG filler rod to hold thigs in place. The amount of force required almost collapsed the c-channel...
View attachment 835632
View attachment 835633
View attachment 835634
View attachment 835635
View attachment 835636
We found that half the seal had been crushed inward deforming the rubber lip into more of an oval shape. It's always nice when the source of a problem readily shows itself
View attachment 835637
I found a scary situation while disassembling the spindle; the tightest of the 10 spindle retaining nuts i had was at 40 ft-lbs when the spec calls for 130-167 ft-lbs...no bueno!
This makes me want to inspect the driver side as well
View attachment 835638
There was so much gear oil in the knuckle (about 1/2 a quart) that I grabbed my brake bleeding hose and suck-started a siphon to drain it out. The clear hose gave me enough warning to move my mouth before taking on any oil...phew.
The worst part of the job was when I flexed the Birfield CV joint too much and all 4 of the outer balls fell out. We had just repacked all the fresh, messy grease in and it took some time to figure out what position I needed to hold my shaft in so that my brother could fondle my greasy balls back into place...

- 8,245
- 20,816
- 113
- Location
- Charlotte NC
.A new warning label so I don't over shoot anyone by a week and a half
My truck wouldn't look good in plaid.
View attachment 835643View attachment 835644
SpaceBalls!
Cool Sticker!!
- 2,206
- 3,422
- 113
- Location
- Florence, SC
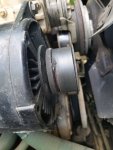
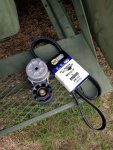
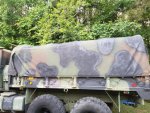
Belt on the truck had some "defects" on it, so I switched it out with a new one & bought a new tensioner as well. I haven't installed the tensioner yet, was curious to how many if you have used the knock off version of the oem? Also used some black spray dye to cover up some rust stain spots on my rear canvas top. Next thing Ill be doing is a complete visual overhaul of the engine, clean everything up & do some painting...
Attachments
-
 69.9 KB Views: 18
 -
 102 KB Views: 20
 -
 204.2 KB Views: 21
 -
 176.7 KB Views: 21
- 1,315
- 2,534
- 113
- Location
- Wenatchee, WA
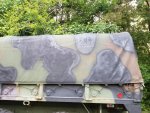
I don't understand how vinyl can rust, but the inside top of my cover has a lot of rust spots. Maybe left over minerals from hard water is what is rusting? Metallics in the paint? No clue. Has anyone found an effective way to remove the rust? Like CLR or something?

- 4,443
- 3,760
- 113
- Location
- Fort Worth, Texas
Scrounger's M931A2 made it my way and I gave her a good steam bath. Now I appreciate camo in all its finer points but when you've got shag carpet on the fenders it has to be cleaned.  The engine and cab were clean from the start!
The engine and cab were clean from the start!Attachments
-
 257.5 KB Views: 34
 -
 314.1 KB Views: 34
Brutacus
Active member
- 242
- 208
- 43
- Location
- Marion, AR.
Now, I haven't done this to my 5-ton, YET. These just arrived today. It took awhile to get the light brackets, but when work slows down I'll start mounting, painting, and running wires for the new turn signa; lights with markers, new Auxiliary Drive Lights, the new Ditch Lights, and my Infrared Lamp I mounted last year.
The Ditch Light brackets can use a blackout lamp buckets found on the M809 series and other trucks of the period. Some 28v aircraft taxi flood lights fit the buckets. The brackets mount at the bottom of the windshield hinge using 3 out of the four hinge bolts, and clear the windshield, allowing it to lay down without any inference, or hindrance.

Some data plates for the switches...

The Aux. Drive lights are the armored lamp types with HI-Low beams.

The Warning signal lamp brackets found the M816 are what inspired my idea for the Aux. Drive light brackets.

The aux. drive light brackets are sourced from some extra turn signal brackets I had laying around. This is the pic I sent to the Master Craftsman who built them for me. He is Adam. He does really good work. My request was that any bracket he builds need to look like a stock bracket, and he did not disappoint. US6X4 is the one ask for all the details. Thankx Adam, your work is Awesome!

The Ditch Light brackets can use a blackout lamp buckets found on the M809 series and other trucks of the period. Some 28v aircraft taxi flood lights fit the buckets. The brackets mount at the bottom of the windshield hinge using 3 out of the four hinge bolts, and clear the windshield, allowing it to lay down without any inference, or hindrance.
Some data plates for the switches...
The Aux. Drive lights are the armored lamp types with HI-Low beams.
The Warning signal lamp brackets found the M816 are what inspired my idea for the Aux. Drive light brackets.
The aux. drive light brackets are sourced from some extra turn signal brackets I had laying around. This is the pic I sent to the Master Craftsman who built them for me. He is Adam. He does really good work. My request was that any bracket he builds need to look like a stock bracket, and he did not disappoint. US6X4 is the one ask for all the details. Thankx Adam, your work is Awesome!
- 8,245
- 20,816
- 113
- Location
- Charlotte NC
Well Brutacus , I don't have any cool lights yet, but today I finally got my hard top attached to the truck.

Now that I have that done, next up are the convoy lights and a set of Eyecon360 lights are coming soon to a shade tree near me...
----
I need to snap a few pictures of the "soft top" take-off parts. I have the cover (might not be factory), the 3 bows that span the window to the back, the pole that fits into the holes out back of the cab and the window bars.
- 1,315
- 2,534
- 113
- Location
- Wenatchee, WA
Brutacus, I'm glad you got your parts in good order and thank you for the kind words! That is quite the collection of lights I must say.
At a casual glance it's hard to know all that went in to making those light brackets and there were many steps involved. For the aux. driving light brackets the hoops had to be cut off and lengthened about 5/8" for a symmetrical clearance around the light. Then the center mount had to be laser cut and formed up and the ball mount was made from trimmed down black out light brackets. Everything but the hoop was then spot welded together like the originals:


The ditch light brackets were the biggest challenge because I had to reproduce the ball mounts after the first two were used to make the driving light brackets. I actually had to design some tooling and get it machined up just to make these parts and they turned out perfect on the first try


- 1,315
- 2,534
- 113
- Location
- Wenatchee, WA
It ended up taking quite a bit longer than I wanted, but overall it was a fun project and it was the good kind of challenging.


Brutacus
Active member
- 242
- 208
- 43
- Location
- Marion, AR.
Brutacus
Active member
- 242
- 208
- 43
- Location
- Marion, AR.
Brutacus, I'm glad you got your parts in good order and thank you for the kind words! That is quite the collection of lights I must say.
At a casual glance it's hard to know all that went in to making those light brackets and there were many steps involved. For the aux. driving light brackets the hoops had to be cut off and lengthened about 5/8" for a symmetrical clearance around the light. Then the center mount had to be laser cut and formed up and the ball mount was made from trimmed down black out light brackets. Everything but the hoop was then spot welded together like the originals:
View attachment 836988
View attachment 836989
View attachment 836990
View attachment 836991
View attachment 836992
The ditch light brackets were the biggest challenge because I had to reproduce the ball mounts after the first two were used to make the driving light brackets. I actually had to design some tooling and get it machined up just to make these parts and they turned out perfect on the first try
View attachment 836996
View attachment 836997
View attachment 836998
View attachment 836999
View attachment 837000
You're Welcome, but all the Thanks goes to you. Your quality work makes this project look like I found some N.O.S. parts, or so my friend from work said earlier today. I knew you put a lot of work into it, but seeing these pics really drive it home.
nayrbrellim
Active member
- 109
- 177
- 43
- Location
- Reidsville, NC
Where did you get your hard top from? I've been looking for a while for one but the shipping is almost as much as the top LOLWell Brutacus , I don't have any cool lights yet, but today I finally got my hard top attached to the truck.
View attachment 836966
Now that I have that done, next up are the convoy lights and a set of Eyecon360 lights are coming soon to a shade tree near me...
----
I need to snap a few pictures of the "soft top" take-off parts. I have the cover (might not be factory), the 3 bows that span the window to the back, the pole that fits into the holes out back of the cab and the window bars.
- 8,245
- 20,816
- 113
- Location
- Charlotte NC
.Where did you get your hard top from? I've been looking for a while for one but the shipping is almost as much as the top LOL
I found mine on one of the facebook groups that I found. He had 6 of them back in March of this year. It was complete. It came with the rubber seals and bolts to attach the parts to the truck. He shipped it to me by freight truck from Modesto, Illinois (his son or daughter consolidates freight for a living). Heck of a nice guy.
I am almost certain it was $1100 and that seems to be about half what I found anywhere else. I think shipping was about $350, Not cheap, but more reasonable than it might have been.
I will send you a PM with his contact information.
nayrbrellim
Active member
- 109
- 177
- 43
- Location
- Reidsville, NC
Awesome thanks - the cheapest i have found was a fiberglass one for over $1500 (included shipping).
I found mine on one of the facebook groups that I found. He had 6 of them back in March of this year. It was complete. It came with the rubber seals and bolts to attach the parts to the truck. He shipped it to me by freight truck from Modesto, Illinois (his son or daughter consolidates freight for a living). Heck of a nice guy.
I am almost certain it was $1100 and that seems to be about half what I found anywhere else. I think shipping was about $350, Not cheap, but more reasonable than it might have been.
I will send you a PM with his contact information.
Brutacus
Active member
- 242
- 208
- 43
- Location
- Marion, AR.
Here is where the ditch lights mount on the M809. This is the passenger side mount is a mirror opposite. The mounts do clear the windshield so as to allow it to lay down with out any interference.


This is where I'm going to mount the Aux. Driving lights. The benefit of this design is that I can mount it a little lower on the fender if needed to fit within the 54" max headlight height law.

Like I mentioned in an earlier post, US6X4 work is high quality. His brackets look like bigger versions of the M816 signal warning brackets.
This is where I'm going to mount the Aux. Driving lights. The benefit of this design is that I can mount it a little lower on the fender if needed to fit within the 54" max headlight height law.
Like I mentioned in an earlier post, US6X4 work is high quality. His brackets look like bigger versions of the M816 signal warning brackets.
- 1,315
- 2,534
- 113
- Location
- Wenatchee, WA
I replaced one of my knuckle boots...what a pain. It may have been quicker to disassemble the king pins & everything & do it from the inside. The TM said the zipper material should be on the inside but these new ones must have been made backwards.

nayrbrellim
Active member
- 109
- 177
- 43
- Location
- Reidsville, NC
I got in contact with guy yesterday and he replied right back, unfortunately didnt have any more in stock. Thanks for the info thoughAwesome thanks - the cheapest i have found was a fiberglass one for over $1500 (included shipping)
- 8,245
- 20,816
- 113
- Location
- Charlotte NC
.I got in contact with guy yesterday and he replied right back, unfortunately didnt have any more in stock. Thanks for the info though
Wow... He had a bunch when I got mine. Not sure where he found them or if he will find more. Seems that he has some inside track to somewhere. Hopefully... If I come across one, I will be sure to let you know.
Let me dig too. There is a guy on SS who's mom lives in Asheville. Just before all this chinese virus crap started, he had one that I was going to buy. Maybe I can find his info.
nayrbrellim
Active member
- 109
- 177
- 43
- Location
- Reidsville, NC
that would be awesome.
Wow... He had a bunch when I got mine. Not sure where he found them or if he will find more. Seems that he has some inside track to somewhere. Hopefully... If I come across one, I will be sure to let you know.
Let me dig too. There is a guy on SS who's mom lives in Asheville. Just before all this chinese virus crap started, he had one that I was going to buy. Maybe I can find his info.
- 114,408members
- 167,298threads
- 2,355,050posts
- 1,259online users